Organizing a Simple Library in Microsoft Access – Pt. 1 : Creating a Database [EN – ID] Mengelola Perpustakaan Sederhana Dengan Microsoft Access – Bagian 1 : Menciptakan Basis Data

1. Scenario
Let's say you have a sufficient collection of books, and you want to open a public library. You need a database to manage your book collection, members, as well as record every time a rental and return occurs. How will you do it? You can either do it manually in a specific book, or choose to utilise technology such as Microsoft Excel or Microsoft Access.
In this tutorial I will write about using MS. Access for such purposes.
How does the MS. Access database that we are going to create work? We will create 3 data sources, namely:
- Book Data, which contains all the books in the collection, including Title, Publisher, Year of Publication, ISBN, Stock. The data is updated every time there is a chnage in the collection;
- Member Data, which contains relevant data for each member, e.g. Name, Address, and Phone Number. The data is updated when a member is added; and
- Rent (Borrowing) Data, is filled in every time a book is borrowed and returned. Rent data will contain information such as: Rent Date, Due Date, Book ID, Member ID (Borrower).
2. Getting Started With Tables
2.1. Member Table
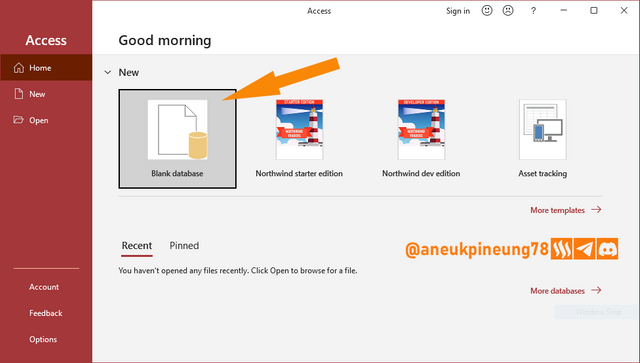
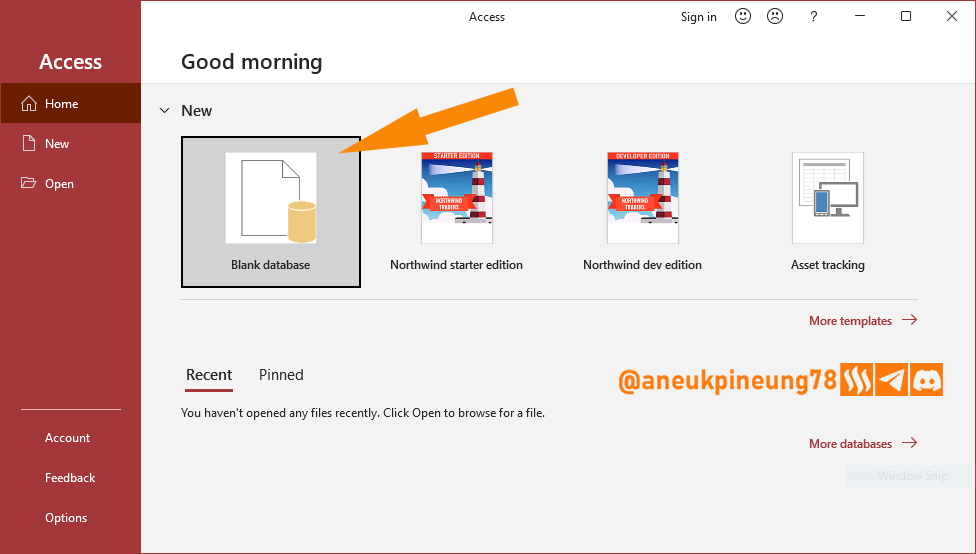
- Open Microsoft Access and create a new database file (Blank database).
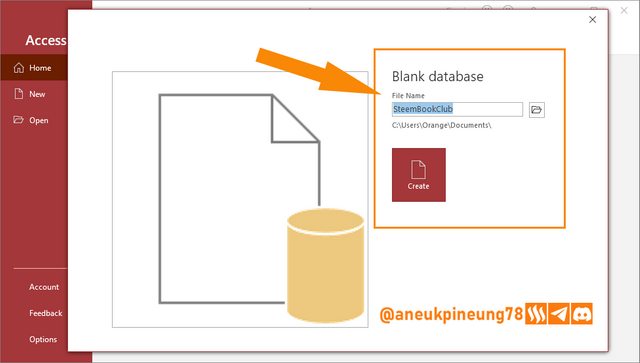
- Specify the file name and storage location. Click [Create]
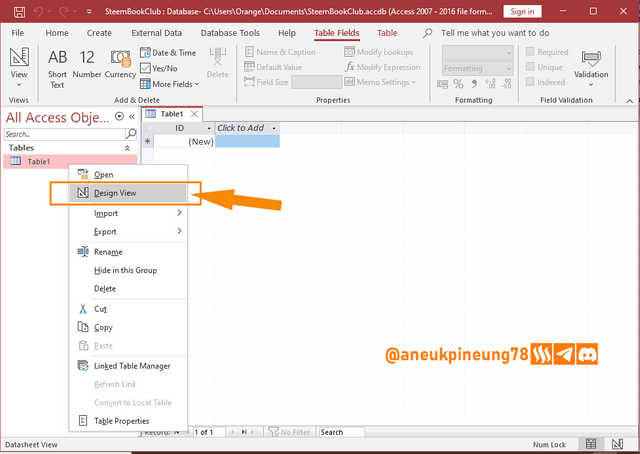
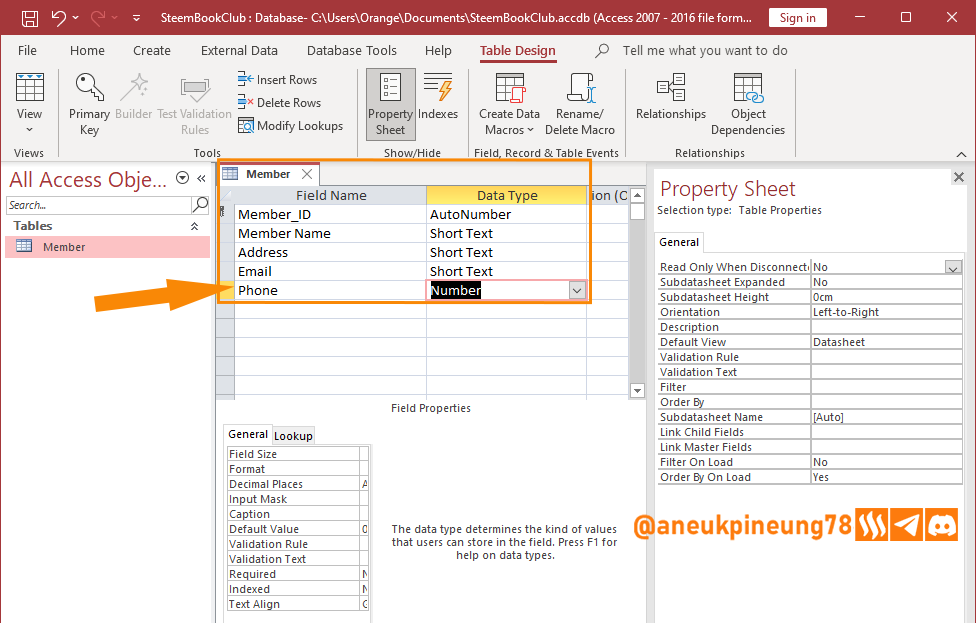
- Now the database is available. Access has provided a table by default to start with. We will use this table to create the Members database. For a better table creation experience, right-click on the table name and select [Design View].
- Set the Table’s name.
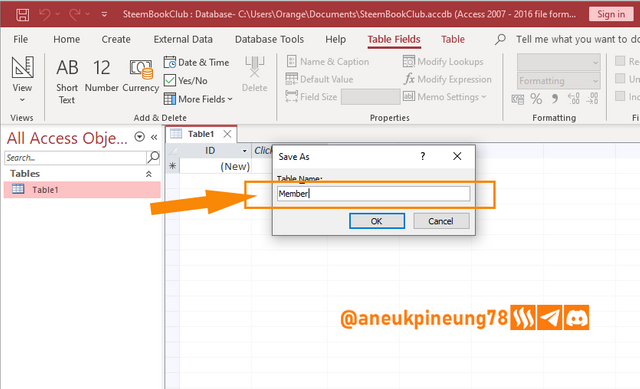
- Fill in the table as shown below. Use the Field Properties (at the bottom) and Property Sheet (right) to make any adjustments you need, but this can always be done in the future if needed.

- Save.


2.2. Book Table
- To start a new table, press [Create] on the menu bar, and select [Table].
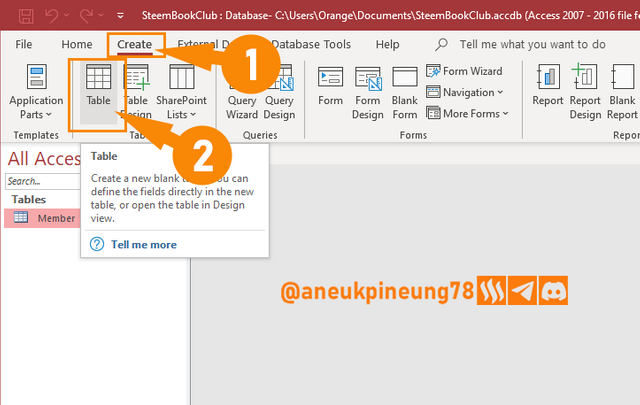
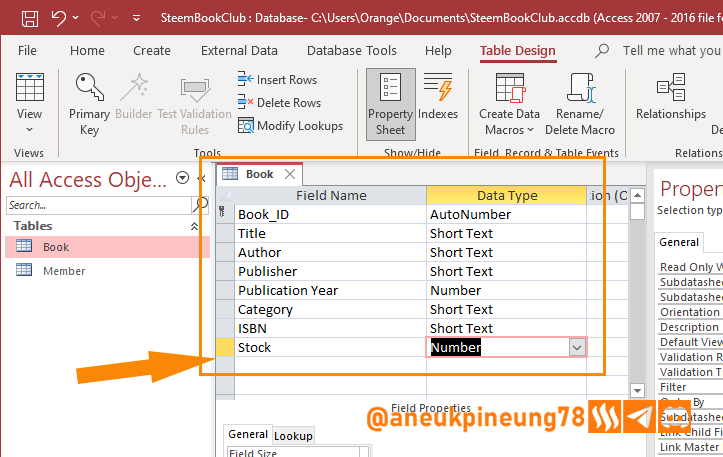
- Open the new table in Design View mode. And create the fields as in the following image.

- Save Table.

2.3. Rent Table
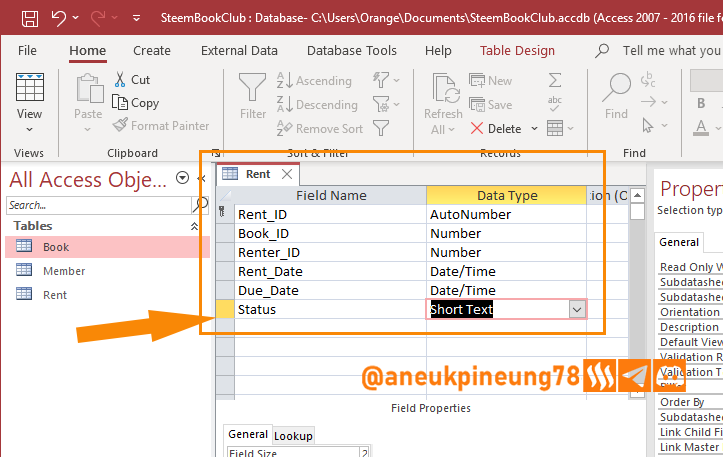
- Create a new table and fill the fields with the data types as shown below.

- Save.
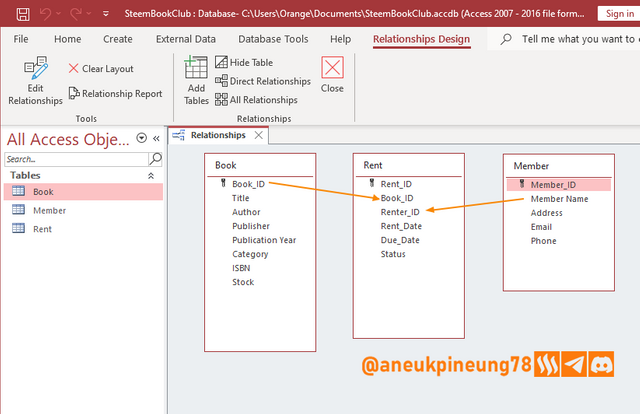
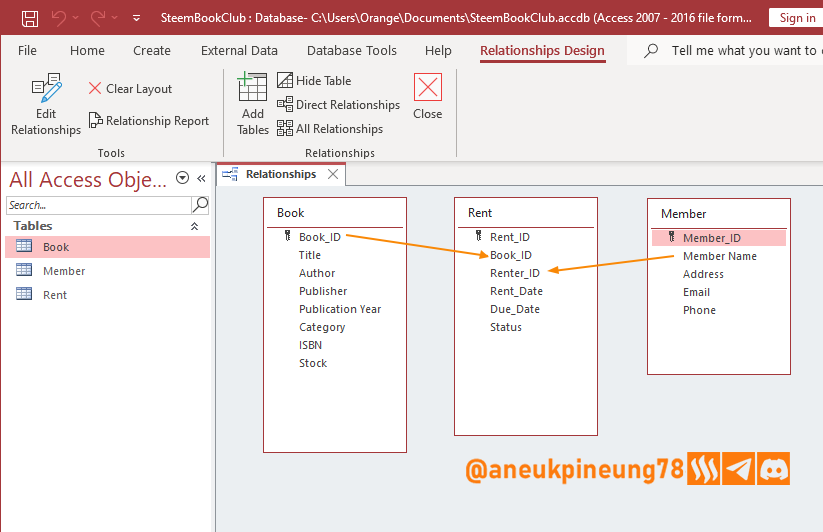
2.4. Linking The Tables
Once the tables are in place, they need to be linked.
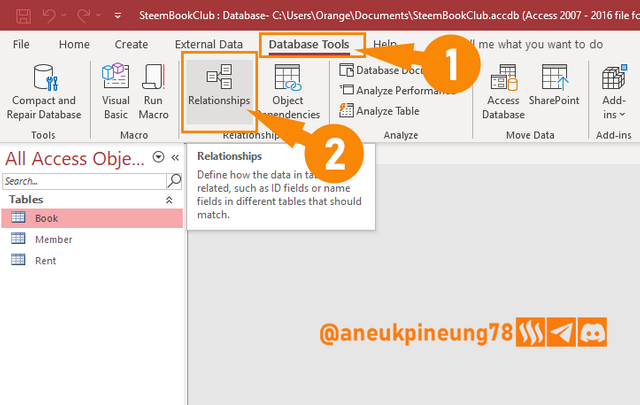
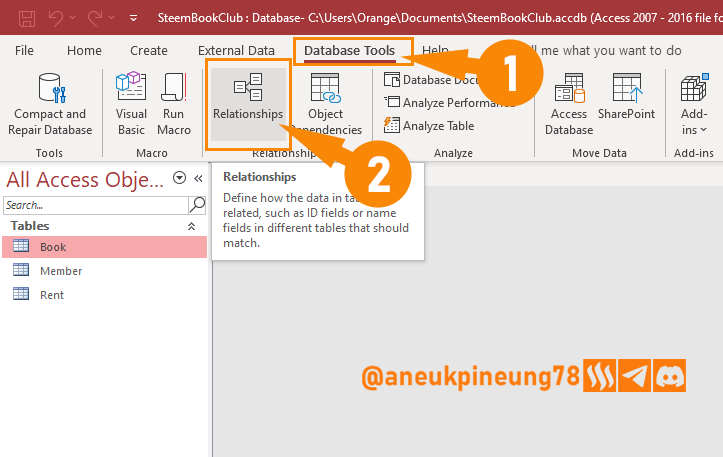
- Click [Database Tools] on the menu bar and select [Relationships].
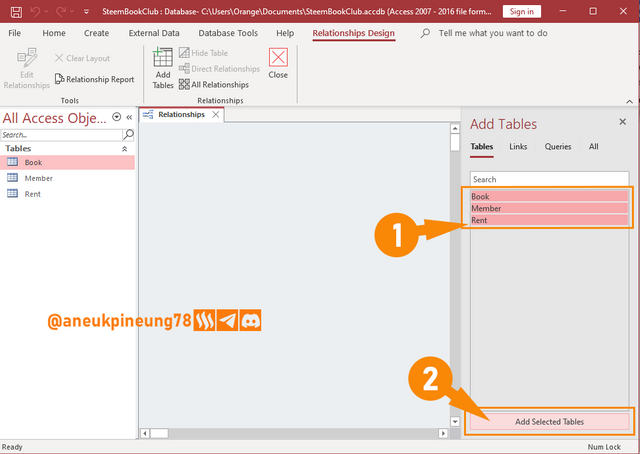
- Select all the tables, and press [Add Selected Tables].
- Click on the Book_ID in the Book Table and drag it to the Book_ID in the Rent Table. And do the same for Member_ID in the Member Table to Renter_ID in the Rent Table. Make sure to start dragging from the Book Table and Member Table, not from the Rent Table.
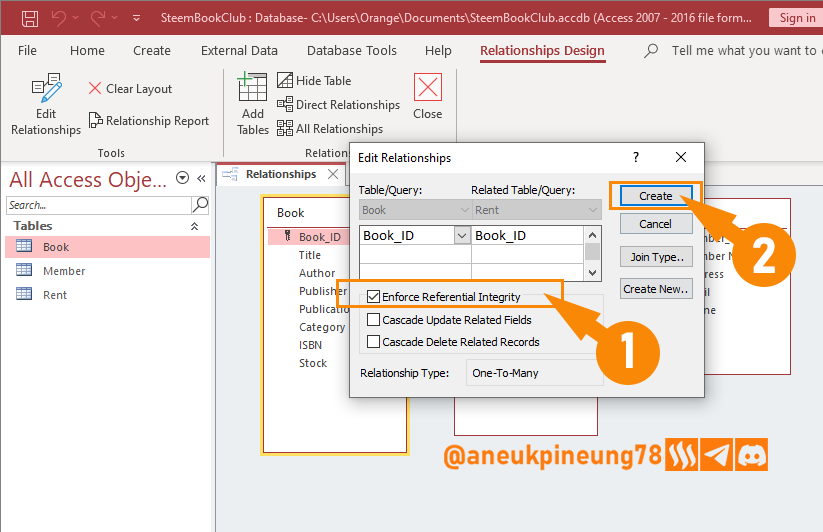
- In the dialogue box that appears, make sure to tick [Enforce Referential Integrity]. Click [Create].
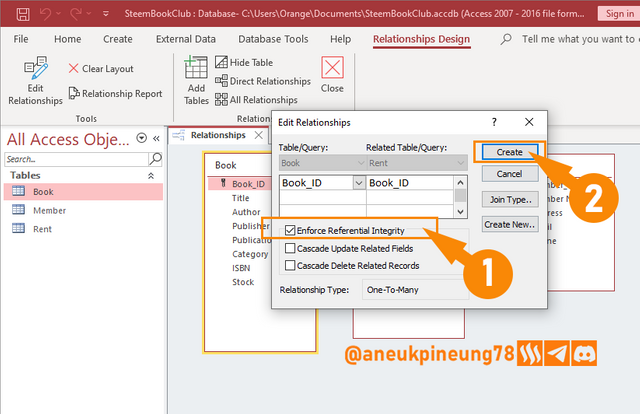
Why you should tick "Enforce Referential Integrity":- Avoiding the existence of ‘Orphan Data’. If Enforce Referential Integrity is not enabled, when the data in table A is deleted, the related data in connected table B will still exist. For example: Data number 5 in the borrower table is deleted, while he has borrowed several books, then the report will show the borrowing without knowing who borrowed.
- Maintaining data consistency: If Referential Integrity is not enabled, Access will not block any input data that includes a foreign key that is not in the primary key of the input table, and this will cause data asynchrony.
- Without Referential Integrity, relationships between tables can become unclear, causing data anomalies and errors in queries.
- And some other reasons.
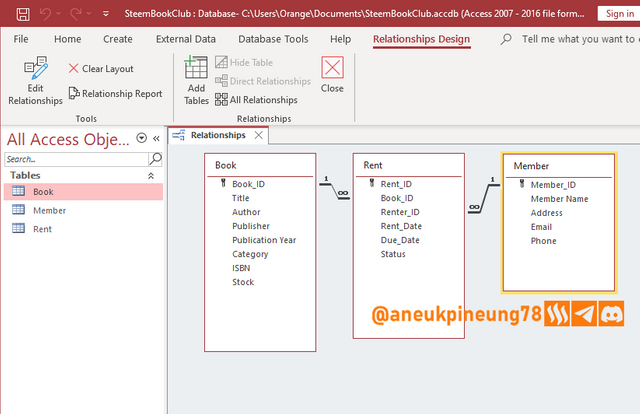
- Save. Now the tables are connected.


3. Proceeding with Forms
Once we have the tables we need and connect them, we actually have everything we need to provide a database, but we will be able to work better in entering, editing, displaying, and managing data with the help of Forms that have a more attractive interface than tables, in addition to other features such as the ability to run Macros and VBA (Visual Basic for Applications) code, as well as enhanced security features.
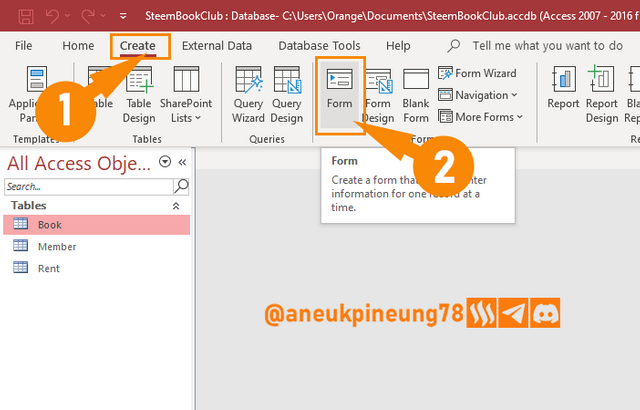
3.1. Book Form
- Make sure the Book Table is selected. Then on the menu bar, press [Create] and select [Form].
- By default, the Form will open in Layout View mode. Make the necessary adjustments such as layout, width and height of boxes (cells), and set the properties of the cells as deemed necessary.
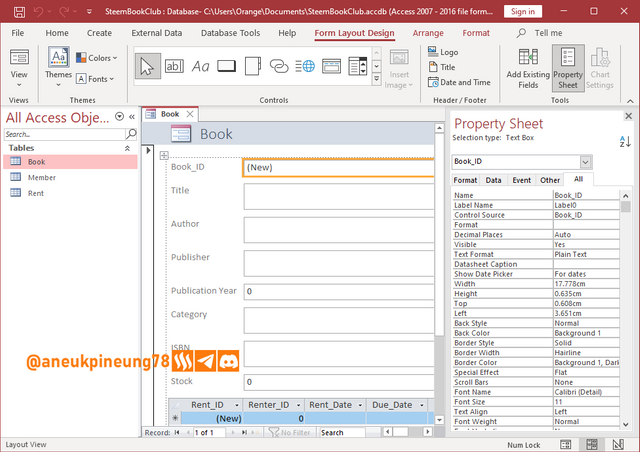
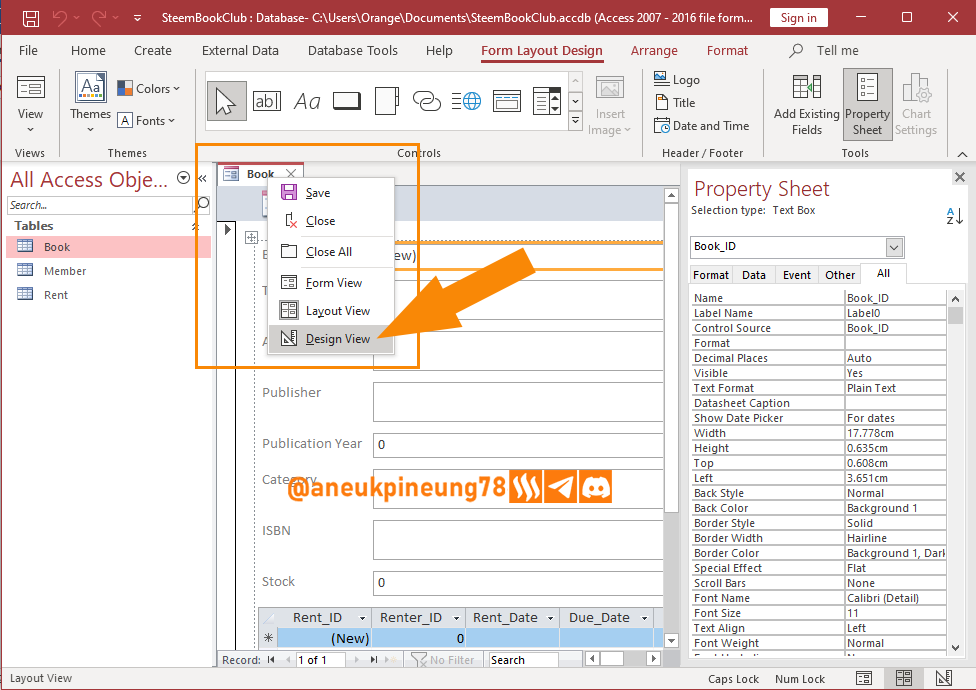
You can switch to Design View mode if you wish. There are several ways to do this, one of which is: right-click on the Form tab and select [Design View].

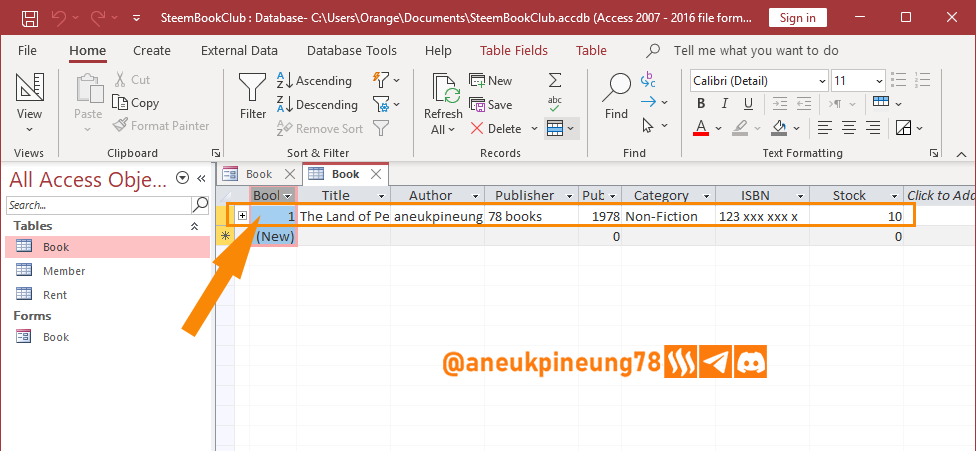
- The form in Form View mode after adjustments have been made is shown in the image below. It can be seen that under the Book Form that has been created, there is a Rent Table, because we have connected the Book Table to the Rent Table.

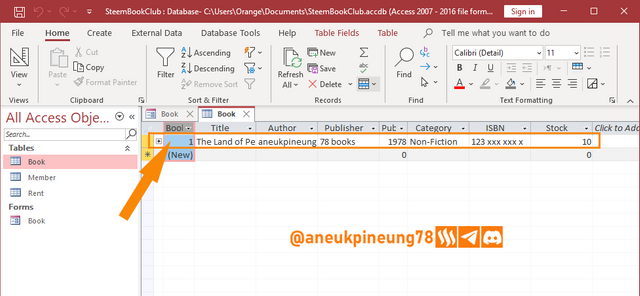
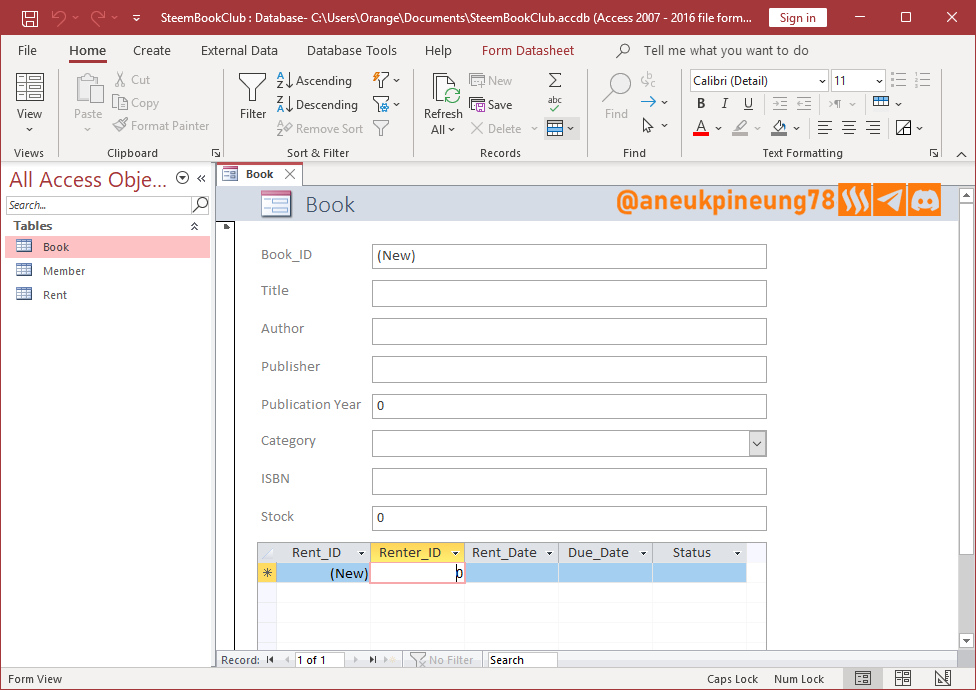
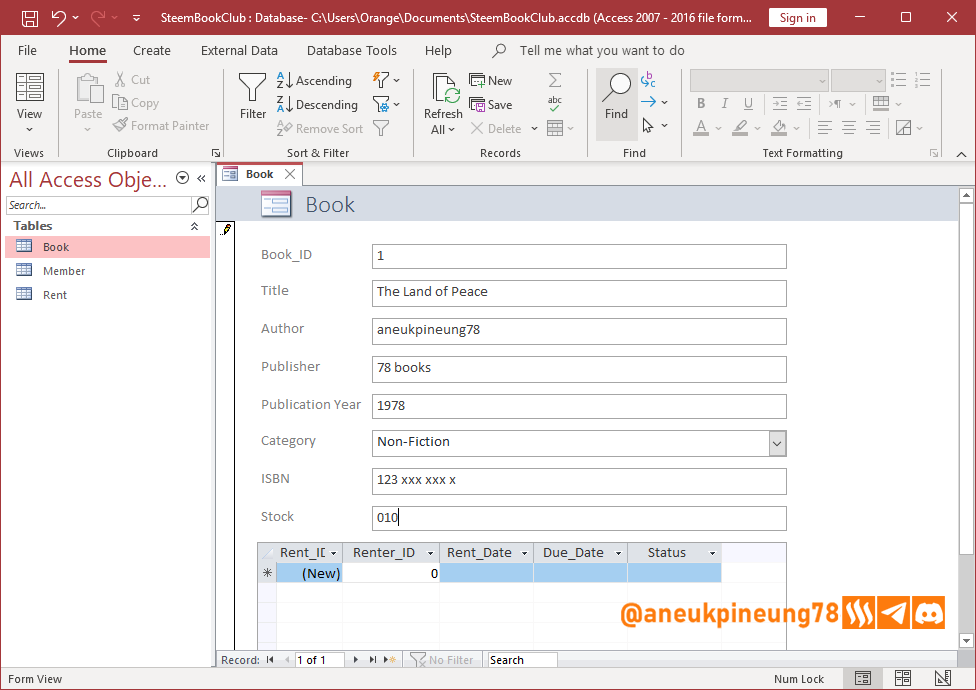
- Now we are ready to record new data for Books using the Book Form. Let's try by entering the first entry. Once done, save it.

- Furthermore, when we open the Book Table, we can see an entry there.


3.2. Members Form
In the same way, we created the Member Form. The result, after making adjustments, looks like the image below.
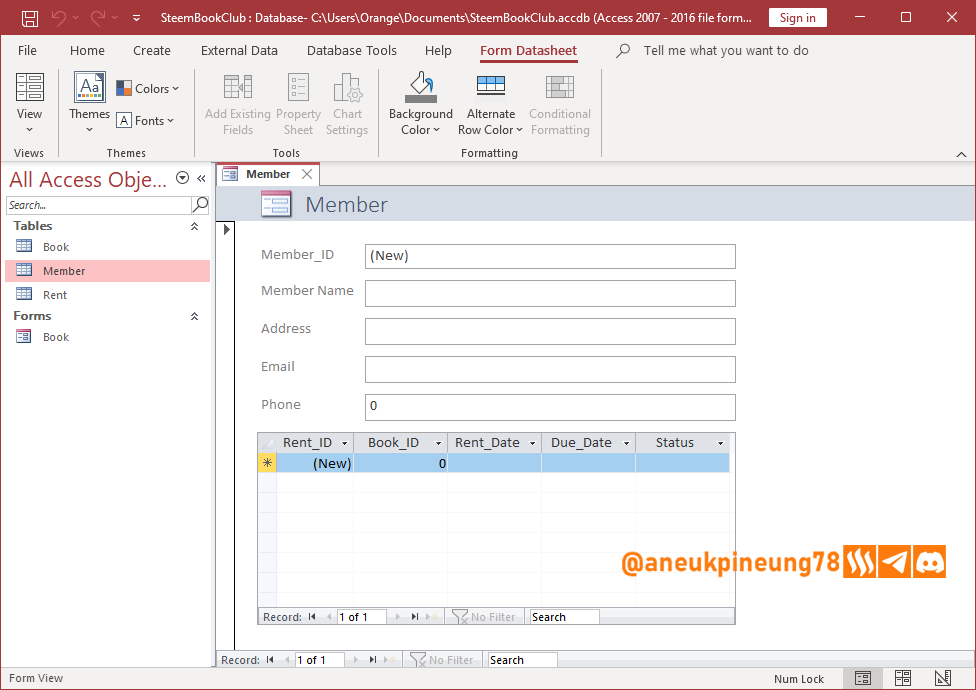
The form is ready to be used for Member data recording. Save the form.
3.3. Rent Form
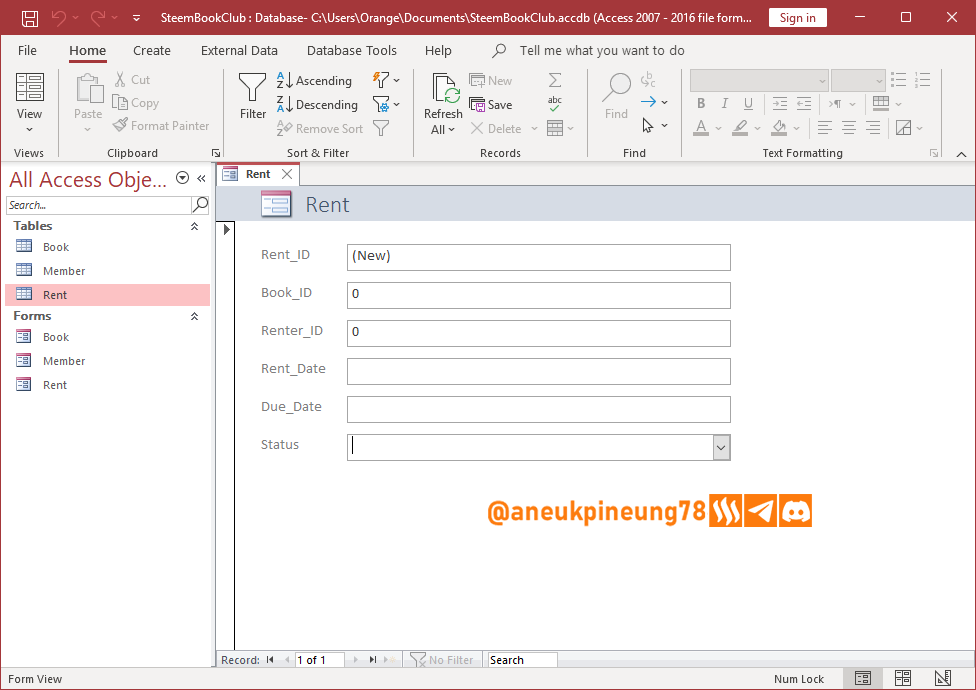
The Rent Form looks like the image below.
3.4. Form Operations
At the bottom of each Form there are operational buttons as shown in the following figure.

The buttons have the functions of navigation and new data addition, as well as searching. There is also information on the total data held.
4. Practice Example
I already have some members and books in my database, and I also have a record of past and current loans.
4.1. Book Form and Table
Here is a screenshot of the book data with ID 8 in the Book Form, where the top of the Form shows the book details, and the bottom conveys the borrowing record information of the book under that ID. Every time someone borrows the book, this borrowing (rent) table will add an entry. Every time the book is returned and the status is changed to ‘Returned’ in the Borrowing Form, the Borrowing Table will also update the data to ‘Returned’.
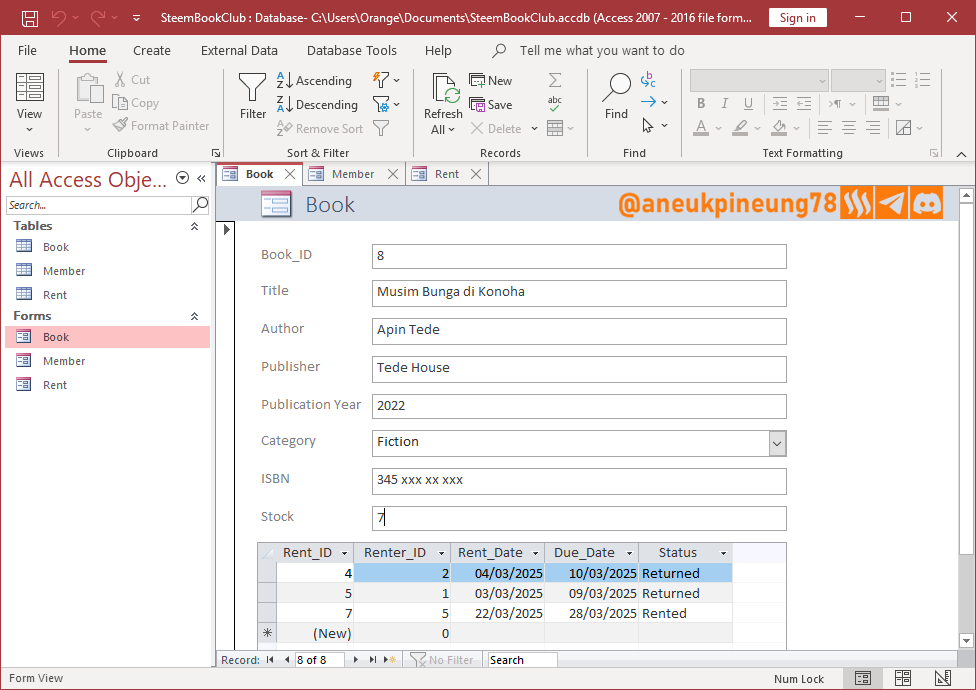
The table below the Form can also be used to add new data related to the ID in the Form above it. So, it works both ways, very flexible, very convenient!
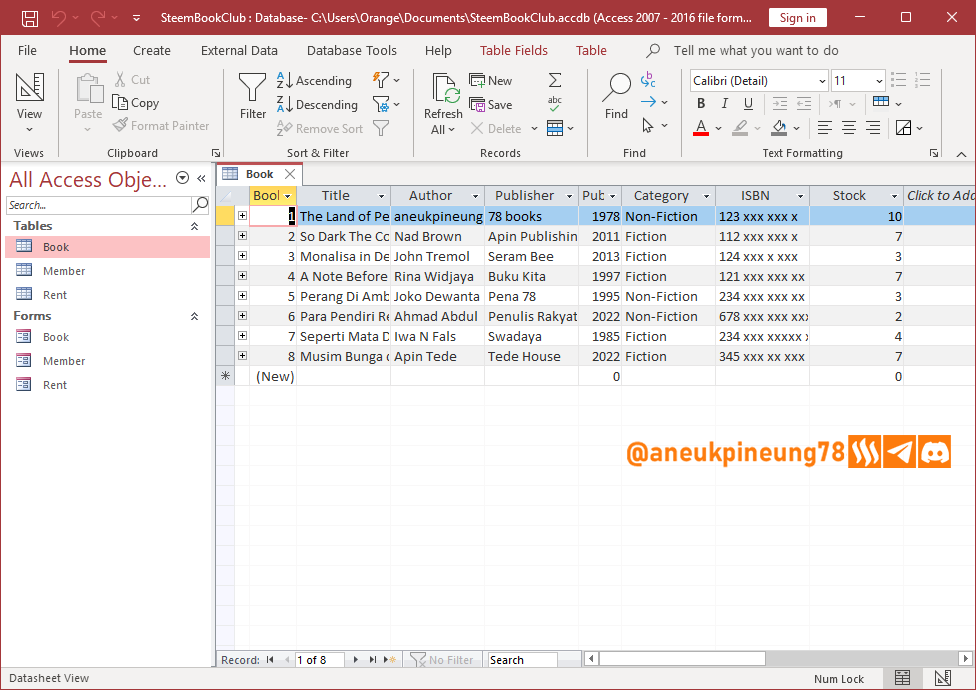
The image below shows the Table View of the books that I have in the Book Table.
4.2. Member Form and Table
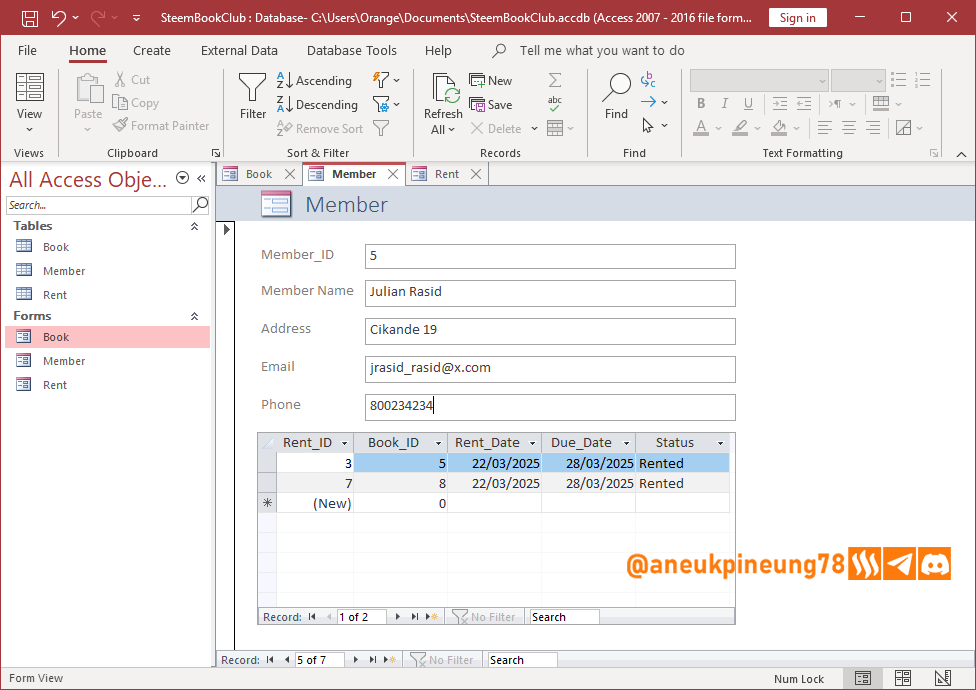
See the following screenshot. It contains information related to the Member with ID 5. We can see the details of personal information and borrowing information.
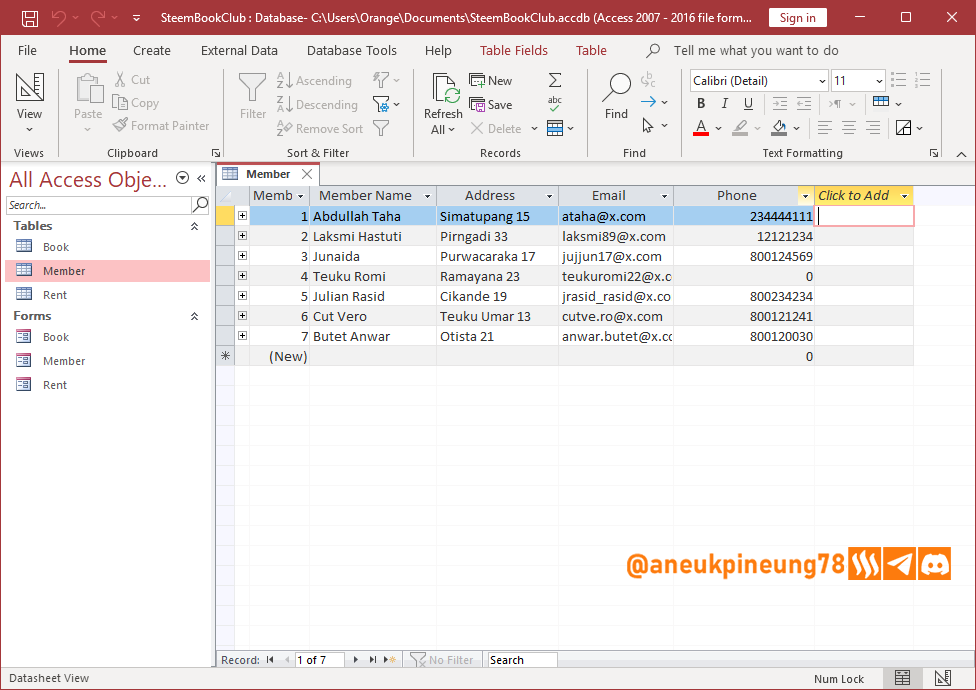
The Member Table I have so far is shown in the image below.
4.3. Rent Form and Table
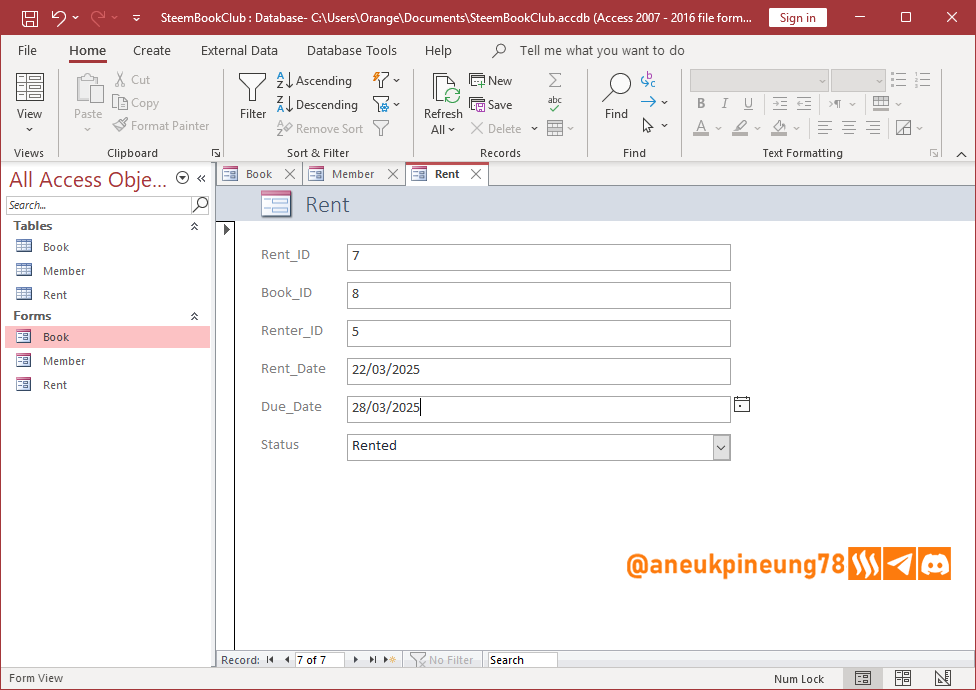
And, the Rent Form, as shown in the image below, does not have any tables under it, because in the Relationship that we created, the Rent table becomes the destination of two other tables (Members and Books). So, the Borrowing Form only serves to record new data and edit existing data.
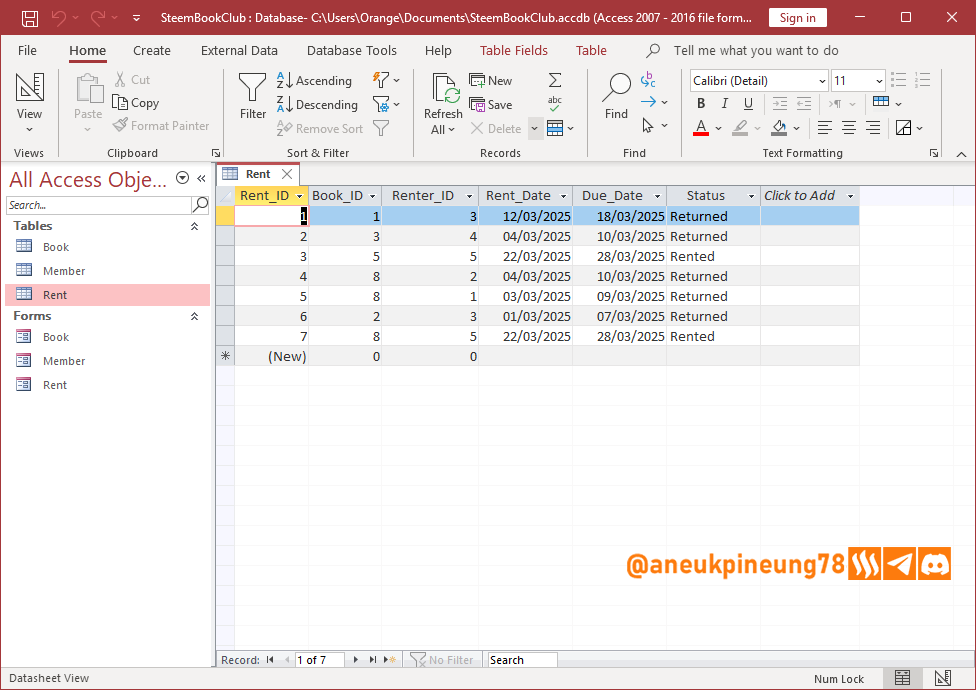
The Rent Table is shown in the image below.
5. Conclusion
- Microsoft Access is used to build databases for various needs;
- Various tables that each manage specific data need to be linked to create connectivity between different types of data;
- Forms and tables can be used to add new data or edit existing data;
6. Closing
We have come to the end of the first part of this article. The next part will be about how to make a report. Thank you for reading. Please leave your feedback to correct or add information. Also very much thanks to the #techclub mentors: @kafio, @mohammadfaisal, @alejos7ven, for the corrections and guidance.


1. Skenario
Katakan, Anda memiliki koleksi buku dalam jumlah yang cukup, dan Anda ingin membuka sebuah perpustakaan untuk umum. Anda memerlukan suatu basis data untuk mengelola koleksi buku, anggota, sekaligus mencatat setiap kali terjadi peminjaman dan pengembalian. Bagaimana Anda akan melakukannya? Anda bisa saja melakukannya dengan melakukan pencatatan manual di dalam sebuah buku khusus, atau memilih untuk memanfaatkan teknologi seperti Microsoft Excel atau Microsoft Access.
Dalam tutorial ini saya akan menulis tentang penggunaan MS. Access untuk keperluan seperti itu.
Bagaimana cara kerja basis data MS. Access yang akan kita buat? Kita akan membuat 3 sumber data, yaitu:
- Data Buku, di mana terdapat semua koleksi buku yang dimiliki, termasuk Judul, Penerbit, Tahun Terbit, ISBN, Stok. Data diperbaharui setiap ada penambahan buku di dalam koleksi;
- Data Anggota, berisi data-data relevan setiap orang yang bisa meminjam buku, misal Nama, Alamat, dan Nomer Telepon. Data diperbarui ketika terjadi penambahan Anggota; dan
- Data Peminjaman, diisi setiap terjadi peminjaman dan pengembalian buku. Data Peminjaman akan berisi informasi-informasi seperti: Tanggal Peminjaman, Tanggal Jatuh Tempo, ID Buku, ID Anggota (Peminjam).
2. Memulai Dengan Tabel
2.1. Tabel Anggota
- Buka Microsoft Access dan buat file basis data baru (Blank database).
- Tentukan nama file dan lokasi penyimpanan. Klik [Create]
- Basis data telah tersedia. Secara bawaan Access telah menyediaan sebuah tabel untuk memulai. Kita akan menggunakan tabel ini untuk membuat database Anggota. Untuk pengalaman penciptaan tabel yang lebih baik, klik kanan pada nama tabel lalu pilih [Design View].
- Beri nama untuk tabel.
- Isi tabel seperti dalam gambar berikut. Pergunakan Field Properties (pada bagian bawah) dan Property Sheet (sebelah kanan) untuk melakukan penyesuaian yang Anda butuhkan, tapi ini bisa selalu dilakukan di masa depan jika dibutuhkan.
- Simpan.
2.2. Tabel Buku
- Untuk memulai tabel baru, tekan [Create] pada menu bar, dan pilih [Table].
- Buka tabel baru dalam mode Design View. Dan buat field-field sebagaimana dalam gambar berikut.
- Simpan Tabel.
2.3. Tabel Peminjaman
- Buat tabel baru dan isi field-field dengan jenis data seperti dalam gambar berikut.
- Simpan.
2.4. Menghubungkan Tabel-Tabel
Setelah tabel-tabel tersedia, tabel-tabel tersebut perlu dihubungkan.
- Klik [Database Tools] pada menu bar dan pilih [Relationships].
- Pilih semua tabel, dan tekan [Add Selected Tables].
- Klik pada Book-ID di tabel Book lalu seret ke Book_ID di tabel Rent. Dan lakukan hal serupa pada Member_ID di tabel Member ke Renter_ID di tabel Rent. Pastikan untuk memulai menyeret dari tabel Book dan tabel Member, bukan dari tabel Rent.
- Pada kotak dialog yang muncul, pastikan mencentang [Enforce Referential Integrity]. Klik [Create].
Mengapa Anda harus mencentang “Enforce Referential Integrity”:- Menghindari adanya 'Data Orphan'. Jika Enforce Referential Integrity tidak diaktifkan, ketika data di tabel A dihapus, tabel B yang terhubung masih ada. Sebagai contoh: Data nomor 5 pada tabel peminjam dihapus, sementara ia telah meminjam beberapa buku, maka laporan akan menampilkan peminjaman tanpa mengetahui siapa yang meminjam.
- Menjaga konsistensi data: Jika Referential Integrity tidak diaktifkan, Access tidak akan memblokir setiap data input yang menyertakan foreign key yang bukan merupakan primary key dari tabel input, dan hal ini akan menyebabkan data tidak sinkron.
- Tanpa Referential Integrity, hubungan antar tabel dapat menjadi tidak jelas, menyebabkan anomali data dan kesalahan dalam kueri.
- Dan beberapa alasan lainnya.
- Simpan. Sekarang hubungan antar tabel telah diciptakan.
3. Melanjutkan Dengan Form
Setelah memiliki tabel-tabel yang kita perlukan dan menghubungkannya, sebenarnya kita sudah memiliki semua yang dibutuhkan dalam menyediakan basis data, tetapi kita akan bisa bekerja dengan lebih baik dalam memasukkan data, mengedit, menampilkan, dan mengelola dengan bantuan Form yang memiliki antar muka yang lebih menarik dari sekedar tabel-tabel, selain fitur-fitur lain seperti kemampuan menjalankan Macro dan kode VBA (Visual Basic for Applications), serta fitur keamanan yang ditingkatkan.
3.1. Form Buku
- Pastikan Tabel Buku terpilih. Lalu pada menu bar, tekan [Create] dan pilih [Form].
- Secara bawaan, Form akan terbuka dalam mode Layout View. Lakukan penyesuaian yang dibutuhkan seperti tata letak, lebar dan tinggi kotak (sel), dan mengatur properties sel-sel yang dianggap perlu.
Anda bisa beralih ke mode Design View jika menginginkannya. Ada beberapa cara untuk melakukan ini, salah satunya: klik kanan pada tab Form lalu pilih [Design View].
- Form View setelah saya melakukan penyesuaian pada Form terlihat pada gambar di bawah. Dapat dilihat bahwa di bawah Form Buku yang kita bikin, terdapat Tabel Peminjaman, karena Tabel Buku telah kita hubungkan ke Tabel Peminjaman.
- Sekarang kita siap untuk merekam data baru untuk Buku menggunakan Form Buku. Mari kita coba dengan memasukkan entri pertama. Setelah selesai, simpan.
- Selanjutnya ketika kita membuka Tabel Buku, maka telah ada entri di sana.
3.2. Form Anggota
Dengan cara yang sama, kita menciptakan Form Anggota. Hasilnya, setelah melakukan penyesuaian, terlihat seperti pada gambar di bawah.
Form siap digunakan untuk pendataan Anggota. Simpan Form.
3.3. Form Peminjaman
Form Peminjaman terlihat seperti pada gambar di bawah.
3.4. Operasi Pada Form
Pada bagian bawah setiap Form terdapat tombol-tombol operasional sebagaimana terlihat pada gambar berikut.
Tombol-tombol tersebut memiliki fungsi navigasi dan penambahan data baru, serta pencarian. Di sana juga terdapat informasi total data yang dimiliki.
4. Contoh Praktik
Saya telah memiliki beberapa anggota dan buku di dalam basis data saya, dan juga saya telah memiliki catatan peminjaman yang pernah dan sedang terjadi.
4.1. Form dan Tabel Buku
Berikut adalah tangkapan layar ketika saya melihat data buku dengan ID 8 di Form Buku, yang mana pada bagian atas Form terlihat detil buku, dan bagian bawah menyampaikan informasi catatan peminjaman buku dalam ID tersebut. Setiap kali seseorang meminjam buku tersebut, tabel peminjaman ini akan menambah entri-nya. Setiap kali buku dipulangkan dan di Form Peminjaman status dirubah menjadi “Returned”, maka Tabel Peminjaman juga akan memperbaharui data menjadi “Returned”.
Tabel di bawah Form juga bisa dipergunakan untuk menambah data baru terkait ID pada Form di atasnya. Jadi, ini bekerja dua arah, sangat fleksibel, sangat memudahkan!
Gambar di bawah memperlihatkan Table View dari data buku yang saya miliki dalam Tabel Buku.
4.2. Form dan Tabel Anggota
Lihat tangkapan layar berikut. Ini mengandung informasi terkait Anggota dengan ID 5. Kita bisa melihat detil informasi pribadi dan informasi peminjaman.
Tabel Anggota yang saya miliki sejauh ini ditunjukkan pada gambar di bawah ini.
4.3. Form Peminjaman
Sementara, Form Peminjaman, sebagaimana terlihat pada gambar di bawah, tidak memiliki tabel apapun di bawahnya, sebab dalam Relationship yang kita buat, tabel Rent menjadi tujuan dari dua tabel lain (Anggota dan Buku). Jadi, Form Peminjaman hanya berfungsi untuk mencatat data baru dan mengedit data yang ada.
Tabel Peminjaman terlihat dalam gambar berikut.
5. Kesimpulan
- Microsoft Access dipergunakan untuk membangun basis data bagi berbagai macam kebutuhan;
- Berbagai tabel yang masing-masing mengelola data spesifik perlu dihubungkan untuk menciptakan konektifitas antara berbagai jenis data;
- Form dan Tabel bisa dipergunakan untuk menambah data baru atau mengedit data yang telah ada;
6. Penutup
Demikianlah bagian pertama dari tulisan ini. Pada bagian selanjutnya tulisan akan berisi tentang bagaimana membuat laporan. Terima kasih telah membaca. Silahkan tinggalkan tanggapan Anda untuk mengkoreksi atau menambah informasi.

This library database project is well-organized with clear steps! I like how you create three important tables - Book, Member, and Rent. The design shows good planning.
Good parts:
Advice:
Your screenshots help understand the process very well. The project is good for small libraries and can be upgraded as needed. Good job on making a useful database.
However, while Access provided this functionality, users can also decorate each form with similar or even more functionalities, especially for aesthetic reasons. And this could also be another topic.
As the title suggests, this post is about organising a simple library (including the database I started to create and the process I am showing in this post is basic and limited to providing a simple database infrastructure). Upgrades can always be made at any time. Many possibilities for development, creativity might be the only limit.
Thank you for your feedback, @kafio. I really appreciate this.
Keep doing the good job!
Click image to see on X.
Informatif dan edukatif, Pekerjaan bagus dan ini menjadi referensi bagi siapa saja yang ingin belajar Microsoft Access
Terima kasih, bang irawandedy, atas tanggapan Anda. Betul sekali, apa yang saya perlihatkan dalam artikel ini adalah sesuatu yang sangat mendasar, semua orang yang memiliki ketertarikan pasti akan mampu mengikutinya. Batasannya adalah kemauan, kegigihan dan kreatifitas.
Your post has been rewarded by the Seven Team.
Meet our work
Support partner witnesses
We are the hope!
Thanks. Good to see a complete example!
It's part 1. I will do the sequel this week.
Thanks for dropping by and leaving the comment, @jeff-kubitz.