[React Native] 이더리움 모바일 지갑(Ethereum Mobile Wallet) 만들기 #7

이더리움 지갑 만들기 마지막 강좌입니다.
이번에는 지갑키로 전자서명을 수행합니다. 그리고 테스트넷에서 이더를 출금(송금)합니다.
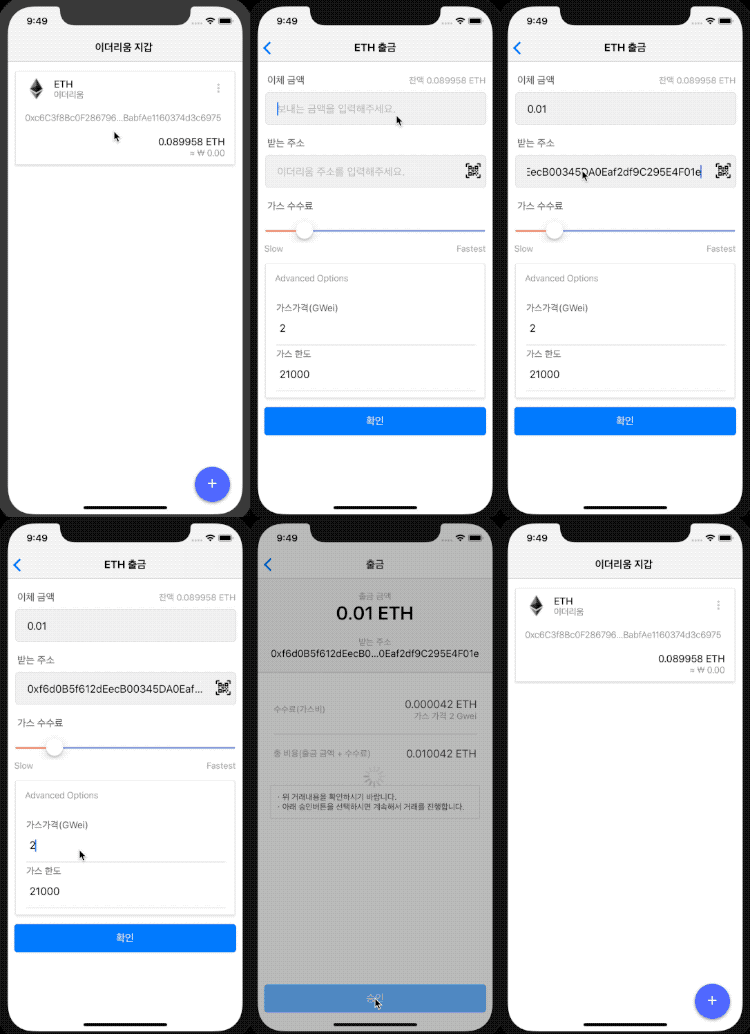
아래는 완성된 앱 동작 화면입니다. 지갑에 필요한 기본적인 기능(지갑 생성, 입금, 출금)이 모두 구현되어 있습니다.

* * *
전자서명 화면 만들기
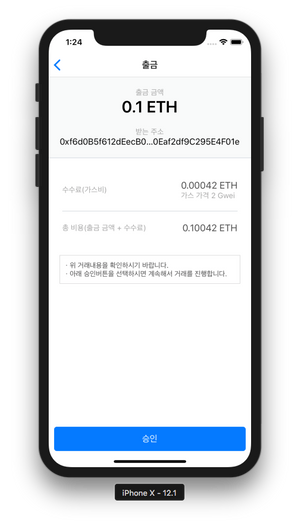
아래와 같이 전자서명을 수행하는 화면을 만듭니다.

ConfimTxScreen.js 파일을 생성합니다. 코드가 내용이 너무 많아서, 핵심 코드만 가져와서 설명합니다. 전체 코드 내용은 ConfimTxScreen.js를 확인하시기 바랍니다.
./src/components/ConfimTxScreen.js
export default class ConfimTxScreen extends Component {

  constructor(props) {
    super(props);

    const {
      fromAddress,
      toAddress,
      gasPrice,
      gasLimit,
      value
    } = props.navigation.state.params;

    // 수수료(가스비) 계산(가스가격 * 가스사용량)
    let estimateFee = ethers.utils.bigNumberify(gasPrice).mul(gasLimit);

    // 가스가격(gwei)를 ether 단위로 변환
    let fee = ethers.utils.formatUnits(estimateFee, 'gwei').toString();

    // 필요한 총 금액 계산(출금금액 + 수수료)
    let totalAmount = ethers.utils.parseEther(value).add(ethers.utils.parseEther(fee));
    totalAmount = ethers.utils.formatEther(totalAmount).toString();

    this.state = {
      loading: false,  // 로딩 화면 출력 여부
      fromAddress,  // 보내는 주소
      toAddress,    // 받는 주소
      gasPrice,     // 가스 가격
      gasLimit,     // 가스 최대 사용량
      value,        // 출금 금액
      fee,          // 수수료
      totalAmount,  // 총 금액
    }
  }

}
- ConfimTxScreen 클래스의 생성자 함수
constructor()부터 살펴봅니다.- 이전 화면에서 전달 받은
props.navigation.state.params에서 데이터를 가져옵니다.- 그리고 출금하는데 필요한 네트워크 비용(가스비)
estimateFee를 계산합니다.- 마지막으로 내 지갑에서 빠져나가는 총 금액(출금 금액 + 수수료)
totalAmount을 계산합니다.
그다음은 실제 서명을 수행하는 함수 sign()를 살펴봅니다.
export default class ConfimTxScreen extends Component {

  sign = async () => {

    // 로딩 이미지 출력
    this.setState({
      loading: true
    });

    let {
      fromAddress,
      toAddress,
      gasPrice,
      gasLimit,
      value
    } = this.state;

    // #1. ropsten 테스트넷 provider 생성
    let provider = ethers.getDefaultProvider('ropsten');

    // #2. nonce 값 조회(거래 시퀀스 번호, 0부터 시작하여 거래할때 마다 증가)
    let nonce = await provider.getTransactionCount(fromAddress);
    console.log({ nonce });

    // #3. Transaction 데이터 생성
    let transaction = {
      to: toAddress,
      value: ethers.utils.parseEther(value),        // ehter => wei
      gasPrice: ethers.utils.parseUnits(gasPrice, 'gwei'), // gwei => wei
      gasLimit: ethers.utils.bigNumberify(gasLimit),
      nonce: nonce,
      data: ''
    };

    // #4. 개인키(서명키) 조회
    let privateKey = await RNSecureKeyStore.get(fromAddress);

    // #5. 서명을 수행할 지갑 생성
    let wallet = new ethers.Wallet(privateKey);

    // #6. 이더리움 Transaction 서명하기
    let sign = await wallet.sign(transaction);

    // #7. 서명된 이더리움 Transaction 배포하기
    try {
      const tx = await provider.sendTransaction(sign);

      // #8. 완료 화면으로 이동
      this.props.navigation.navigate('CompleteScreen', tx.hash);

    } catch(error) {
      console.log(error);
      Alert.alert('ERROR', `${error.code}\n${error.message}`);
    }

    this.setState({
      loading: false
    });
  }

}
- 승인 버튼을 누르면
sign()함수가 실행될 것입니다.sign()함수에서는 지갑키로 트랜잭션을 서명하고 배포합니다. 자세한 설명은 주석으로 대신하겠습니다.
- 전체 코드 내용은 ConfimTxScreen.js를 확인하세요.
추가로, ethers에는 서명과 배포를 좀 더 간단하게 하는 방법도 있습니다. 지갑(Wallet)을 생성할때 provider 와 함께 지갑을 생성하면, 아래와 같이 짧은 코드로도 서명 함수 구현이 가능합니다.
// provider 연결과 함께 지갑 생성
let provider = ethers.getDefaultProvider();
let wallet = new ethers.Wallet(privateKey, provider);

// transaction 생성
let transaction = {
    to: "0x88a5c2d9919e46f883eb62f7b8dd9d0cc45bc290",
  value: ethers.utils.parseEther('1.0')
}

// 지갑으로 서명하고 서명값을 서버에 보내기
let tx = await wallet.sendTransaction(transaction);
참고로
transaction에 필요한 나머지값들은 자동으로 채워집니다.
거래 완료 화면 만들기
다음은 거래 완료을 만듭니다.
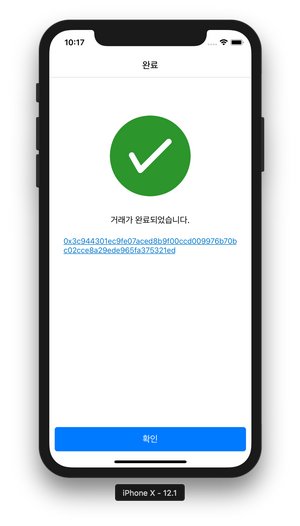
아래와 같이 거래가 완료되면, 화면에 TX Hash가 출력됩니다. 그리고 TxHash를 눌렀을때, etherscan.io로 연결하면 더 좋을 것 같습니다.

CompleteScreen.js 파일을 생성합니다.
./src/components/CompleteScreen.js
import React, { Component } from 'react';
import { StyleSheet, View, Slider, TouchableOpacity, Alert, AsyncStorage, Image, BackHandler } from 'react-native';
import { Container, Spinner, Content, Header, Card, CardItem, Body, Text, Icon, Button, Left, Right, Thumbnail, Title, Toast, Form, Item, Input, Label } from 'native-base';

export default function(props) {
  const hash = props.navigation.state.params;
  return (
    <Container style={styles.container}>
      <View style={{ flex: 1, marginTop: 50 }}>
        <View style={{ alignItems:'center', justifyContent:'space-evenly', marginHorizontal: 25, height: 300 }}>
          <Icon name='checkcircle' type='AntDesign' style={{color:'#2c952c', fontSize: 150}} />
          <Text>거래가 완료되었습니다.</Text>
          <TouchableOpacity>
            <Text note style={{ color:'#07C', textDecorationLine: 'underline' }}>{hash}</Text>
          </TouchableOpacity>
        </View>
      </View>
      <View style={{ marginHorizontal: 10, marginBottom: 30 }}>
        <Button block
          onPress={() => {
            props.navigation.popToTop();
          }}>
          <Text>확인</Text>
        </Button>
      </View>
    </Container>
  )
}

const styles = StyleSheet.create({
  container: {
    flex: 1,
    backgroundColor: 'white',
    justifyContent: 'space-between'
  },
});
- CompleteScreen는 함수형(function) 컴포넌트로 구현하였습니다. 함수형 컴포넌트가 클래스형 컴포넌트 보다 렌더링 속도가 조금 더 빠릅니다.
- 전달 받은
props.navigation.state.params에서 tx hash 를 가져와서 화면에 출력합니다.- 그리고 확인 버튼을 누르면 최상위 화면으로 이동합니다.
props.navigation.popToTop()
* * *
이더리움 지갑 만들기 강좌를 시작한지 벌써 2주가 지났습니다. 시간이 정말 금방 지나갑니다.
여기서 더 구현한다면 이더리움 토큰(ERC20) 지갑을 만들고, 백업과 인증(보안) 쪽을 좀 더 보완하고 싶습니다. 아, 그리고 거래 기록도 보여줘야겠네요.
여기까지 읽어주셔서 감사합니다.
dorian-dev님의 도리안의 개발 이야기 #49 - 개인 개발 주제 구상
짱짱맨 호출에 응답하였습니다.
3.1 운동 100주년을 기념하여 북이오는 "독도 - 인터넷독본"을 한시적으로 무료판매 합니다.
널리 공유되기를 희망하며, 참여에 감사를 드립니다.
Hi @anpigon!
Your post was upvoted by @steem-ua, new Steem dApp, using UserAuthority for algorithmic post curation!
Your UA account score is currently 2.914 which ranks you at #11553 across all Steem accounts.
Your rank has not changed in the last three days.
In our last Algorithmic Curation Round, consisting of 192 contributions, your post is ranked at #100.
Evaluation of your UA score:
Feel free to join our @steem-ua Discord server
심플하게 잘 만들었네요.
Congratulations @anpigon! You have completed the following achievement on the Steem blockchain and have been rewarded with new badge(s) :
Click here to view your Board
If you no longer want to receive notifications, reply to this comment with the word
STOPDo not miss the last post from @steemitboard: