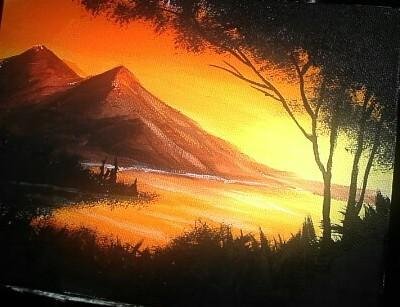
SUNSET OVER A LAKE: My welcome back artwork after a long time.
Hey great steemians,
Happy Sunday to you all, hope the weekend is much going well?
It's been a long time but I'm finally back to give steemit all I can and entertain my great followers and those that are following me.
Today, I made another artwork you all will love and decided to share it here but am going to be teaching you all today, the way you can actually achieve this piece of artwork. I much hope that everyone will learn with the little way I can help explaining even though it wasn't easy explaining.
The materials I use here include :
Large square headed brush
Small pointed head brush
Medium size square headed brush
All square headed brush and lastly,
A rake brush.
Paints include :
Primary red
Primary yellow
White and
Black pigment.
So below are the respective steps we can use to achieve the aim of the artwork which is a representation of sunset over a lake.
STEP 1
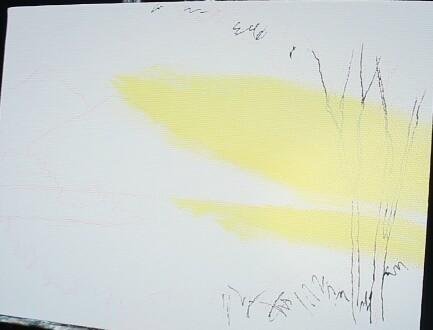
The first to do here is to use a small pointed head brush and a little primary black mixed well with water to paint or draw a small viable sketch of the tree surrounding the lake.
Next is to have a mixture of primary yellow and white and with the help of a large headed brush, apply it slowly and in a horizontal motion just like I have shown in the image above.
STEP 2
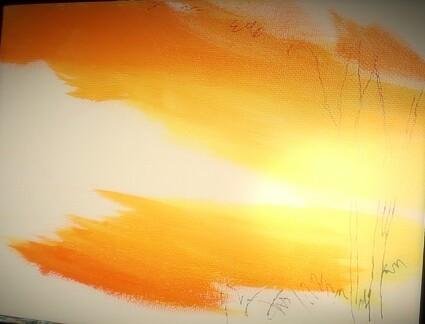
Next step is to have a mixture of primary red and primary yellow.
Apply the pigment at the top of the white carbon paper you using to paint and slowly blending it down softly to get a really natural transition of what you doing from one point to another.
You will then use the same mixture that you apply at the sky level and implement it down at the lake level as shown in my own artwork.
But remember that you going to use the sharper edge of the large square headed brush to achieve this.
STEP 3
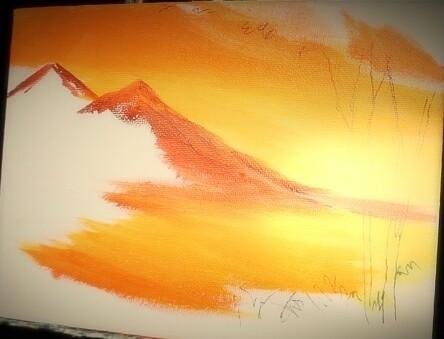
In the next step, with the help of your medium size headed brush, use a mixture of red and white pigment to have a sketch of the mountain.
Make sure that it reflect much as the color you use at the top because it's important that the sky reflect much on the mountain you have paint and getting that scenario is the key to having a better artwork here.
Make sure that the mountain you painting is well blended down to be touching the water body so as to have an ice move transition from one point to the other.
STEP 4

Now, going back to the mountain top, apply a little bit of black and the color you use to blend the sky area and blend it to much reflect a real artwork you have in mind.
It's important to note that, the left side of the mountain should be abit darker than the right side that is well exposed to the sun, that's the essence of applying that black pigment to the mountain, so that it makes it look more real and more 3-dimensional.
STEP 5
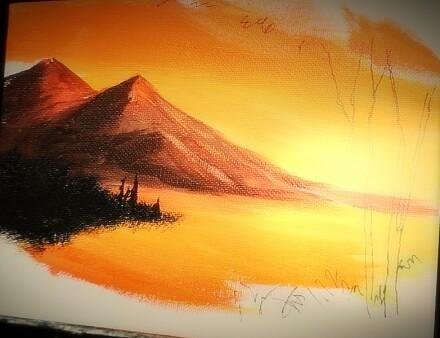
In step 4, with the help of your all square headed brush, and in a tapping motion, create an implication of trees in a distance down the mountain using your black pigment.
Make sure that my own painting work images here are use as your guide to achieve the same.
STEP 6
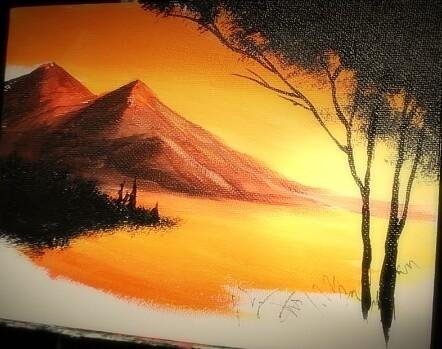
Using the same all square headed brush, and in a tapping motion, create an implication of leaves in our tree just like I have shown in my artwork.
But to much make the lieves reflect that of many leaves in the tree, you can paint it once in a horizontal or circular motion.
With the help of the small square headed brush, you create the actual tree branches just like I have shown and making sure that everything appears much real with a pure black pigment.
STEP 7
In the final step, we going to use a different kind of special brush '' the rake brush ''.
This is because, a single stroke you made using the rake brush, the brush will try making sure that the stroke is well represented 3-4 times, like as if you did it to that extend..
With the rake brush, you start creating a feather like strokes (grasses) around the lake side. Despite the long time it takes making it perfect and well represented, it worth the time to make it great.
Here the pigment is all black and well mixed with water.
So down the strokes you have made, use your large square brush to paint the down of it to reflect much of the huge grasses that is growing around the lake side just like I have shown in the picture above.
This is a little bit of how I paint the sunset over a lake and I tried explaining the possible way you can do yours incase you want to take up that chance of making a good painting artwork.
Even though I couldn't much explain it better, I hope to improve on that next time so that everything will be much easy to understand.
I much hope you all welcome me back here after a long time away with much of your love.
I remain @messinaldo
More to come from me.. Much love to you all.
Learned from:
http://www.myhobbyclass.com/painting-a-sunset-over-a-lake-with-acrylics-in-10-minutes/613
World of Photography
>Visit the website<
You have earned 5.05 XP for sharing your photo!
Daily photos: 1/2
Daily comments: 0/5
Multiplier: 1.01
Server time: 15:54:07
Total XP: 96.60/100.00
Total Photos: 19
Total comments: 0
Total contest wins: 0
Follow: @photocontests
Join the Discord channel: click!
Play and win SBD: @fairlotto
Daily Steem Statistics: @dailysteemreport
Learn how to program Steem-Python applications: @steempytutorials
Developed and sponsored by: @juliank
Very interesting art.thumbs up
Did you learned how to paint it from this video?
http://www.myhobbyclass.com/painting-a-sunset-over-a-lake-with-acrylics-in-10-minutes/613
I have much really been inspired by Acrylic.. That's much the reason I learn everyday from the tremendous artwork they keep doing.
They keep me going and being the best.
Yes I learn it
That's good, just be careful, put the link. You don't want @steemcleaners to think that you took this work from someone else.
Thanks much.. I appreciate this
Brilliant work keep it up please