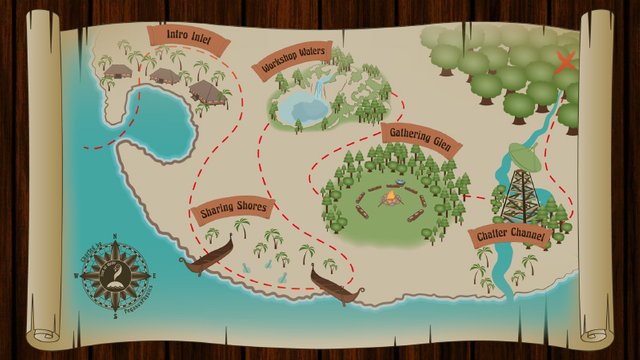
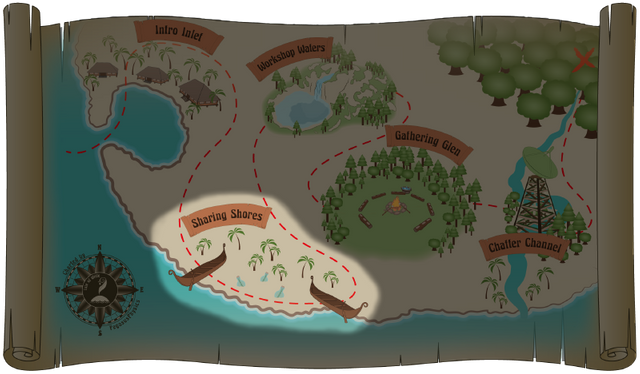
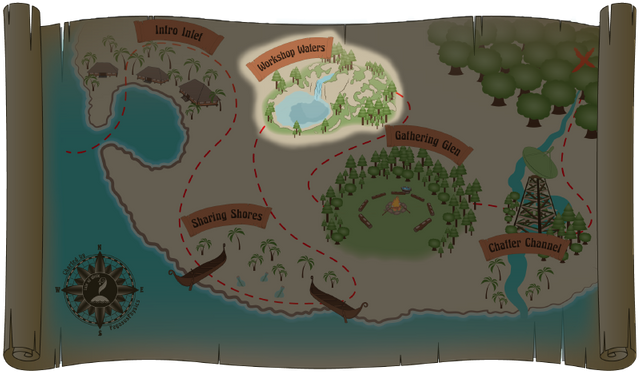
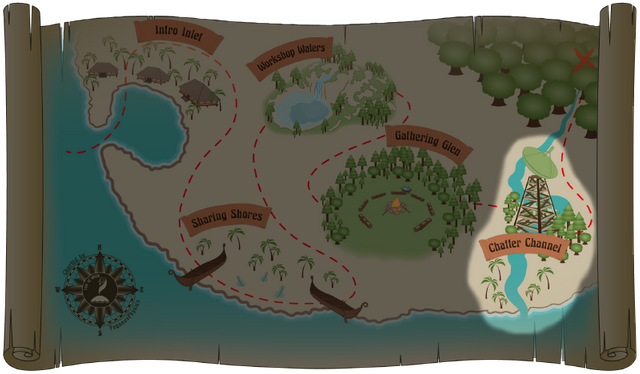
Making the Isle of Write Treasure Map
Making the Isle of Write Treasure Map...
In my mind, at that time, it would be a quick and easy thing to achieve -- despite the fact that my freehand drawing skills were (and still are) nearly non-existent, I'm new to adobe illustrator, and I've never made a map.
I learned a lot from this project.
For example, I knew I'd need to make my assets (the individual images on the map) first, but the recolour process I went through taught me that I should probably choose my colour palettes first and make my assets in the planned colour scheme... at least for a project with this many assets.
So, since I took a few different approaches for asset creation, I'll just go asset by asset. Note, this is not the order in which the assets were made, I'm starting with the bottom layers (scroll, sea, etc) then following the path to the X.
Asset 1 - Scroll
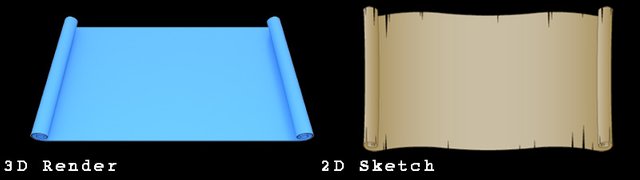
I couldn't find a scroll to my liking in my 3D library, so I opened Sketchup and made a very basic scroll. I was really just after that curled shape at the edges anyway.
I imported the model into DazStudio and rendered it at an angle that favoured said curled shape. That render was then imported into Adobe Illustrator where I hand-traced the curled shape I was after. From there, I made the necessary adjustments to make it look more like a scroll - at least, informed by my google image search for "map scrolls".
Asset 2 - Sea

This was one of the easiest. I just copied the core shape of the scroll, turned it blue, and blurred the edges.
Asset 2.5 - Compass

Hand drawn in Adobe Illustrator with the aid of visual references from a google image search. The points on the compass were made with the pen tool (an adobe illustrator feature) -- I just applied a nice tapered stroke and turned it into a shape so I could apply a gradient to it.
In the center is the Isle of Write logo, and around the edges it reads "Charted by PegasusPhysics"... though these may be details that are lost at smaller sizes.
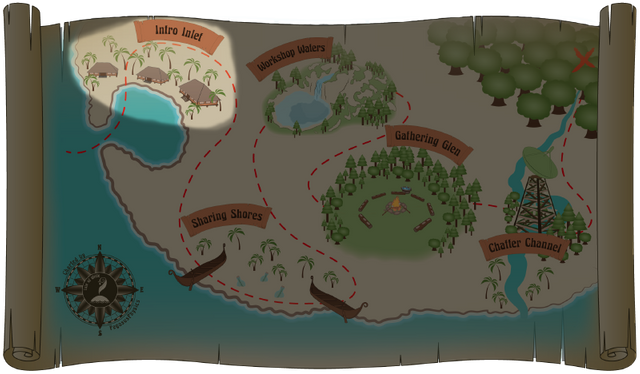
Asset 3 - Land
Originally, I wanted to utilise a program called Fractal Mapper, but it wasn't giving me what I wanted, so I went back to Adobe Illustrator and pulled out the pencil tool. The nice thing about this tool is that it lets me dynamically edit the line by simply drawing a new line that attaches to it. It's difficult to describe in words, so here's a quick feature video:
That basically let me nit-pick each portion of the coastline until it was the shape I wanted. Then I added two strokes for the outline, one darker to accent the coastline, and one lighter and more transparent to make it look a bit like shallow water around the coast.
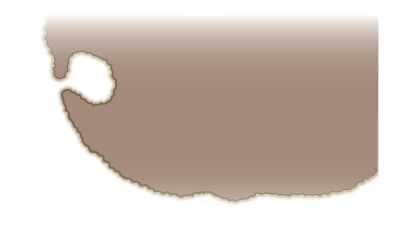
Asset 3.5 - Opacity Mask

I wanted the image to fade at the edges of the map, so I dug back into my "Adobe Illustrator Master Class" over on Udemy and pulled out the opacity mask tutorial. This taught me to make what was basically an image that could control where the fading would be applied at any time during the creation process.
Asset 4 - Trees

I'm skipping to the trees just to get them out of the way. They were easy compared to some of the others I created. Mildly adjusted rectangles for tree stumps, circles and triangles for tree tops... the palm tree is just a collection of curved lines! And it's amazing what a simple gradient can do. I wasn't loving the triangle trees when I had each triangle as a different shade of green... but as soon as they each got a gradient, they seemed to just pop. I'm pleased with my simple trees. ^_^
Landmark 1 - Intro Inlet
The original idea for this was just a beach hut with a fancy dock, so it was just what the map needed when @jrhughes started making adjustments to the rooms in the Discord server. Sure, it added a little time to creation, but I liked the Inlet so much more.
Asset 5 - Bay Huts
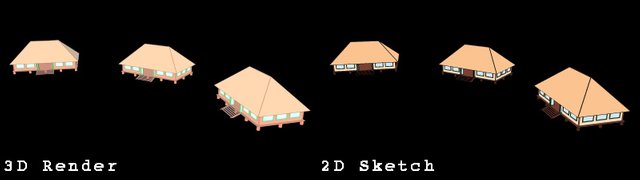
The three huts that occupy the Intro Inlet are three angles of a single hut I modelled in SketchUp. Again, I imported the model into DazStudio. But this time, I remembered the "GeoShell" (geometry shell) feature to which I could apply an "outline shader", and "toon camera" that comes with features better capable of rendering outlines. This gave me nice crisp outlines on the model edges in the final render.
With three copies of the model laid out with the intention to hug a mini coastline, and the camera positioned to the desired perspective... I rendered the three-hut group for hand-tracing in Adobe Illustrator. And despite it being all straight lines, that probably took two or three hours. Hopefully I get faster at using these tool with practice.
Landmark 2 - Sharing Shores
Rowboats and bottled messages to reflect the sharing of our Steemit posts with one another. This was actually the original idea and it survived the changes that created the Intro Inlet.
Asset 6 - Bottled Messages
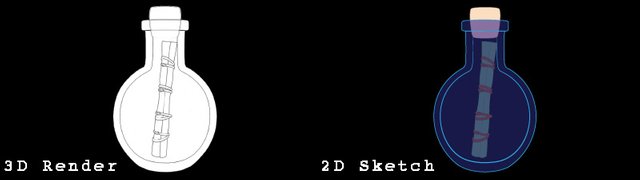
Both the bottle and the scroll where two of the many 3D models already in my extensive 3D library, so I brought them into DazStudio, hid the liquid in the bottle, gave them some basic textures, and utilised the 'geoshell-toon camera' method I mentioned for Asset #5. The bottle was a quick trace with the pen tool and a few adjusted curves... but the little ties on the scroll in the bottle? You can't really even see them at their final size, but I was determined to include them anyway. ^_^;
Asset 7 - Beached Boats
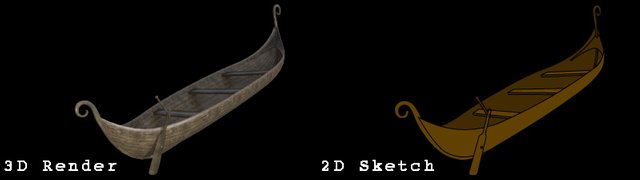
Another asset in my library. Same 'geoshell-toon camera' treatment. Hand-traced in Illustrator. Once I added one to the map, a little reflect, rotate, and resize gave me the second one.
Landmark 3 - Workshop Waters
Originally planned as an island cluster with each island in the cluster representing a different workshop. But with the other landmarks populating the map, there simply wouldn't have been room unless this one took up most of the space. So it was adapted to an inland forested waterfall with a lake.
Asset 8 - Waterfall Lake
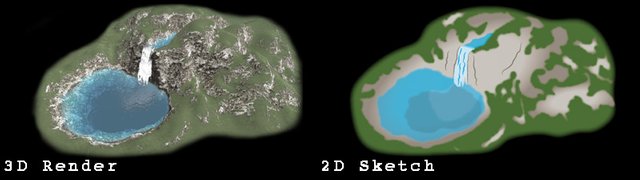
I didn't have any 3D assets for this one, so I had to make it in Lumion. Lumion also has some nice non-photorealistic rendering options and the "manga" filter was just what I needed to get some guiding outlines.
With the waterfall and lake rendered on a bare landscape, I brought it into Illustrator for hand-tracing and 2D landscaping. It may not be the best waterfall in the world, but it's definitely a waterfall and that's all that matters, right? (I had a hard time with the waterfall bit, lol)
Landmark 4 - Gathering Glen
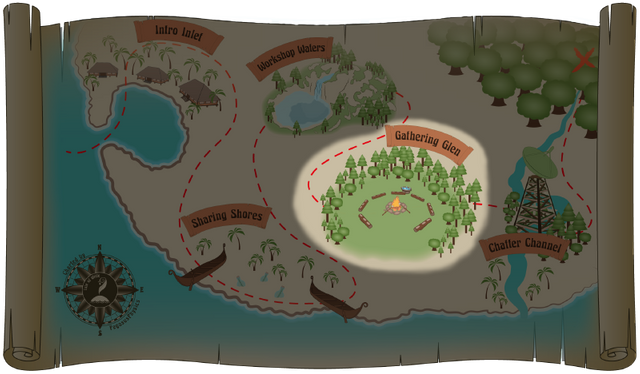
This is where the population of the Isle often gathers to chat about a variety of interests.
Originally planned as campgrounds, the imagery was changed a bit when it became a Gathering Glen -- a gathering in a nice open field around a fire. The marshmallows and beverage bucket are more details that are there but not so visible at smaller sizes.
Asset 9 - Beverage Bucket
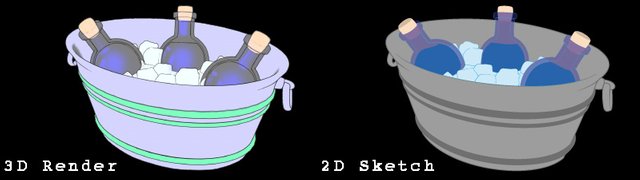
For this one, I found a round bucket of wine bottles in ice water in my 3D library. I deleted the wine bottles, stretched out the bucket and water layer, added more of the ice cubes that were part of the prop, and then added three copies of the bottle from Asset 6. I gave all the pieces the 'geoshell-toon camera' treatment and hand-traced the result into Illustrator.
Asset 10 - Marshmallow Sticks
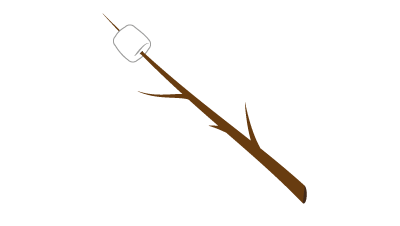
The shape for this one was so simple that I just drew it out in illustrator with images from a google image search as visual reference. The placement could probably be better, though...
Asset 11 & 12
Asset 11 - Seating Logs
This is an asset I found on Sketchup's 3dWarehouse. I brought eight copies into DazStudio, spread them out in a nice circle around Asset 12, and gave 'em the 'ol 'geoshell-toon camera' treatment.
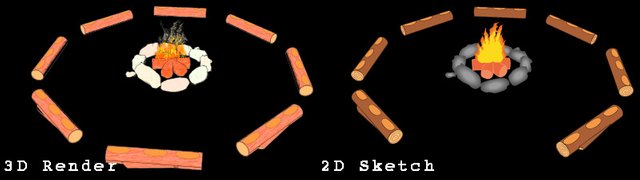
Asset 12 - Campfire
This took two different 3D campfire assets and the log from Asset 11 to get the look I wanted -- the stones came from one campfire, and the fire from another. Again, all given the 'geoshell-toon camera' treatment.
I rendered Asset 11 and 12 together and hand-traced that result into Illustrator.
Landmark 5 - Chatter Channel
This landmark was added to the map when things were reorganised. I hadn't thought to add any representation for our voice channels since we aren't using them... yet. But that "yet" gave it a place on the map, as I hear there are plans...
Asset 13 - Dish Tower

This one I had to both make and source from 3dwarehouse. The dish and its little square base came from 3D warehouse. The rest, I made in Sketchup. I had to scale the dish up in size to get it to look nice sitting on the top, but I think it came out okay. The finished model was imported into DazStudio and given that 'geoshell-toon camera' treatment, then hand-traced into Illustrator.
Landmark 6 - Unborn Orchard
Asset 14 - 'X' marks the Spot
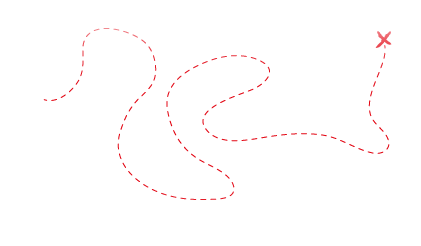
The easiest asset of all... A nice little path through the landmarks with a 'dashed line' filter, ending at an inky red X.
All in all, it was an extremely fun project that took longer than I thought it would and probably could have been easier than I made it. A better understanding of Illustrator's perspective tool probably could have made a world of a difference... especially if I can apply a specific perspective to an image post-creation.... hmmm... something to play with.
But I've always wanted to make a map for something, and after this, now I know I want to make more maps... because I guess I like maps. Perhaps, in a past life, I was a map enthusiast. ^_^;
Anyway, thanks for stopping by! I hope you enjoyed the post. Peace!
~PegasusPhysics ^_^
Fantastic job @pegasusphysics! We at the Isle could not be happier with your part in founding our little tropical paradise. It is our sincere hope that through your lovely work, many more wonderful friends will find us there!
art and flair courtesy of @PegasusPhysics
Thank you! I completely forgot to make the last map image a link! ^_^;
Love how you went about your process and made every asset from scratch. Most people just use stock images to trace over. I love illustrator for the powerful tool that it is but I use it mainly for posters, illustrations and design. i LOVE maps, drawing them by hand that is. Never tried one on illustrator by using my own models imported from sketchup/lumion etc. Really want to give this a shot now!
Great job!
Thank you! I love maps too! I don't think I realised just how much until I made this one. ^_^
Fantastic post - I love to learn how things are done, and this is an eye-opener. So much more work than the average person would ever guess. Creatives of all kinds know that ALL projects take far longer than we ever anticipated, with more glitches than we'd dream possible. If we knew how long things would REALLY take, we wouldn't do it, so I guess it's a built-in safety feature to keep people creating stuff.
Question: Do I need to update my bifocals, or is the font on the treasure map really hard to read (like, nearly impossible), and I cannot enlarge the map to get a better look.... and how many people can tell the compass contains the Isle of Write logo? (Yes. I probably need stronger lenses. Again.)
How do we enlarge the map for a closer look
You should be able to right click on the image and select "View Image" from the menu that appears... Well, if you're on a desktop/laptop... no clue how that works on mobile devices.
I wonder about the readability of the font too. But I can't really judge too well since I've got everything zoomed in and whatnot on this tiny monitor. ^_^;
Heck of a job here! Most folks don't understand how many different skills and chunks of work go into creating a larger, cohesive piece. Obviously you know what you're doing here :) Great work, and great post!
That is very true. I've learned to code in C#, hoping that i could make some games, i've got the code working but i cannot get my graphics at a good enough level so i can release my games.
Haha, thanks! I dunno if I'd say I know what I'm doing or not... maybe in that "in the zone" kind of way... but sometimes it just feels like I'm winging it, lol. Anyway, thanks again, glad you like it! ^_^
hey this was very cool, mainly because you showed the process, i think that's super important for people setting out because most of the time people don't understand the work behind the scenes. you got an upvote and a follow! looking forward to more.
Thank you! I'm glad you liked it. ^_^
@pegasusphysics hey dude thats a good info hope u will make more.
Thanks! Will do. ^_^
You go on my "all name" team - wonderful username :) This post is great! I love it when I get to see processes that are so different from my own. I am definitely of the "draw it freehand" camp so it is super fascinating to see these other ways of getting to a relatively similar end point - I have draw tons of maps, but never like this! Wonderful detail in the step by step explanation of the process involved in each asset, this is just a terrifically written and formatted post. And the map looks great!
Much love - Carl
Oh man, I wish I could be in the "draw it freehand" camp... it looks like magic to my eyes! But Illustrator let's me get close... with a bit effort, lol.
Thank you for the kind words and compliments! And I'm glad you like the map! I hope to make many more! ^_^
Congratulations @pegasusphysics, this post is the second most rewarded post (based on pending payouts) in the last 12 hours written by a User account holder (accounts that hold between 0.1 and 1.0 Mega Vests). The total number of posts by User account holders during this period was 2912 and the total pending payments to posts in this category was $8187.38. To see the full list of highest paid posts across all accounts categories, click here.
If you do not wish to receive these messages in future, please reply stop to this comment.
I have the same program and have no idea how to use it ( along with most of the premiere package I was given) but thanks to your post I might be able to take some time and give it a chance.......Thanks
Hi! Thanks! Happy to help! To learn the basics of the software I followed this course on Udemy: https://www.udemy.com/illustrator-cc-masterclass/ along with numerous youtube videos for specific situations.
I'd say start with the pen tool, the pencil tool, and the basic shape tools... those alone allow for so much. I've also found that a lot of functionality is tucked behind right clicks and double clicks on tool icons, or activated by holding other keys like shift, ctrl, or alt (sometimes simultaneously) when using a tool.
Anyway, have fun if you do give it shot, and let us know how it goes! ^_^
wow that looks like a paris
Does it really? I've never been. ^_^