Accept Crypto with Coinbase Commerce: Intro and Integration Guide

You run an online shop and know about the advantages of Cryptocurrency. You wish to support the movement and boost your holdings. Doing so is very simple, by integrating the relatively new service by Coinbase, named Coinbase Commerce.
Introduction
Coinbase Commerce is a separate service from Coinbase’s main branch of products that allows you to accept Bitcoin, Bitcoin Cash, Ethereum and Litecoin within your online shop checkout.
Let’s overview some facts about the service before continuing to integration, and refer to Coinbase Commerce as CC for the rest of this article:
The service is still very basic. The dashboard is very simple, easy to navigate, but lacking features such as withdrawing funds directly from your account. However, you do have the option to import your keys into an external wallet such as Jaxx to manage your funds. Bottom line here is that features will come, and we are early adopters.
You are limited to the 4 currencies mentioned above, however, you can toggle whether you accept them from the Dashboard; I could turn off BCH and LTC and only accept BTC and ETH for example.
CC provides simple checkout buttons for predetermined payment amounts from the Dashboard, which is not very useful. We are interested in the REST API used for charges and checkouts. The API contains everything you would expect from authentication, webhooks and standardised feedback.
CC provides a checkout landing page to process payments. They present a wallet address or a QR Code.
Charges are open for 15 minutes. If a transaction has not been received in this time, the transaction will cancel.
With this background, let’s check out some landing pages.
Find the CC home page at https://commerce.coinbase.com.
Find the API Reference documention at https://commerce.coinbase.com/docs/api/
For more information about how the service works, visit the FAQ, at https://commerce.coinbase.com/faq
Go ahead and sign up for an account and explore the Dashboard.
Integrating into your checkout
Preparation
We need to do some preparation before integrating CC into our checkout. From the left menu go to your Settings and configure the following:
Toggle which currencies you wish to accept.
Whitelist the domains you wish to integrate the checkout on. e.g. https://mywebsite.com
Under the API Keys section, Create an API Key. No surprises here, your API Key is used for authenticating API requests.
Lastly, add your webhook URLs. Notifications will be sent to these URLs. E.g. https://mywebsite/coinbase-commerce-webhook
API Calls
Now we are ready to start integrating payments into our checkout. Let’s go through the process of accepting a payment.
The API Reference provides clear explanations of the endpoints, fields required and fields returned, so at each stage, I will provide a link to the relevant service.
We are interested in the Charge service
Charge Endpoint: https://commerce.coinbase.com/docs/api/#charges
Step 1: Prepare the charge
When your customer has finalised their shopping cart and delivery method, it is time to pay. At this point, you will display your payment methods. This is also the time we create a Charge on CC.
Create Charge Endpoint: https://commerce.coinbase.com/docs/api/#create-a-charge
Only a small amount of data is needed for this request - namely a name, description and price details for the charge. A successful response will contain a JSON object confirming the transaction details, wallet address information and any metadata you supplied in the request.
The first field, however, code, is what we need to take the user to the CC checkout page.
At this point, display a button on your checkout page that points to the following URL:
https://commerce.coinbase.com/charges/{{ code here }}
Replace {{ code here }} with your code.
Step 2. Responding to checkout page visit
Now, at this stage, 2 things should happen. The first one is automatic - another tab is opened and the CC checkout page opens.
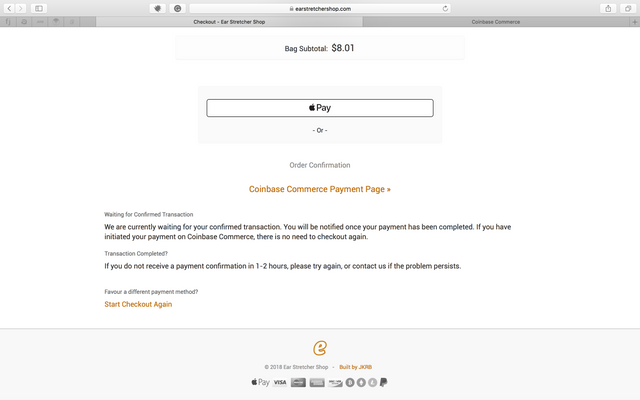
The second thing that should happen is that your checkout page should progress beyond the payment section, and display a UI that is reflecting your payment status. For example, you could display the title “Waiting for your transaction”, and provide instructions on how to complete checkout on the CC checkout page.
The illustrations I have provided at the end of this article will make this step clear.
Step 3. Webhooks and Paying
As a developer, all we need to do now is set up our Webhooks and update our UI accordingly when we get a confirm charge event.
Let’s check out the webhook data structure:
Webhooks: https://commerce.coinbase.com/docs/api/#webhooks
We are interested in the charge:confirmed event here. We can also react to when a new charge is created, and when a charge fails.
The important thing to do here is to verify that the event you are receiving is legitimate. To do this, we can use the Show Charge endpoint using the code field we receive from the event, to verify the charge in fact exists and is confirmed.
Show Charge Endpoint: https://commerce.coinbase.com/docs/api/#show-a-charge
It is also important to store the status of each transaction in your application's database. If the charge has already been confirmed, this will reflect in your local records. In this scenario you can dismiss the event.
To review this step:
Upon a user interacting with your checkout button, update your UI to the transaction stats.
Your Webhook will receive a charge:confirmed event when the transaction is confirmed.
Note: Once you have made the transaction, the CC checkout page will update accordingly, giving the customer real-time feedback of whether the transaction is confirmed, or still processing.
Upon receiving a charge:confirmed event, use the Show Charge API to verify the transaction is valid.
This is the majority of our integration completed. From here you can process a completed order, send your customer a confirmation email, and update your UI accordingly.
Limitations
CC is a new service and has adopted a slow rollout approach. This is more so evident by the lack of checkout customisation.
Even though we cannot do things like customising the checkout page at this time, you can bet that it is coming in a future update. This is truly early adopting, but familiarising yourself with a Cryptocurrency checkout experience early on will be beneficial as we endeavour to improve our checkout experiences.
I am available to offer support for you, should you be interested in integrating CC within your online shop.
Illustrations
Shops I personally manage accept Cryptocurrency. One of those shops is at https://earstretchershop.com. Below I have provided some screenshots of how I have presented a CC checkout.
Selecting the CC payment option:
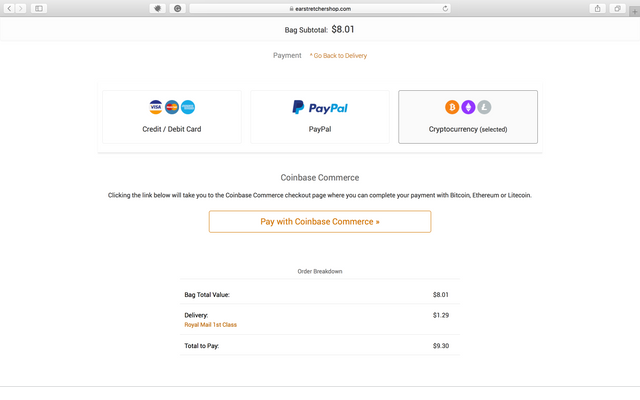
Updating the UI after opening the CC checkout page:
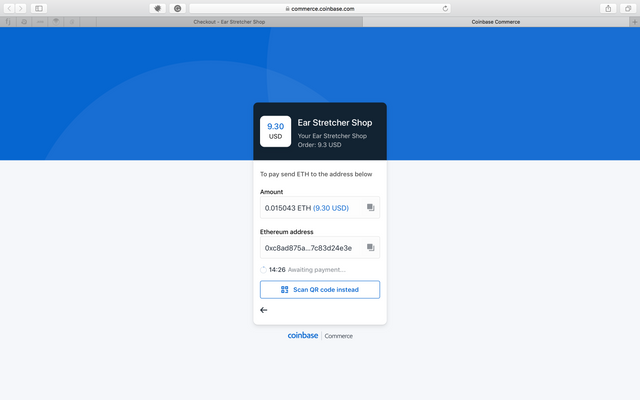
The CC checkout landing page:

After selecting your payment currency, you have 15 minutes to complete the transaction:
Great post. It doesn't seem like you are getting the likes it deserves though. Have you checked out the upvote communities? You should check out steemengine. or steemfollower.com.
Coins mentioned in post: