Make Your Own BlockChain Using Python Part Two - Creating the BlockChain, Concept Model of BlockChat

In the first part, we installed python and I explained the concept of BlockChat which will be a de-centralized messaging service where anyone can start their own node or login to an existing node and chat. All the chats will be encrypted with user generated keys and the entire project is open source so if anyone is concerned about security they can start their own node and review the source themselves.
If you haven't already, read Part One
This time we will be installing a python library called flask, which will allow use to create a small python web server. In the next part, we will be using Django but flask is much easier to set up to test out our concept. Install flask by opening a terminal and entering-
- Windows-
pip install flask - MacOS/Linux-
sudo -H pip3 install flask
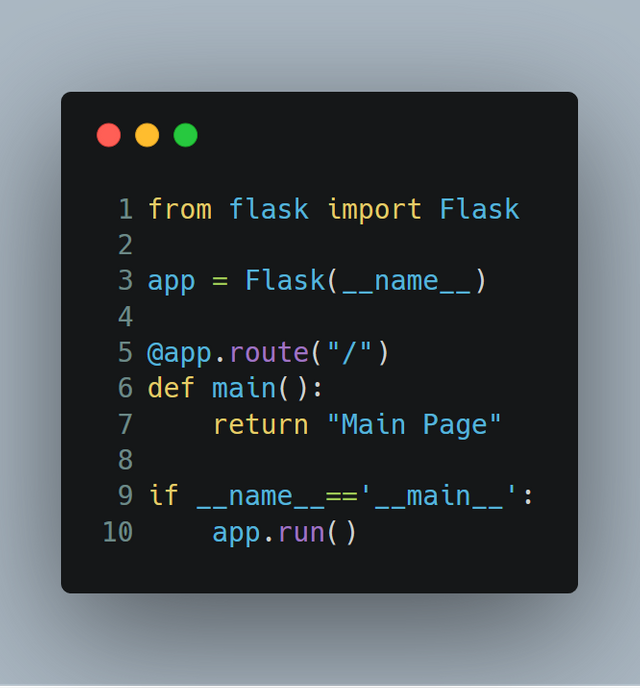
Open up PyCharm and create a new project, create a file called main.py. We will be entering the content below-

The first line imports the Flask object, then app = Flask(__name__) creates an instance of flask. @app.route("/") defines the function below's URL in the server. If you say wanted to make a flask website where www.home.com/mansion goes to the mansion page the line would be @app.route("/mansion"). We're creating a main page where it just returns the text Main Page into your web browser. if __name__=='__main__': is a standard line for python programmers to put all the code not in a function or initializing anything in for organization's sake. Run by right clicking the tab and Run 'main', after this first run, you will be able to just click the green run button in the upper right hand corner. Open a web browser and go to 127.0.0.1:5000. You will see the text Main Page.
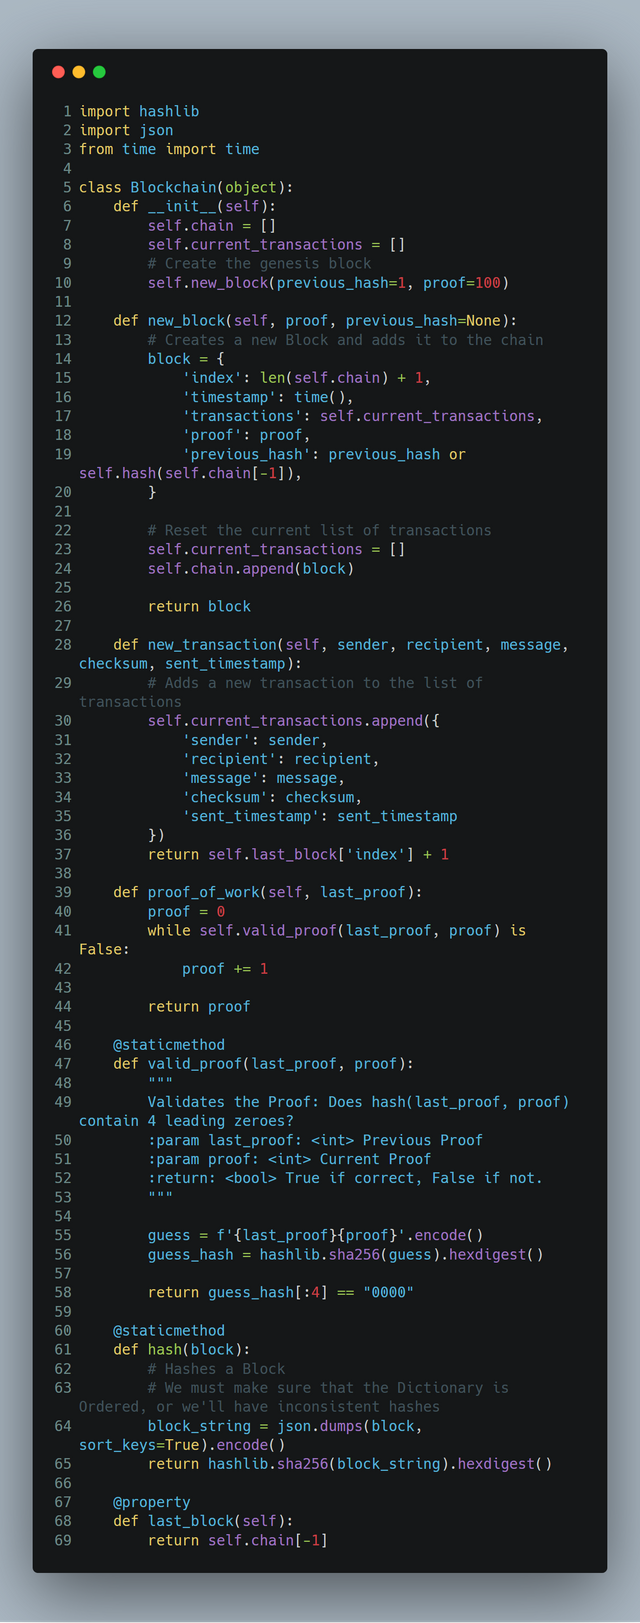
Now, we need to plan our blokchain out. We need a to address, a from address, a signature, timestamp, index, previous hash, the message, and the proof. Each user is given a set of credentials, a public key which is the user's address, and a private key which is only known by them for other to verify the messages are from you. Create a new folder called source to create a folder to organize your code in different files. Create a file called __init__.py which allows python to detect other python files in the folder. Another file in source called blockchain.py has the contents below.

Creating a class means you can create an instance to save variables between every time you declare it. The __init__ function is ran when the class is declared, here we're using it to start the lists we store our chain and transactions in. Then we call the new_block function and create the genesis block which is the first block in the chain and what all the block will base themselves on.
So, how on earth do we keep our messages private and how do we prevent people from submitting messages as another person? You see, we will be using RSA keys which allow you to have a public and private key. You can generate a public key from a private key but not vice versa. Anyone with a public key can encrypt a message, but to decrypt a message the public key is required. We can also hash our message, then apply the private key to create a checksum. Anyone can take the message, and create the hash and check it against the public key and checksum to verify. As long as the private key is kept secret, no one could decrypt your messages or pretend to be you.
So what's proof of work? I bet you noticed a lot of code mentioning it, and it prevents users from spamming the network constantly. Basically there's a simple SHA256 equation where you try to find a number using your computer. This is mining, and when I release this I might include a javascript miner in the HTML so any user on the webpage contributes and we get DOS as well as a crude super spam filter.

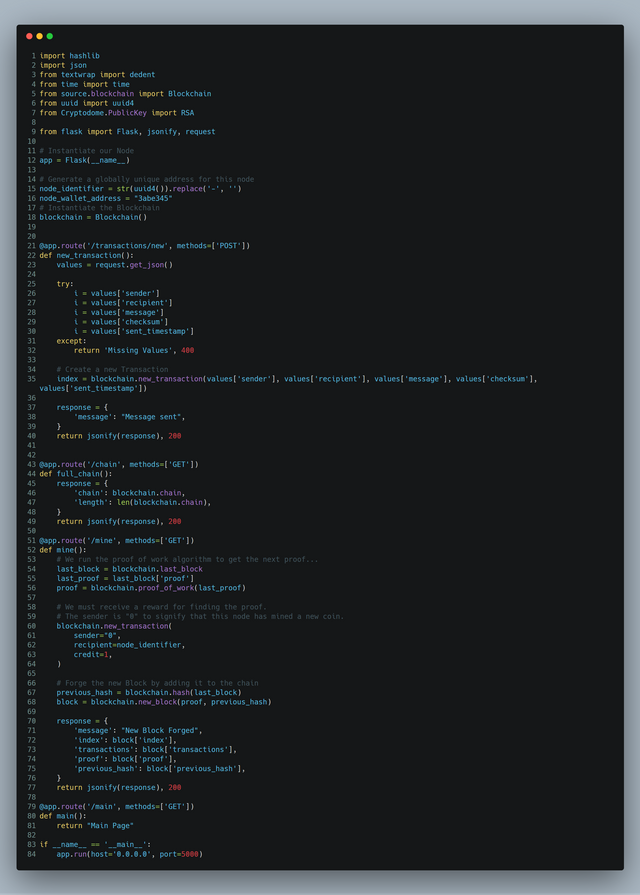
Above is the code to allow us to interact with the blockchain. It's very rough and not at all easy to use. But using a program such as postman you can submit GET or POST requests. By making a GET request to /chain, you can see the full blockchain. To create a new "transaction" which is a message being sent, you can submit JSON to specify a recipient, a sender, a message, checksum as well as a sent timestamp submit to /transactions/new. The url /mine tells the server to mine a block which gives itself credit.
If you play with this demo either on github or by coding it yourself, you'll see our concept works where we can put messages in the blockchain. There is no block verification, node registration, Consensus, GUI or key system yet, but we're getting there! In the next episode, now we know how we're doing everything, we can start putting together the final blockchain, then after create all those other things I mentioned. I will be moving quickly after this, fallow me to get the next part!