Ferrum Network FRM Purchase Guide
Dear Community,
Thank you for completing the KYC process! We are happy to report that a total of 1530 people submitted KYC. Of those, 1170 are on the whitelist.
Now we would like to explain the sale process that will occur through our partner Prima Block, but first some general information.
General Information
Time and Date: August 1st, 2019 at 12:00pm GMT (8:00am EST)
The sale will be split into 3 tiers with timing and personal limits as follows.
Tier 1 (high value supporters): 8:00–8:15 AM. Personal Limit: $1,000
Tier 2 (whitelisters): 8:20 AM EST — 8:55 AM, first come, first serve among whitelisters. Personal limit: $400
Tier 3 (anyone who did KYC — Gas War Lite): 9:00 — close, FCFS among all KYC participants. Personal limit: $3,000
Note on limits: the $3000 limit in the final round applies to all participants. So if a Tier 2 contributor maxes our their contribution, they have a balance of $400. Once the gas war starts they can add $2,600, but not more because they cannot exceed the $3,000 limit.
Minimum contribution: .15 ETH
Timing of Participation
There will be one official pool that only we control. We will open up the pool to the tier 1, tier 2 and tier 3 according to the timing below. Every person who has performed KYC has been categorized based on whether they are a tier 1, tier 2, or tier 3.
At 8:00 AM we will open it up to the approximately 30 people in tier 1. Only people in that tier can contribute. It will be impossible for others to contribute.
At 8:20 AM we will open it up to the whitelisters. Non-whitelisters will not be able to contribute.
At 9:00 AM we open it up to everyone else who has done KYC.
The Steps
Here are the steps to participate.
Step 1: Go to Official Ferrum Network Sale Site
Go to the official Ferrum Network Sale URL (to be released soon).
IMPORTANT: there may be people attempting to create a fake URL. However, Prima Block is closely monitoring their system and immediately shutting down any fake “Ferrum” ICO pools. There will be a single, secure URL communicated by the team in the near future. Please report any suspicious activity.
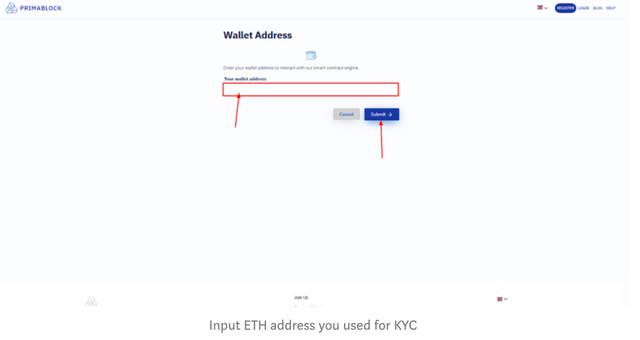
Step 2: Input ETH Address
Input the Ethereum address you used in the KYC process (it will be identified in your KYC confirmation e-mail). You MUST contribute using this address otherwise you will not be able to participate. Once you have input your ETH address, press “submit”.
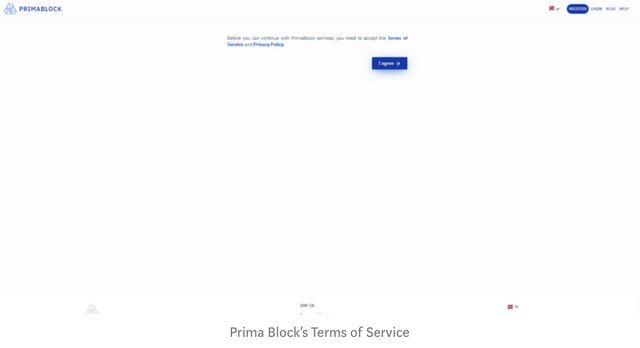
Step 3: Agree to Prima Block’s Terms of Service
You must agree to Primablock’s terms of service (TOS)
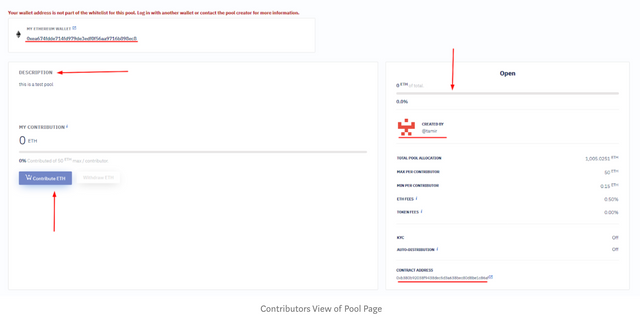
Step 4: Familiarize Yourself with the Pool Page and Press “Contribute ETH”
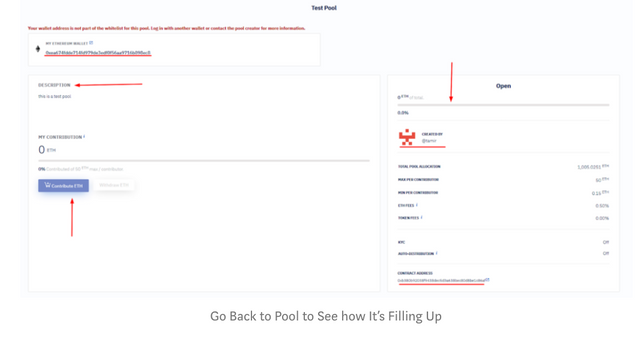
Before the sale begins, please familiarize yourself with the official Ferrum Network ICO pool page. Review all aspects of the page: a) description of pool; b) your contribution amount; c) the contribute button; 4) the amount of ETH in the pool, etc.
Note: Check the FRM smart contract address at the bottom right side of the page and make sure matches the official address that will be provided by the team. This will be another validation that you’re in the correct Ferrum Network ICO pool.
When you are ready, press “contribute ETH” to go to next step..
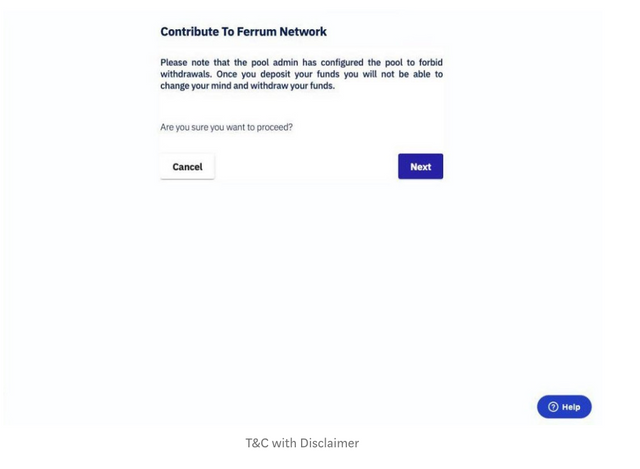
Step 5: Agree to Ferrum’s Terms and Conditions
After hitting “contribute ETH”, you will be directed to accept the terms and conditions.
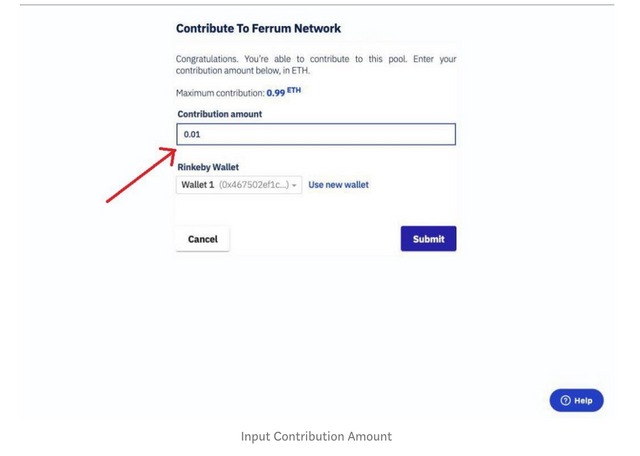
Step 6: Input Your Contribution in ETH
Input the value of your contribution in ETH. A maximum contribution will be displayed based on the tier that you are in (see above).
NOTE ON PRICE PEG: the ETH price peg will be determined 30 minutes before the sale using binance.com as the reference point and announced to the community.
Step 7: Select Your Wallet and Confirm ETH Address
Next, select which wallet you want to use, and confirm ETH address you used during the KYC process.
For the wallet, Metamask is highly recommended due to the speed and ease in participating in the sale. Anyway, click the appropriate wallet and proceed to confirmation page.
NOTE RE: ETH ADDRESS: you must use the same ETH address you used during the KYC process.
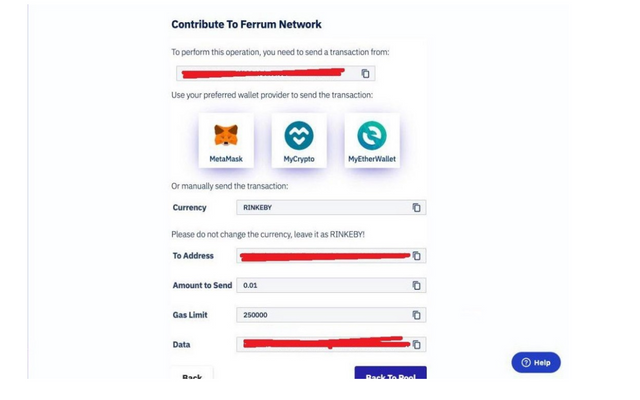
NOTE re: “Gas Limit:” You’ll see a field for gas limit. This is set by Prima Block, but is not that important for you because it is NOT the amount you will spend to increase the speed at which your transaction is processed (that is “gas fee” — see step 8).
For a full discussion on “gas limit” vs “gas price/fee” check out this article and this article.
Step 8: The Confirmation and Contribution
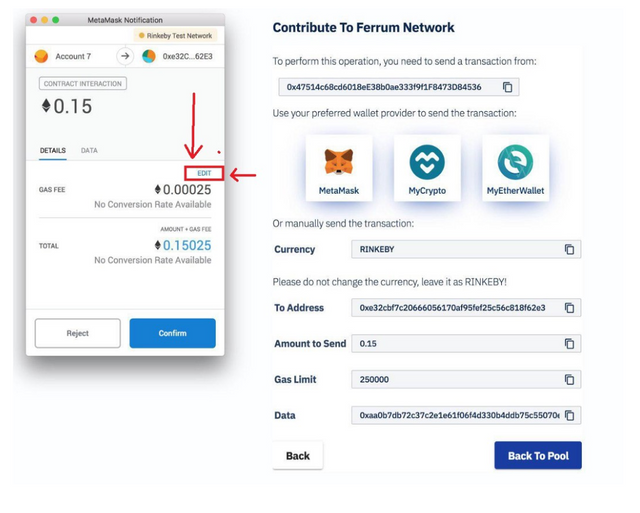
In this tutorial, we used Metamask as the wallet, so the Metamask confirmation screen appeared on the left corner of your screen.
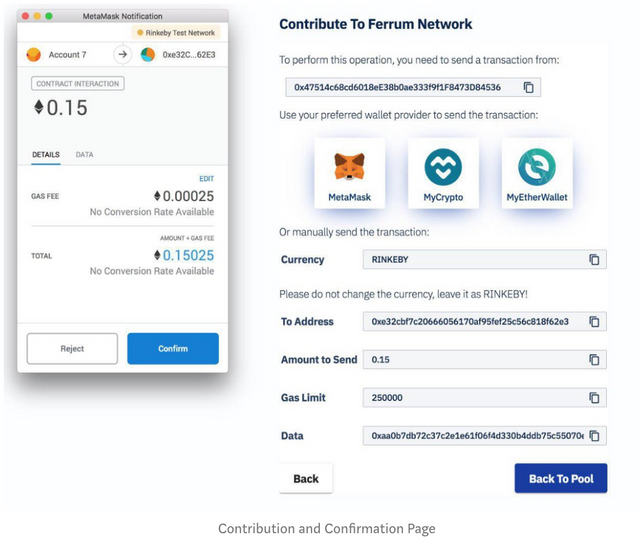
Here you will see the amount you will contribute, plus your gas fee.
IMPORTANT NOTICE RE: GAS FEE: you can increase the gas fee to increase the speed in which your transaction will be accepted. 50 “Gwei” is usually sufficient for a fast transaction, even during times of a gas war.
To increase gas fee press “edit” — this will take you to a page where you can increase the gas fee.
Gas fee is separate from the pool contribution, but you will need enough ETH in your wallet to pay for their contribution, plus enough ETH to pay for the gas costs. For more information, please see “Gas War” section of this guide.
After selecting your gas fee, you will see your total contribution amount: amount of ETH you will contribute, plus your gas fee.
Press “Confirm” to contribute to the pool.
Step 9: Back to Pool to See if Contribution Was Successful
After confirming your transaction, you’ll want to check if it was successful. So click “Back To Pool” and return to the pool screen and your balance will update on the Prima Block page. Another way to is to check the status of the transaction on Etherscan. If the transaction succeeded then it’s part of the pool!
Step 10: Wait for Next Tier to Open (if you want to contribute more)
For Tier 1 and Tier 2 members, you can also participate in Tier 3 — the gas war lite.
THE GAS WAR GUIDE
Tier 3 is a Gas War round and will begin at 9:00 AM EST. Everyone who did KYC and received a confirmation email can participate in this round.
Steps for Gas War
This example is using Metamask. If you’re using another wallet make sure you’re familiar with adjustments to the GAS FEE (GWEI) — this will determine how much weight your contribution will carry during the gas war.
This guide will begin from STEP 8 in the basic overview guide.
8.1 In Metamask, to adjust your GAS FEE (to increase transaction speeds), hit “Edit”
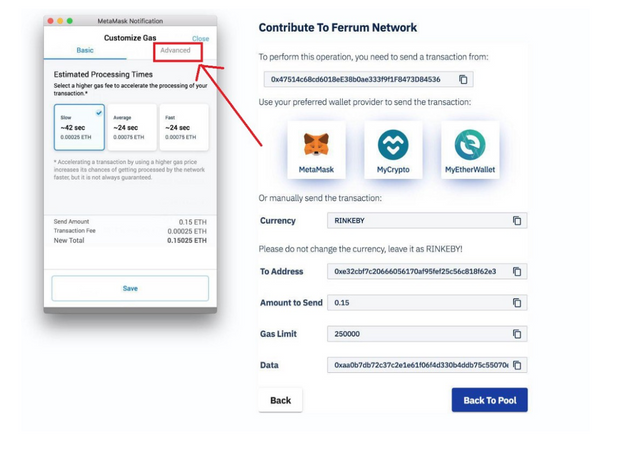
8.2. You will see “Basic” and “Advanced”. Select “Advanced to edit the GAS PRICE.
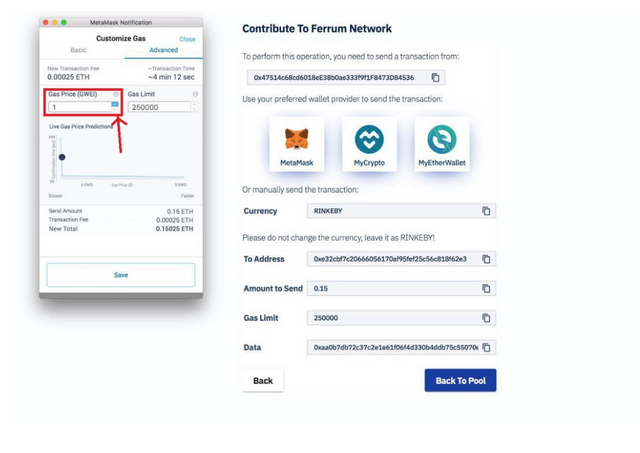
8.3 Adjust your GAS FEE to any specified amount. The higher the gas fee, the faster your transaction. There is no limit to gas fees.
8.4 After you adjust the GAS PRICE, hit “Save”. This will return you to the screen where you can then send your transaction.
Last Step
You’ve successfully completed in the Ferrum Network Sale! You can monitor the sale’s progress and distributions on the main Ferrum Network pool page at anytime.
What’s Next
An article on how the distribution will work will be released within the next few days.
Our CMs will be working around the clock to answer your questions. If you feel we missed anything in this guide, please let us know.
Thank you and good luck!
Very truly yours,
The Ferrum Network Team
Links:
Website: https://ferrum.network/
Telegram: http://telegram.ferrum.network
Twitter: http://twitter.ferrum.network
LinkedIn: http://linkedin.ferrum.network
YouTube: http://youtube.ferrum.network
Reddit: http://reddit.ferrum.network
Bitcoin Talk: http://bitcointalk.ferrum.network
Facebook: http://facebook.ferrum.network
Github: https://github.com/ferrumnet/
Instagram: http://instagram.ferrum.network