Fun way to create animated videos with HTML5 Canvas.
These are instructions for creating an autmated video from an HTML5 Canvas
You will need an HTTP server running PHP, on your local machine to do this. I've tried a few and recommend WAMP. If you attempt this with a public website, you will need a queue of sorts and the ability to wait for large amounts of data to upload.
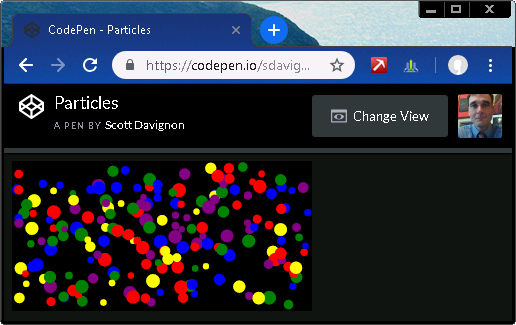
Start with a simple animation.
//Javascript

(function () {
    var canvas = document.getElementById('c'),
        c = canvas.getContext('2d'),
        w = canvas.width, h = canvas.height,
        p = [], clr, n = 200;

    clr = [ 'red', 'green', 'blue', 'yellow', 'purple' ];

    for (var i = 0; i < n; i++) {
        // generate particle with random initial velocity, radius, and color
        p.push({
            x: w/2,
            y: h/2,
            vx: Math.random()*12-6,
            vy: Math.random()*12-6,
            r: Math.random()*4+3,
            clr: Math.floor(Math.random()*clr.length)
        });
    }

    function frame() {
        // cover the canvas with 50% opacity (creates fading trails)
        c.fillStyle = 'rgba(0,0,0,0.5)';
        c.fillRect(0, 0, w, h);

        for (var i = 0; i < n; i++) {
            // reduce velocity to 99%
            p[i].vx *= 0.99;
            p[i].vy *= 0.99;

            // adjust position by the current velocity
            p[i].x += p[i].vx;
            p[i].y += p[i].vy;

            // detect collisions with the edges
            if (p[i].x < p[i].r || p[i].x > w-p[i].r) {
                // reverse velocity (direction)
                p[i].vx = -p[i].vx;
                // adjust position again (in case it already passed the edge)
                p[i].x += p[i].vx;
            }
            // see above
            if (p[i].y < p[i].r || p[i].y > h-p[i].r) {
                p[i].vy = -p[i].vy;
                p[i].y += p[i].vy;
            }

            // draw the circle at the new postion
            c.fillStyle = clr[p[i].clr]; // set color
            c.beginPath();
            c.arc(p[i].x, p[i].y, p[i].r, 0, Math.PI*2, false);
            c.fill();
        }
    }

    // execute frame() every 30 ms
    setInterval(frame, 30);
}());
Notice there is a function, called frame, that is executed every 30 milliseconds via javascript setInterval. This frame function represents a single frame of the animation in which each particle is adjusted and rendered into the image. The velocity is also reduced to 99% each frame, to cause the particles to gradually slow down.
Recording Frames
Creating a video will require the capture of each frame as an image. In HTML5 the canvas element allows access to this image data with the canvas toDataURL method. This method returns a base64 encoded stream of data as a URL which can be understood by the browser.
Using PHP we will extract the base64 string, decode it to binary, then write it to a PNG file named with the sequence number. Every time a new frame is rendered, the javascript code will send the frame data URL along with a serial number asynchronously to the web server. Each frame will be executed repeating the process until the sequence is complete. The final step of processing will require FFMPEG to combine the sequenced images into a video.
Webserver setup
Using a very simple PHP script we can extract the base64 data, decode it with the base64_decode function and save the binary data to a file with file_put_contents.
//PHP File to receive the recorded frame

<?php
$path = 'frames/';
if(isset($_POST['data']) && isset($_POST['i']) && is_numeric($_POST['i'])) {
    // split the data URL at the comma
    $data = explode(',', $_POST['data']);
    // decode the base64 into binary data
    $data = base64_decode(trim($data[1]));

    // create the numbered image file
    $filename = sprintf('%s%08d.png', $path, $_POST['i']);
    file_put_contents($filename, $data);
}
The $path variable should contain a path, with trailing slash, to where you want the images stored. This directory must be writable to your HTTP server.
An important note, extract the data part of the URL, with this format "data:image/png;base64,iVBOKGgoAAA..." Everything after the comma is the data. name the file using sprintf, the "%08d" part, prints the sequence number as 8 digits, 0 padding as necessary.
Modifying the JavaScript
With the web server side complete and running, we modify the JavaScript, add a counter variable to store the sequence number. This will be incremented for each frame.
    var canvas = document.getElementById('c'),
        c = canvas.getContext('2d'),
        w = canvas.width, h = canvas.height,
        p = [], clr, n = 200,
        // frame identifier
        counter = 0;
Now we need to add some code to the end of the frame function. This is where we will be making an AJAX request. Here, we create two new variables an XMLHttpRequest object and our data URL. We have also opened a new POST connection to our PHP script.
        var req = new XMLHttpRequest();

        // open a POST request to our backend
        req.open('post', 'saveframe.php');

        // capture the data URL of the image
        var data = canvas.toDataURL();
Now, we are going to put together our POST data in a URL encoded string. This includes two variables: data, an escaped version of our data URL and "i" the frame number. Note the use of counter++, which returns the current value and then increments it.
        // encode the data along with the frame identifier (and increment it)
        data = 'data=' + encodeURIComponent(data) + '&i=' + counter++;
      // set the appropriate request headers
        req.setRequestHeader("Content-type", "application/x-www-form-urlencoded");
        req.setRequestHeader("Content-length", data.length);
        req.setRequestHeader("Connection", "close");
We also need to specify what to do when the request is done. Here is where we either execute another frame or end based on whatever conditions we decide. In this example, I stop it after the 150th frame which is 5 seconds at 30 fps. You can replace counter < 150 with whatever condition you prefer.
        // handle request responses
        req.onreadystatechange = function () {
            // continue if request is done
            if (req.readyState === 4 && req.status === 200) {
                // if we have not finished recording, execute another frame
                if (counter < 150) {
                    frame();
                } else {
                    alert('done');
                }
            }
        };

        // send the data
        req.send(data);
In the original script, we had a setInterval to keep the animation going at a steady pace. Now that we have our frame function repeating itself on its own time, we replace the setInterval with a single function call to start the process.
    // start the whole process
    frame();
Creating Video
With everything in place, we can now execute the script. After waiting patiently for the process to finish, assuming everything is right, we will have a pile of PNG images in our server directory.
We can now convert these images in sequence to a video format. There are many programs that can do this, and I use (VirtualDub)[http://www.virtualdub.org/] for one-off animations. All you have to do is open the first image, set the framerate (~30 fps), choose a compression, then save as a video.
Conclusion
Here is the complete code, I hope you can use it as inspiration for your next animation project.
(function () {
    var canvas = document.getElementById('c'),
    c = canvas.getContext('2d'),
    w = canvas.width, h = canvas.height,
    p = [], clr, n = 200,
    // frame identifier
    counter = 0;

    clr = [ 'red', 'green', 'blue', 'yellow', 'purple' ];

    for (var i = 0; i < n; i++) {
        // generate particle with random initial velocity, radius, and color
        p.push({
            x: w/2,
            y: h/2,
            vx: Math.random()*12-6,
            vy: Math.random()*12-6,
            r: Math.random()*4+3,
            clr: Math.floor(Math.random()*clr.length)
        });
    }

    function frame() {
        // cover the canvas with 50% opacity (creates fading trails)
        c.fillStyle = 'rgba(0,0,0,0.5)';
        c.fillRect(0, 0, w, h);

        for (var i = 0; i < n; i++) {
            // reduce velocity to 99%
            p[i].vx *= 0.99;
            p[i].vy *= 0.99;

            // adjust position by the current velocity
            p[i].x += p[i].vx;
            p[i].y += p[i].vy;

            // detect collisions with the edges
            if (p[i].x < p[i].r || p[i].x > w-p[i].r) {
                // reverse velocity (direction)
                p[i].vx = -p[i].vx;
                // adjust position again (in case it already passed the edge)
                p[i].x += p[i].vx;
            }
            // see above
            if (p[i].y < p[i].r || p[i].y > h-p[i].r) {
                p[i].vy = -p[i].vy;
                p[i].y += p[i].vy;
            }

            // draw the circle at the new postion
            c.fillStyle = clr[p[i].clr]; // set color
            c.beginPath();
            c.arc(p[i].x, p[i].y, p[i].r, 0, Math.PI*2, false);
            c.fill();
        }

        var req = new XMLHttpRequest();

        // open a POST request to our backend
        req.open('post', 'saveframe.php');

        // capture the data URL of the image
        var data = canvas.toDataURL();

        // encode the data along with the frame identifier (and increment it)
        data = 'data=' + encodeURIComponent(data) + '&i=' + counter++;

        // set the appropriate request headers
        req.setRequestHeader("Content-type", "application/x-www-form-urlencoded");
        req.setRequestHeader("Content-length", data.length);
        req.setRequestHeader("Connection", "close");

        // handle request responses
        req.onreadystatechange = function () {
            // continue if request is done
            if (req.readyState === 4 && req.status === 200) {
                // if we have not finished recording, execute another frame
                if (counter < 150) {
                    frame();
                } else {
                    alert('done');
                }
            }
        };

        // send the data
        req.send(data);
    }

    // start the whole process
    frame();
}());