Disaster Preparedness for the Apocalypse: How to Prepare for any Disaster
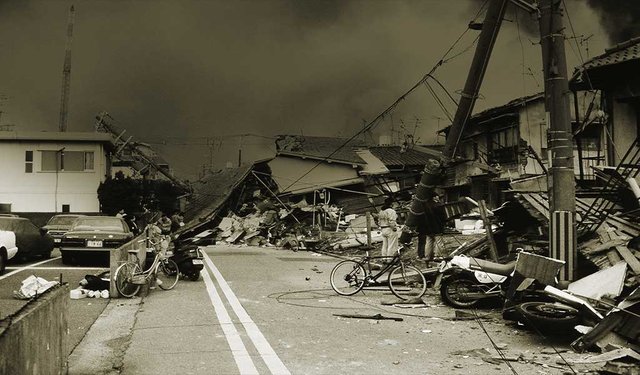
Disaster Preparedness
 The likelihood of a Zombie Apocalypse, such as, "The Walking Dead," is pretty much zero. I know. It's disappointing. Who wouldn't want to walk around annihilating dead people with a crossbow? Right? Okay, not really or course.
I know. It's disappointing. Who wouldn't want to walk around annihilating dead people with a crossbow? Right? Okay, not really or course.
However, setting aside fantasy, disaster occurs. And while others may find comfort in the fact that a major disaster hasn't hit yet, the Sheepdog Man knows better. He is ready, driven; prepared. (What is a Sheepdog Man? Read more here).
To Protect and Provide
That's the crux of it. If you take the commitment to protect and provide for your family seriously, you will do it now, when all is well, and also prepare to do it then, when the proverbial SHTF.
The Historical Default
Sadly, many people suffer normalcy bias. They think that because they have enjoyed peace and prosperity till now, such is the default. It is not! I will never forget what one of my professors said,
"If you look at world history, the default has been either chaos, famine, war, tyranny or a combination of these. It's only a matter of time until the US enters the default once again. Additionaly, most of the world is experiencing the default even now."National catastrophes such as an EMP, solar flare, nuclear war, viral outbreak, asteroid, currency collapse or hyperinflation could happen at any time.
Additionally, a small local catastrophe such as a flood, hurricane, earthquake, extreme cold, or civil unrest is likely as well. Also, personal tragedies like sickness, injury or job loss occur too often.
Therefore, the Sheepdog Man, understanding the historical default, and because of his love for family and community, prudently masters the art of disaster preparedness.
Starvation and Dehydration are Bad Way's To Die
Let's take a look at one of the scenarios listed above as an example.
You are racing home with your kids because there is a hurricane warning. It's only been thirty minutes since you had lunch. However, one of the kids in the backseat yell's out, "Hey Dad, I'm hungry!"
Now fast forward to three days since the hurricane hit. You've run out of food, the electricity is still down, and you are almost out of drinking water.
Jump to two weeks since there was anything in the grocery store. One week since you realized it was too dangerous to seek help from FEMA.
You, my friend, are in a world of hurt.
You start to wonder, "How long can we survive without food and water?"
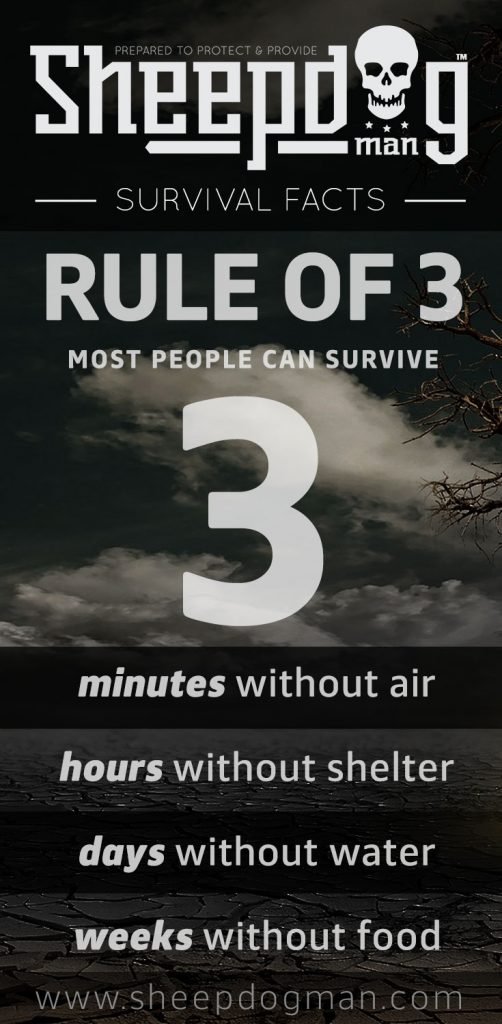
Remember the rule of 3. Most people can live 3 minutes without air, 3 hours without shelter (in a harsh environment), three days without water, and three weeks without food. Despite this possibly helpful rule, some people have survived up to 10 days without water, and others have survived up to 73 days without food.
Dehydration and Sickness from Contamination are Serious Threats
More important than food, clean drinking water is an essential of life. One hour without water, the body becomes thirsty. Twelve hours without water, dehydration has begun to set in. Twenty-four hours without water, mental capacity weakens. Three days without water and you can perish.
Potential contamination dangers include Cholera, Hepatitis A, Giardiasis, and chemical pollutants.
Never Ration Water - the effects of dehydration far outweigh the benefit of saving water for later. Sometimes the effects of dehydration can overtake a person so swiftly they have no time to react. There have been reports of people dying from dehydration with a full water bottle right by their side. A state of unconsciousness can occur with little warning. Don't guzzle, drink in sips, be methodical and if you do find water after being dehydrated drink it slowly. Drinking too quickly can cause your stomach to go into convulsions, and you will lose more fluid by vomiting. Stay hydrated my friend!
Bottom line, everyone needs water, and while the human body can do some amazing things to keep going without food, you don't want to go very long without food and here's why:
The Effects of Starvation
6 HOURS AFTER EATING
After we eat, our bodies digest food and break down glycogen, which are the molecules that store energy. This process produces glucose — a molecule that is used as a major source of energy and absorbed into the bloodstream.Glucose is used as our primary energy source if we’re on a normal eating schedule. This keeps us feeling well fed and happy, because glucose goes to our liver and muscles, and fatty acids get stored for later use. Glucose fuels us for about six hours, and once it runs out, we begin to feel that “hangry” state when we’re hungry and grouchy.
STARVATION MODE: 3 DAYS OF NO FOOD
Your glucose stores may last you for up to 24 or 48 hours, though they will mostly be depleted after six hours. Then, not only will you be hangry, but your body will be entering a state of ketosis, which involves elevated levels of ketone bodies in your system. Ketone bodies are produced from fatty acids when liver glycogen is entirely depleted, and are used for energy. Typically, if you’re fasting or starting a keto diet (a low-carb diet), your body enters ketosis. Sometimes this diet is used as a medical intervention to treat intractable epilepsy.However, your brain can’t be fueled by fatty acids as its only source of energy, so it will continue to use the last remaining glucose stores in your body. Your brain actually uses 120 grams of glucose every day, which is a significant amount — so when glucose is depleted, your body has to figure out a back-up plan for the brain.
On day three, your brain will turn to the energy from ketone bodies — getting about 30 percent of its energy from them. By the time it’s day four, however, your brain will be getting nearly 70 percent of its energy from ketone bodies.
EATING NOTHING FOR OVER 72 HOURS
The rough part happens after 72 hours of no eating — this is the stage of autophagy. Once the fats are broken down, your body turns to breaking down protein in muscles, essentially wasting away your muscles. At this point, your brain’s requirement for glucose will have dropped from 120 grams per day to only 30 grams. But your brain will need to start getting energy from protein next. Breaking down protein and releasing amino acids into the bloodstream will produce more glucose; this transformation takes place in the liver, and your brain will be fueled by its much-needed glucose once again. Regardless, though your brain will be able to survive from protein, your muscles will slowly disappear.Interestingly, the greatest amount of protein loss occurs during the first 72 hours. Afterward, the body adapts to conserve protein. Essentially, your metabolism slows down so much to the point that your body uses the smallest amount of energy as possible.
[Source: medicaldaily.com]
Okay, enough of that starvation stuff, let's look at some general disaster preparedness steps, that you can take now, to prepare for any disaster.
Step One: Create a Water Access Plan
A retired military man, when asked why he was moving out of town said, "I am moving so that I can have access to a well. If I don't control my access to water, I don't control my life."He's right. How long can you survive if your water is shut down or contaminated?
Access to good, clean drinking water is an essential part of any disaster preparedness plan.
Potential Water Sources
- Water storage
- Wells
- Lakes, ponds, rivers, streams
- Rain
- Trees, plants, the air
Water Storage
Plan to have water storage solutions in place as well as the ability to take some water with you in a bug-out situation.How Much Water is Needed?
In keeping with the FEMA guidelines, store one gallon of water per person per day, with a minimum of two weeks' supply. WOW!Some simple math to put things into perspective.
1 gallon of water = 8.36 lbs. So if you wanted to store eight weeks' of water, you would need: For One Person: 56 gallons = 468.16 lbs. Two People: 112 gallons = 936.32 lbs. Four People: 224 gallons = 1872.64 lbs.
The standard bathtub, which measures 60 inches long by 30 inches wide, holds approximately 35 to 50 gallons of water. This means that if you have a chance to fill your entire bathtub before an emergency hits, one person can survive eight weeks', two people four weeks', and four people two weeks,' at best.
Let's say you want a three-month supply for four people. You need approximately 448 gallons of stored water.
Clearly, storage is great for short-term situations. However, long-term situations will require a permanent water source.
Small, transportable, bug-out ready options.
Foil Water Disaster Preparedness Packets
Foil Water Bags. These little bags are fantastic for medium to longer term storage.
On a recent hunt, we ran out of drinking water and decided to use a few of these foil water bags that had been in our camp box for a couple of years. The water tasted great.
The foil is thick, and there is enough room for expansion when frozen.
They're great for throwing in packs, the glove box or to store in boxes. Recommended shelf life is five years. However, they will still be safe well beyond that - though the water will probably taste like metal.
The FDA does not require an expiration date on water. The "use by date" is something manufacturers put on by choice because they are concerned with users "enjoying" the taste. But who the heck cares about taste if it saves your life.
At 64 packs for $28.95, a two weeks' supply (for one person) or 448 packets (14.77 gallons) = $202.65. You can get them here.
Blue Can Disaster Preparedness Water
Blue Can - Premium Emergency Drinking Water. With a shelf life of over 50 years, these cans are fantastic for long-term storage. They are hermetically sealed, tested BPA Free, No Chlorine or Fluoride purified with 12-step filtration, reverse osmosis, and UV light treatment.
At 24 cans for $47.95, a 2 weeks supply (for one person) or 168 cans (15.75 gallons) = $335.65.
Currently, you can only purchase these here.
Larger, tap water options
AQUATANK2 Water Storage BladderThese bad boys are available in 30, 60, 150, and 300 gallons. They are super durable, a great way to transport water, work well under the seats of some vehicles, and can be thrown in the bed of a truck or even on a roof rack (if you're careful).
BPA free with an inner lining made from 100% Food-Grade TPU (Polyurethane) and an Outer Shell of Durable Nylon you can't go wrong with these. Get them here.
waterBob Emergency Drinking Water Storage. In the opening scene of The Road, the main character begins to fill the bathtub with water. His wife asks why he's taking a bath and he simply says "I'm not."
While filling the bathtub, and anything else you can in an emergency situation is a good idea, it's not the most sanitary. Water stored in an open bathtub, with dirt, soap film, potentially harsh cleaning chemicals, and exposure to debris will spoil and become useless.
The waterBob solves these problems and provides an easy way to fill the tub with up to 100 gallons (most tubs hold 35 to 50 gallons) of clean water that can be used for drinking, cooking, washing and flushing. It keeps water fresh and clean for up to 16 weeks and includes a siphon pump to easily dispense the water into jugs or pitchers. Pretty sweet, don't you think?
The waterBob is a must in an apartment, or anywhere else storage is limited.
The waterBob provides a safe and easy way to fill your tub in an emergency situation.
Water Barrels. For those who have space, these 55-gallon, food-grade, water barrels are an affordable way to store a large amount of water for long-term disaster preparedness. II recommend that you replace the water every five years.
At 55 gallons per barrel, one barrel will last one person 55 days.
You can get your barrels here.
To store water in the barrels properly, be sure to use a food grade hose when filling, add water preserver (some say it's not necessary if using city water which already has chlorine). Don't forget a pump and smaller bottles such as the Aqua-Tainer for transport.
Wells
For a sustainable, long-term, stay-in-place water source, a good well is the best possible scenario. If your pump requires electricity, be sure to have a grid-down solution in place. Get a hand pump and invest in a generator, or even better, solar power to run the electric pump.
Lakes, Ponds, Rivers, Streams
Depending on where you live, you might have access to natural water sources like lakes, ponds, rivers, and streams. If you do, figure out where they are and how you can access them now. Remember, it is never safe to drink from these sources without first purifying the water and make sure you think about how you can transport the water from the source to your home.
Trees, Plants, the Air
These are last-ditch options. But hey, if you find yourself dehydrating to death, they are worth trying.
Trees and plants
To gather water from trees, tie a plastic bag around a branch or couple of branches with leaves and let sit overnight. In the morning collect the water that has built up inside the bag from condensation.Collect morning dew from trees and plants by wiping dew from wet surfaces with an absorbent cloth, and then wring the water out. You can also tie cloths around your ankles, or use clean socks and then walk through wet grass to quickly collect water.
There are a number of plants that contain water, such as agave, aloe, and most species of barrel cacti. Learn which of these plantsFsky exist in your region now.
The Air
Wait a second. You're saying I can get water from the air. Yes, sir. You can. There are at least two methods for pulling water from the air.Solar Still
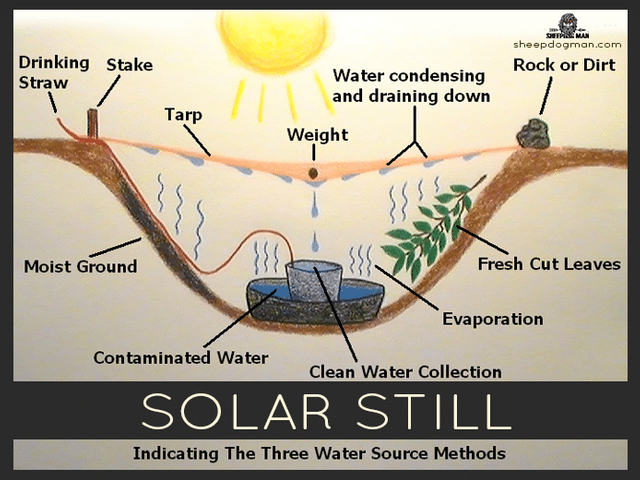
Okay, so a solar still doesn't exactly pull water from the air, but it does use the process of heat transfer from the sun and evaporation and cooling to distil water from the ground or other contaminated sources of moisture. Here is a simple method to build such as till.
Dig a hole, as large as you can to accommodate your tarp or sheet of plastic when laid over the hole. Put any available contaminated water in the hole as well as any other sources of moisture such as leaves or grass. Place a cup or pan in the center of the hole, and throw a tarp or piece of plastic over the hole. Secure with stakes or rocks. Put a rock or other weight directly over the cup so that when the water evaporates onto the bottom surface of the tarp, it will run down to the center to the weight and drip into the cup below.
Dehumidifiers
Dehumidifiers do pull water from the air. They begin by using a fan to draw in ambient indoor air. This air runs over a condensing coil, which, like a glass of cold water, pulls moisture from the air using condensation. The drier air is then passed through a warmer coil that returns it to approximately room temperature. The accumulated liquid condensation, called condensate, is collected in a bucket or piped outdoors through a tube.Please keep these issues in mind when considering the use of a dehumidifier. First, you will need electricity. Secondly, the water from a typical dehumidifier contains contaminants and must be purified. Thirdly, distilled water contains no minerals, which may not be the healthiest for long-term use. You may want to add minerals back into the water.
There are systems available on the market, which do produce safe drinking water. Two such models suitable for home use are Air2Water's dolphin line, which the company claims can produce clean water at the cost of $0.16 to $0.52 per gallon, and RainCloud's C-15, which costs about $1,000 wholesale.
Rain
Rain Barrels. What better way to collect water than from the sky? Whoda thunk?It's great to know that nothing nasty has been added. And it's free once you have the equipment.
100-gallon Barcelona Barrel from Algreen.
We recommend a diverter like the Rain Barrel DiverterPro Kit from Fiskars. The Diverter channels rain barrel overflow away from your house to protect the foundation offers improved rainwater capture rate during heavier rains, allows installation of rain barrels on both sides of the diverter, and filters debris, so they never reach your rain barrel.
If you are the kind of person who cares your barrel's being attractive and conspicuous, check out the 100-gallon Barcelona Barrel from Algreen.
Because the water comes from the sky, runs through your rain gutter system and is collected in a barely-protected barrel outside, it's a good idea to filter and purify the water before drinking. Some people simply use the collected water for watering their garden and plants.
Many preppers include barrels in their disaster preparedness plans primarily as a non-drinking source.
Whatever the case, keep in mind that some drought-prone states have regulations on methods and require permits, and some states (like Texas) give a tax credit for buying rain collection equipment. Be sure to check the regulations for your state.
Water purification methods
Distillation
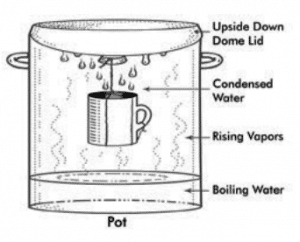
If you have a highly suspect source of water, use distillation. Distillation is the only method that will remove microorganisms, as well as heavy metals, salts, and most chemicals.Distillation involves boiling water and then collecting the vapor that condenses back to water. The condensed vapor will not include salt or most other impurities. To distil, fill a pot halfway with water. Tie a cup to the handle on the pot's lid so that the cup will hang right side up when the lid is upside-down (make sure the cup is not dangling into the water), and boil the water for 20 minutes. The water that drips from the lid into the cup is distilled.
Another way you can distil water is to boil the water in a large pot, cover the pot with a clean cloth, so it catches all the steam. If you don't have a cloth, you can also use moss. From time to time wring out the cloth or moss into another container.
Boiling
When distilling is not an option, and there isn't as much concern about dangerous chemicals, boiling is the next best thing. Make sure you have a backup plan that includes pots, pans, and propane stove or some other way to boiling water.When boiling in a large pot or kettle, bring water to a rolling boil for one full minute, keeping in mind that some water will evaporate. Let the water cool before drinking.
Boiled water will taste better if you put oxygen back into it by pouring the water back and forth between two clean containers. This will also improve the taste of stored water.
If you find yourself in a scenario where you have a paper bag but not a pot in which to boil water, I present to you a life hack from a 1950s issue of Modern Mechanix magazine.
Chlorination
Potable Aqua
You can use household bleach to kill microorganisms. Use only regular household liquid bleach that contains 5.25 to 6.0 percent hypochlorite. Do not use scented bleaches, color-safe bleaches, or bleaches with added cleaners. Because the potency of bleach diminishes over time, use bleach from a newly opened or unopened bottle.
Purification Tablets
Store some iodine and sodium chlorite tablets for purification as well.
Filters
Royal Berkey

There are many excellent filtering options available. We recommend starting with the smallest, easily transportable options such as the LifeStraw Steel and the Katadyn Hiker Pro Microfilter for you bug-out-bag. Moving up from there to the LifeStraw Mission High-Volume Gravity-Fed Water Purifier or the DayOne Response Water Bag for base camp or short-term water filtration needs.
For a long-term, stay in place, everyday solution nothing beats the Berkey systems.
Step Two: Create a Food Access Plan
Second only to water is food. Let's examine some options for you food disaster preparedness plan.
Potential food sources
Barter and the purchase of food from neighbors
While this should be part of your plan, it will not be the most reliable source. Many variables will determine whether or not acquiring food from neighbors is even possible. Lack of Security, lack of items to barter with and lack of the availability of food from neighbors are unknown variables that make placing to much stock in this option unwise. That said, do your research in advance. Learn where the farms, gardens, and neighbors with food near you are? Store small items that will be good for barter. Consider what items those who have a surplus of food might want, need or be willing to trade.
Hunting, trapping, fishing, and foraging
These activities should also be part of your disaster preparedness plan. However, the opportunity and safety of doing these things will depend significantly on where you live and what skills you have acquired. Once again, this is not the most reliable source for consistent food. That said, learning these skills in advance is prudent. Learn now how-and-where to hunt, trap, fish, and forage. You will not be able to acquire these skills or the equipment they require on the fly.
Farming, gardening, and raising livestock
Get out there and plant something. Don't wait until you "have to." Don't have farmland? Start a garden, or look into chickens, rabbits or fish farming. At some point - in the event of a very long and disruptive disaster - farming, and raising livestock will have to become the primary "long-term" food production plan. But even in the event of a small, short-term event like job loss, gardening and small food-source animals like chickens and rabbits can go a long way to help mitigate food costs.
Food storage.
Finally, food storage should most definitely be part of your disaster preparedness plan. In fact, for most people, this should be the primary part of the "short term" plan, and that is why it's number one. It's easy, safe, and anyone can do it.So let's dig a little bit deeper into food storage.
There are many questions to consider when planning food storage. We can't cover them all, but here are some important things to factor: shelf-life, the number of people to feed, nutrition, transportability, are water and cooking needed, and can this food be palatable for a sustained period?
Additional food storage facts to consider
Freeze-dried food has a very long shelf life. Typically 20 to 30 years. The process removes 98% of the water content from food and retains 100% of the nutritional content. Freeze-dry at home with this Instructable.
Dehydrated food does not last as long as freeze-dried food -- typically 1-8 years. The process removes only 75% of the water content. The remaining water reduces shelf life. Therefore, manufacturers often add salt, sugar, and other preservatives. Of course, if you are dehydrating at home you may or may not use additives. The process removes 50% of the foods nutritional content (because of the heating).
Vacuum-Packed and naturally durable dry foods will last many years when properly packaged and stored. These items include rice, beans, sugar, flour, salt, pepper and dried herbs.
Canned Food can last a very long time. Typical suggestions are 1 1/2 to 5 years. However, just how long canned food will be safe to eat is a little bit of a matter debate. In this article from NPR, it suggests that it is most likely still safe to eat old canned food. And the FDA consumer published this story in 1990,
"The steamboat Bertrand was heavily laden with provisions when it set out on the Missouri River in 1865, destined for the gold mining camps in Fort Benton, Mont. The boat snagged and swamped under the weight, sinking to the bottom of the river. It was found a century later, under 30 feet of silt a little north of Omaha, Neb.Among the canned food items retrieved from the Bertrand in 1968 were brandied peaches, oysters, plum tomatoes, honey, and mixed vegetables. In 1974, chemists at the National Food Processors Association (FPA) analyzed the products for bacterial contamination and nutrient value. Although the food had lost its fresh smell and appearance, the NFPA chemists detected no microbial growth and determined that the foods were as safe to eat as they had been when canned more than 100 years earlier." (Read full story)
Canned Food Tips
- Check the best by date, or even better get your canned food online
.
- Canned meat tends to have the longest shelf life.
- Never buy dented or damaged cans.
- Store in a cool (40 to 70 Degrees Fahrenheit), dry, dark place.
- If the can is bulging, if it spurts when opened, if there is a bad odor or mold, throw it out.
An essential item is a quality can opener. We highly recommend the (Made in the USA) EZ-DUZ-IT 3028 Deluxe Can Opener $8.99. We have been using this can opener for many years and can guarantee it is well worth the investment. Get two or three. Throw one in the bug-out/camping box.
And now for the most important step of all
Step Three: Start Your Disaster Preparedness Now! Don't Wait!
Step Four: See Step Three
One other thing
Don't Wait!
Well, that's a wrap on the Sheepdog Man disaster preparedness guide.If you like this post, don't forget to upvote, comment and resteem it. Also make sure to follow @sheepdogman to stay updated about future posts.



Congratulations @sheepdogman! You have completed some achievement on Steemit and have been rewarded with new badge(s) :
Click on any badge to view your own Board of Honnor on SteemitBoard.
For more information about SteemitBoard, click here
If you no longer want to receive notifications, reply to this comment with the word
STOPBy upvoting this notification, you can help all Steemit users. Learn how here!