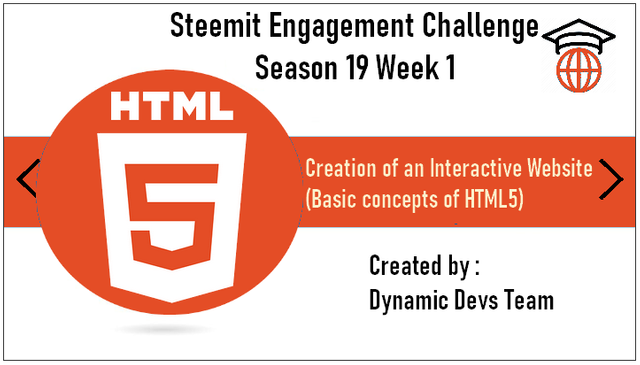
SEC S19W1 || Creation of an Interactive Website (Basic concepts of HTML5)
Welcome to the First Lesson of Season 19 of the Steemit Engagement Challenge!
This first week, we'll explore the basics of creating HTML5 documents and using HTML forms. This lesson is designed to give you a solid understanding of the structure and syntax of an HTML5 document, as well as the skills to create interactive forms, essential for developing effective, well-structured websites.

Basic Structure of an HTML5 Document
HTML documents are plain text documents saved with a .html or .htm file extension rather than a .txt file extension. All HTML documents have a mandatory minimum structure that includes the declaration and the following elements:
< !DOCTYPE html >, < html >, < head >, and < body >.
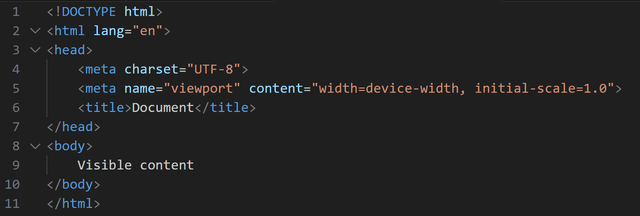
The document type declaration, or < !DOCTYPE html >, informs web browsers of the version of HTML used and is placed at the beginning of the HTML document. A declaration for a document written in HTML5 is simply < !DOCTYPE html >.
After the document type declaration, the < html > element marks the start of the document.
Inside < html >, the < head > tag contains the document's header, including all metadata (information about the web page). The content inside the < head > element is not displayed on the web page itself. Instead, it can include among other things:
< title >which is the title of the web page that appears in the browser's title bar. It is the only element in< head >that has a visual effect.
Example:
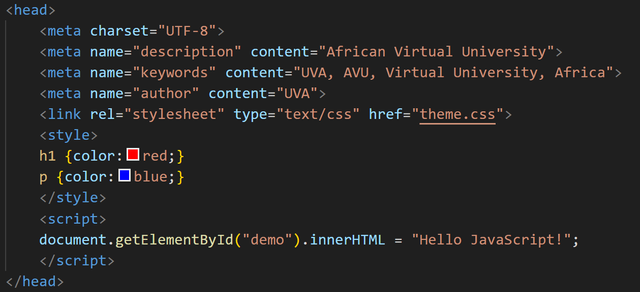
The < link > element refers to a data resource like a CSS file.
The < meta > element provides additional information about the page, such as encoding, page summary, and instructions for indexing engines like Google.
The < style > element contains CSS code directly within the web page.
The < script > element allows the inclusion of JavaScript code in the page or references to a file containing JavaScript code.
The following code gives an example of < head > even though none of these elements are strictly mandatory.
The final series of tags < body > and < /body > surrounds all the content on the web page that is intended to be displayed, such as headings, paragraphs, images, tables, etc. It has interesting attributes like background, which allows setting an image or color as the web page background.
Basic Syntax of HTML5
Titles and Paragraphs
< h1 >to< h6 >: Heading tags, with< h1 >being the most important.< p >: Paragraph tag.
Lists
< ul >: Unordered list.< ol >: Ordered list.< li >: List item.
Links and Images
< a href="URL" >Link text< /a >: Creating hyperlinks.< img src="url" alt="image description" >: Inserting images.
Tables
< table >: Table container.< tr >: Table row.< td >: Table cell.< th >: Table header cell.
Forms
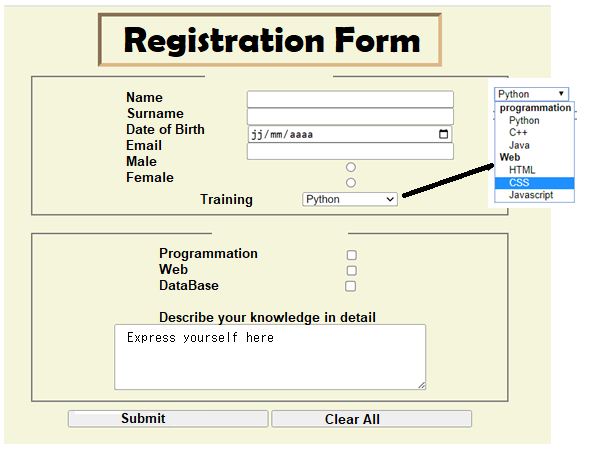
Web pages built in HTML allow presenting and disseminating information from a web server to a client browser. A client-server "dialogue" is established when the client can, in turn, send information to the server, particularly through forms:
- Gathering information using controls in an HTML form
- Sending information to the server
- Processing information by the server (using a suitable language such as PHP or Perl)
- Possible return of HTML information to the client (response, acknowledgment of receipt, request for clarification, etc.)
A page can include one or more forms in its < body > section. All form controls must be enclosed between < form >…< /form > tags:
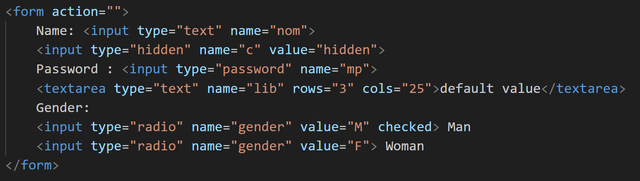
Text Field
A text field allows inputting any type of data. Here it is in its "minimal" version:

The name attribute is mandatory to allow the server, which processes the values, to retrieve these values from the name assigned to them (two controls in the same form cannot have the same value for the name attribute).
The message from the placeholder disappears when the cursor is placed in the field (which is the case here due to autofocus): it appears when the field is not selected, and no content has been entered. Placeholder, autofocus, and required are HTML5 attributes not yet recognized by all browsers.
The default attribute allows specifying a default value in the field (which the cursor's arrival in the field does not delete): if there is no re-entry, this value will be transmitted (whereas placeholder does not indicate a value).
The < label > tag has semantic value (identifying form labels), its for attribute refers to the text field's id (which can have the same value as name), allowing the cursor to be sent to the field when the label is clicked.
Presenting Form Controls
Hidden Field
It can be used to store (and transmit) values that do not need to be displayed on the screen (but are visible in the source code).

Password Field

Long Text Field

The appearance of the multiline text field can be configured using the rows (lines) and cols (columns) attributes or with CSS (properties width and height).
Radio Buttons
They allow making a single choice (conditioned by the same value for the name attribute) among proposals. The optional checked attribute determines the preselected value.

Checkboxes
They allow making one or several choices among a limited number of proposals; the choices made can be stored in an array (attribute name[]) or each checkbox can have its own name attribute value.

Dropdown List
It allows making a single choice among a large number of proposals.
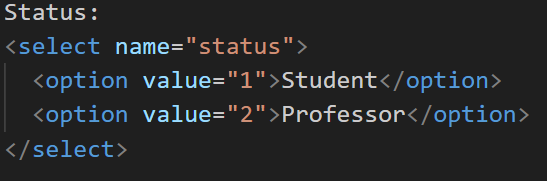
The value attribute indicates the returned value.
List Box
It allows displaying several (according to the size attribute) proposals. The optional multiple attribute allows multiple selections (the name attribute must then designate an array).
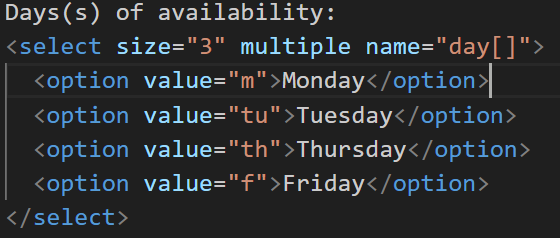
The optional selected attribute of the < option > tag would allow preselecting an element of the list.
File Upload
It allows searching for a file to send as an attachment.

Reset Button
It resets all form controls to empty or their default values.

Submit Button
It sends the form data to the server for processing by the script specified in the action attribute of the < form > tag.

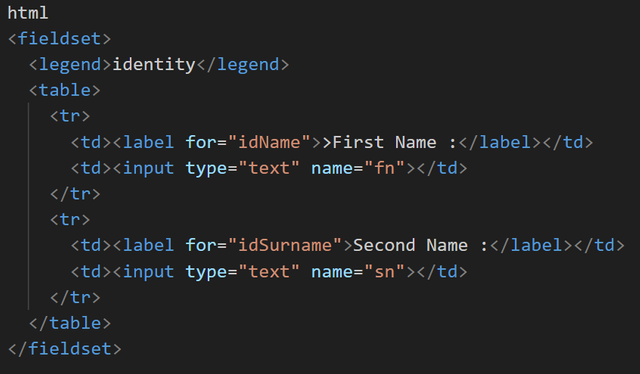
Enhanced Input Fields
Grouping form fields by theme.
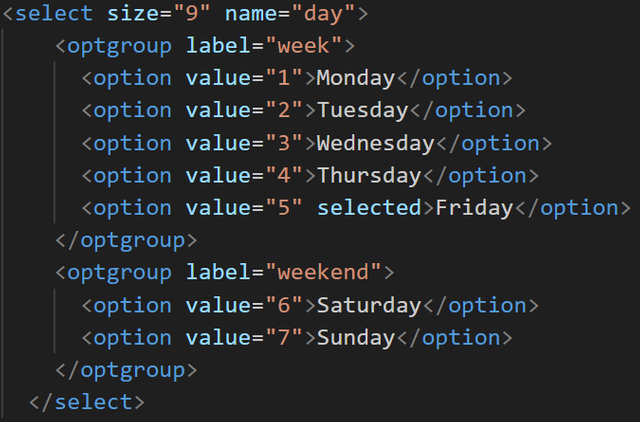
Group labels (week and weekend) are not clickable.
Suggestion List
This type of value is most often fed from values already recorded in a database.
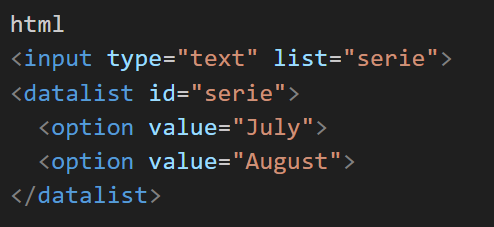
Note: if "August" is entered, it will then be proposed twice (once by the suggestion list, once by the browser's cache memory).
HTML Code Snippet
Output

Progress

Homework :
1. Quiz
Which tag is used for the most important headings?
- a)
< title> - b)
< h1> - c)
< p>
- a)
Which tag is used to create a paragraph?
- a)
< paragraph> - b)
< p> - c)
< para>
- a)
Which tag is used to insert an image?
- a)
< image> - b)
< img> - c)
< src>
- a)
Which CSS property is used to change the text color?
- a)
font-color - b)
color - c)
text-color
- a)
How do you link a CSS file to an HTML file?
- a)
< link rel="stylesheet" href="styles.css"> - b)
< stylesheet>styles.css</stylesheet> - c)
< css link="styles.css">
- a)
2. Theoretical Questions
What is the function of the
< meta >element in the< head >of an HTML document? Give an example of use.What are the main attributes used with the
< input >element to create text fields, radio buttons, and check boxes in an HTML form? Give an example for each.Explain the difference between
< ul >and< ol >elements. When would you use each of them?What is the purpose of the
< form >element in HTML? What are the important attributes to include in the< form >element to specify the method and action? Give an example.What is a
< fieldset >tag and what is its role in an HTML form? Include an example in your answer.
3. Practical Questions
- Download and install Visual Studio Code from code.visualstudio.com.
- Open VSCode and create two files named form.html.
- Take a screenshot of your completed form in the browser.
- Share the screenshot and HTML source code on Steemit in your entry post.
Form
Contest Guidelines
Post can be written in any community or in your own blog.
Post must be #steemexclusive.
Use the following title: Sec S19W1 || Creation of an Interactive Website (Basic concepts of HTML5)
Participants must be verified and active users on the platform.
Post must be more than 350 words. (350 to 500 words)
The images used must be the author's own or free of copyright. (Don't forget to include the source.)
Participants should not use any bot voting services, do not engage in vote buying.
The participation schedule is between Monday, July 8 , 2024 at 00:00 UTC to Sunday, - July 14, 2024 at 23:59 UTC.
Community moderators would leave quality ratings of your articles and likely upvotes.
The publication can be in any language.
Plagiarism and use of AI is prohibited.
Participants must appropriately follow #club5050 or #club75 or #club100.
Use the tags #dynamicdevs-s19w1 , #country (example- #tunisia, #Nigeria) #steemexclusive.
Use the #burnsteem25 tag only if you have set the 25% payee to @null.
Post the link to your entry in the comments section of this contest post. (very important).
Invite at least 3 friends to participate in this contest.
Strive to leave valuable feedback on other people's entries.
Share your post on Twitter and drop the link as a comment on your post.
Your article must get at least 10 upvotes and 5 valid comments to count as valid in the contest, so be sure to interact with other users' entries
Rewards
SC01 would be checking on the entire 7 participating communities and upvoting outstanding content. Upvote is not guaranteed for all articles. Kindly take note.
At the end of the week, we would nominate the top 3 users who had performed well in the contest and would be eligible for votes from SC01/SC02.
Important Notice: The nomination of the top 3 users in our community is not based on good grades alone, it includes their general engagements (quality and quantity of their interactions with other users' articles) to measure the overall performance. Also note that generally, you can only make one post per day in the Steemit Engagement Challenge.
Best Regards,
Dynamic Devs Team

Does this means we will have to copy the source code and share it here on Steemit or just the screenshot is enough?
Thank you, friend!


I'm @steem.history, who is steem witness.
Thank you for witnessvoting for me.
please click it!
(Go to https://steemit.com/~witnesses and type fbslo at the bottom of the page)
The weight is reduced because of the lack of Voting Power. If you vote for me as a witness, you can get my little vote.
hey , check this ---> https://steemit.com/xpilar/@steem.botto/ann-post-botsteem-a-replacement-to-world-of-xpilar-automation-tools
Yaay yur post is very informative for me. I have been interested in web development for some time now. I also want to learn web development, so learning HTML is essential. Today, I watched important tags related to HTML. I will apply these tags tonight and try to complete the assignments given. You have explained the use of these tags very well in simple wording, which has made it easy for me to understand.🤗🌺💖🌸💞
here is my entry....
https://steemit.com/hive-109435/@mateenfatima/sec-s19w1-or-or-creation-of-an-interactive-website-basic-concepts-of-html5
Here's my entry link 🤗💞💐:
https://steemit.com/hive-109435/@hudamalik20/sec-s19w1-or-or-creation-of-an-interactive-website-basic-concepts-of-html5
Thanks @kouba01 for a very useful topic. This post will help many people learn programming and how to create their own website. Amazing!
https://steemit.com/burnsteem25/@simonnwigwe/sec-s19w1-or-or-creation
My entry.
https://steemit.com/dynamicdevs-s19w1/@josepha/sec-s19w1-or-or-creation
Here is my entry:
https://steemit.com/hive-180106/@ahsansharif/sec-s19w1-or-or-creation-of-an-interactive-website-basic-concepts-of-html5