How to optimize Ethereum mining Hashrate for R9 380x GPU
Everyone is now jumping onto the bandwagon of cryptocurrency mining, as Bitcoin just went through the roof.
Though I had heard and read a bit about bitcoins few years ago, when it was being mined on devices as meagre as Raspberry Pi’s. People had posted detailed instructions on believing ur own super cheap RPi rigs to mine bitcoins, and of course those who did, must be laughing their way to the bank during last few months. Like many other ignorant idiots, I too didn’t take it serious enough then and missed the train so bad. Now you need multi-thousand dollar Miner mean machines called ASIC, to even begin mining any of those bitcoins.
Anyhow, as they say, the next best time is now. And being no rich person with thousands of dollars lying idle under the mattress, I just decided to play my bet on the next best possible crypto today, i.e. Ethereum, as GPU mining is still possible today, before the algorithm gets into ASIC. I got myself the components for a basic desktop computer and a GPU, to get my hands dirty in this mining.
Here’s the hardware I was fortunate to collect on a low budget:
- A cooler master K380 Casing with 1 front and 1 rear fan attached (Used)
- Cooler Master 750W Semi-modular 80+ Bronze PSU (Used) for $ 61
- Gigabyte 970 AM3+ motherboard (Used) for $32
- AMD Athlon 2 X2 2.8MHz CPU (Refurbished) for $8
- Cooler master basic CPU fan (used)
- 500GB normal HDD (used)
- 2GB x 2 DDR2 RAM modules (Used)
- A wireless keyboard - mouse, I already had
- Small HP VGA monitor (Used)
- As this motherboard doesn’t have an inbuilt VGA, I got another cheap Nvidia 9400 GPU (Used), just to be able to connect to the monitor first.
- Got lucky to get my hands on a Powercolor R9 380x 4GB GPU (Used) for less than $170
- A USB wifi and bluetooth dongle, DVI to VGA connector to connect the monitor (New)
- A TP link smart plug with energy monitoring (New)
Overall, the set cost me around $480, including a few small losses, as I got a defective PSU and motherboard in the process, before getting the better ones above.
Anyway, now that the hardware are all in place, it’s time to boot it up. And we need an OS to begin with. As I studied around on the internet, it seemed like Ubuntu linux is the best choice for most ETH miners (not counting the paid options like EthOS). So downloaded the latest Ubuntu 16.04 and made bootable USB for the same.
However, after numerous tries I realised it’s a big pain to even install the Ubuntu on this hardware, with the correct drivers for this GPU, and to begin mining. I did try hard with gazillion re-tries, installing on the HDD, on another USB 3.0 flash drive, etc. After a whole week of breaking my head on it, finally just gave up, and gave in to the more noob friendly Windows 10, with the latest Adrenalin 17.12.2 driver for the AMD Radeon R9 300 series GPU.
Next up actual mining software. After some research online, I figured there’re a few ways one could go about ETH mining:
- Solo mining
I could mine and collect all the spoils for my own self. Lucrative, but figured that with my status of hardware, I might just end up getting no spoils at all. May be I can think of this option if I can make some more money to be able to buy a bigger rig of GPUs. - Pool mining
This is the next best option for beginners with tiny hardware like me. There are a few Eth pools online, to choose from. I chose one of the most popular ones to begin with, nanopool.
Next we need a miner program, and again, the easiest to work with nanopool is the one recommended on their site, viz. Dual miner created by an awesome geek Claymore.
Downloaded Claymore's Dual miner from here, and set it up, as per the tutorials here. I decided to start with just one crypto mining for Ethereum, and not dual mining, with the miner software. Entered my wallet, worker ID and email ID, as below, into the bat file, start.bat:
setx GPU_FORCE_64BIT_PTR 0
setx GPU_MAX_HEAP_SIZE 100
setx GPU_USE_SYNC_OBJECTS 1
setx GPU_MAX_ALLOC_PERCENT 100
setx GPU_SINGLE_ALLOC_PERCENT 100
EthDcrMiner64.exe -epool eth-asia1.nanopool.org:9999 -ewal 0x3d244d2590efaabbbc05e53238eea8655b0b9626.mineworker/[email protected] -epsw x -mode 1 -ftime 10
Ran this start.bat, and lo and behold, the mining actually started off. But not more than a minute or two. Everytime I tried to execute it, it crashed the GPU itself, and if the monitor is connected to the Radeon GPU, display would go blank and PC hangs. If I connect the monitor to the other Nvidia GPU, then the PC would crash a bit more gracefully, giving the BSOD with a message “THREAD_STUCK_IN_DEVICE_DRIVER”.
Time to get back to R&D and troubleshooting. I tried the guru3d DDU, to remove all files of the display driver, and then installed the older Crimson 15.12 driver, as suggested by some people on the reddit and other forums. But no improvement, the crashes continued. After a lot of head-banging, I just decided to re-install the whole Windows 10 on the same HDD partition, overwriting the earlier installation.
Once the fresh windows 10 re-installed, once again installed the Crimson 15.12 drivers, along with the AMD chipset drivers of the motherboard. Started the Claymore’s miner once again. It ran a bit longer this time, but crashed once again in about 5 minutes of mining.
After reading some more forums for people experiencing similar crashes, I figured, that we also need to install the audio drivers, even if it’s just the audio on the motherboard. While I couldn’t determine why the audio drivers were so critical for mining, I did download and install the Realtek audio drivers for Windows 10. Then tried to start the mining .bat file after reboot. And that certainly made the difference. Now the crash was gone, and the mining actually ran, with around 17 MH/s… for 5-6 mins, and boom, crash again.
Damn, now what happened. After reboot, I ran it again, this time with the GPU-Z running along side, with the sensors tab open. And then I noticed, the temperature of GPU soared to 80+ ºC before it crashes.
So I realised it’s not software issue anymore, it’s the hardware itself getting too hot. To confirm this, I opened the casing side panel, and placed a standing fan outside, blowing air into it. And started the mining. Yes, this time it did continue running for much longer, while the temperature staying somewhat stable at 77-78 ºC. But it’s still too hot, and can’t really sustain long enough. After a bit of looking around inside the casing and motherboard, I figured the motherboard itself can still support two more casing fans, and the casing itself had 3 more places to fit 120mm fans on it. I like the Cooler master casing for this. So I went out and bought 3 more 120mm fans for quite cheap, like $2-4 each, still decent quality ones.
Fitted 2 of the fans on the top and bottom of the casing and connected to the motherboard connectors. third one connected to a spare IDE power connector from the PSU, and fixed at the side panel of the casing, as you can see in the picture here.
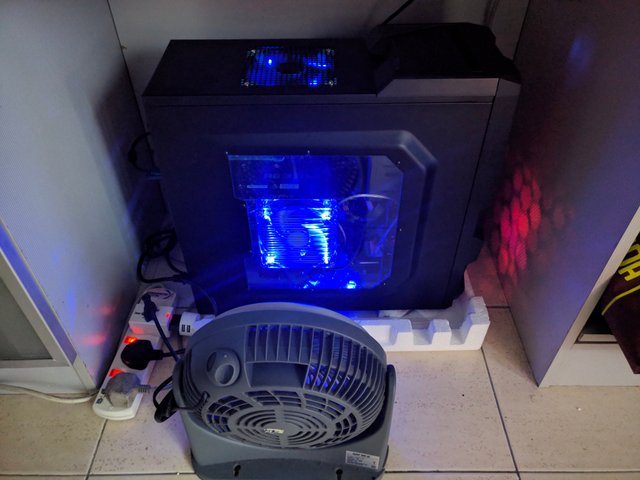
Now, upon starting, I can see the temperatures fell down considerably. At the current software setup of Crimson 15.12 drivers, and no changes to the clock-speeds etc, I got the temperatures stable at 70-72 ºC, and stable hash rates of 17-17.6 MH/s. And it was running well for longer, without crashes.
Alright, so the 1st step achieved, stability. But the hash-rates and temperature, are still not the optimum, as I’ve read people getting 23-25 MH/s with this GPU R9 380x. So some tweaking was due for sure.
First up, I upgraded the display driver, to the latest Adrenalin 17.12.2. This itself gave me a boost of hash rate to 20+ MH/s, and was still stable.
Next I got the MSI afterburner, and ran it. After a bit of tweaking around, here’s the final setting I got to give me the optimum balance, between temperature, stability and hash rate.
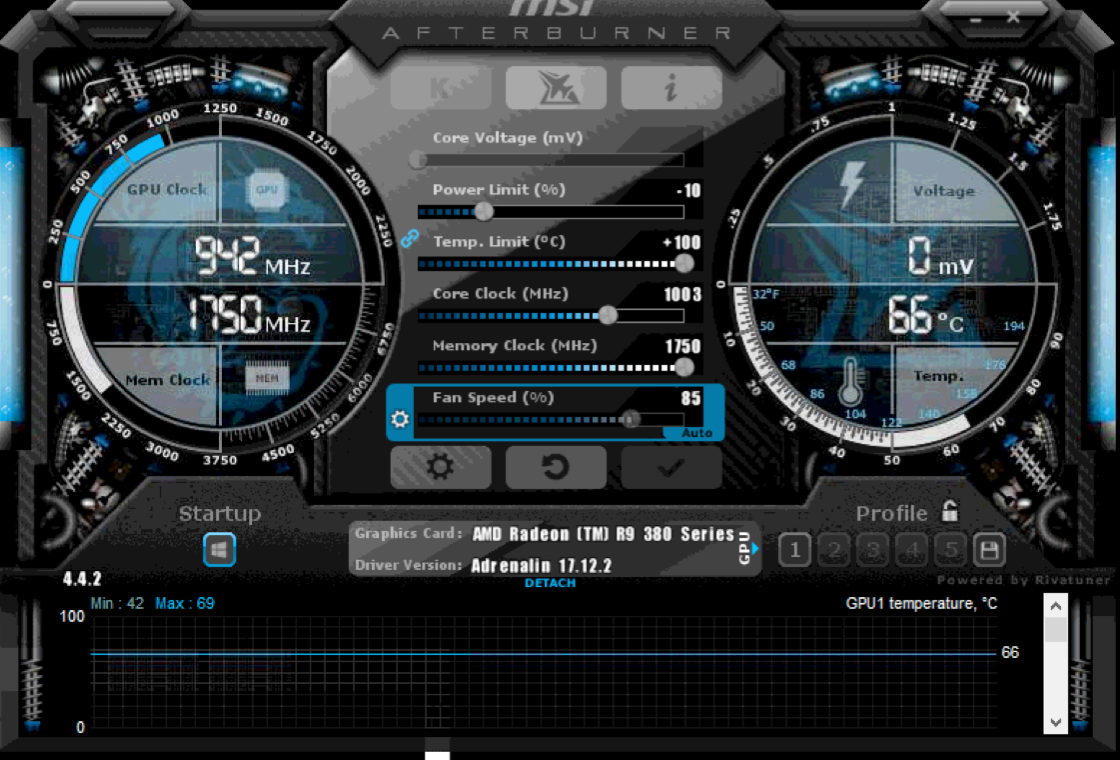
Basically the changes I made are:
- Power Limit reduced to -10%
- Memory clock jacked up to the maximum 1750 MHz
- Tweaked the fan settings as below
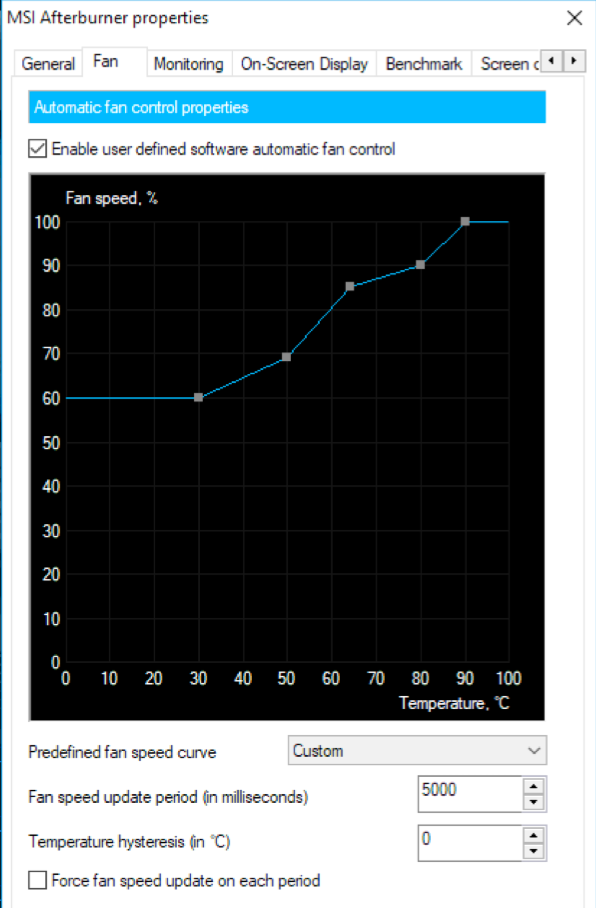
With this, I got a stable hash rate of around 23 MH/s. Great!
But don’t stop here. I did some more digging, and now I adjusted the Windows power setting in control panel. Right click on the desktop > open Display Settings. Go to "Power and sleep” set both the options to ‘Never’.
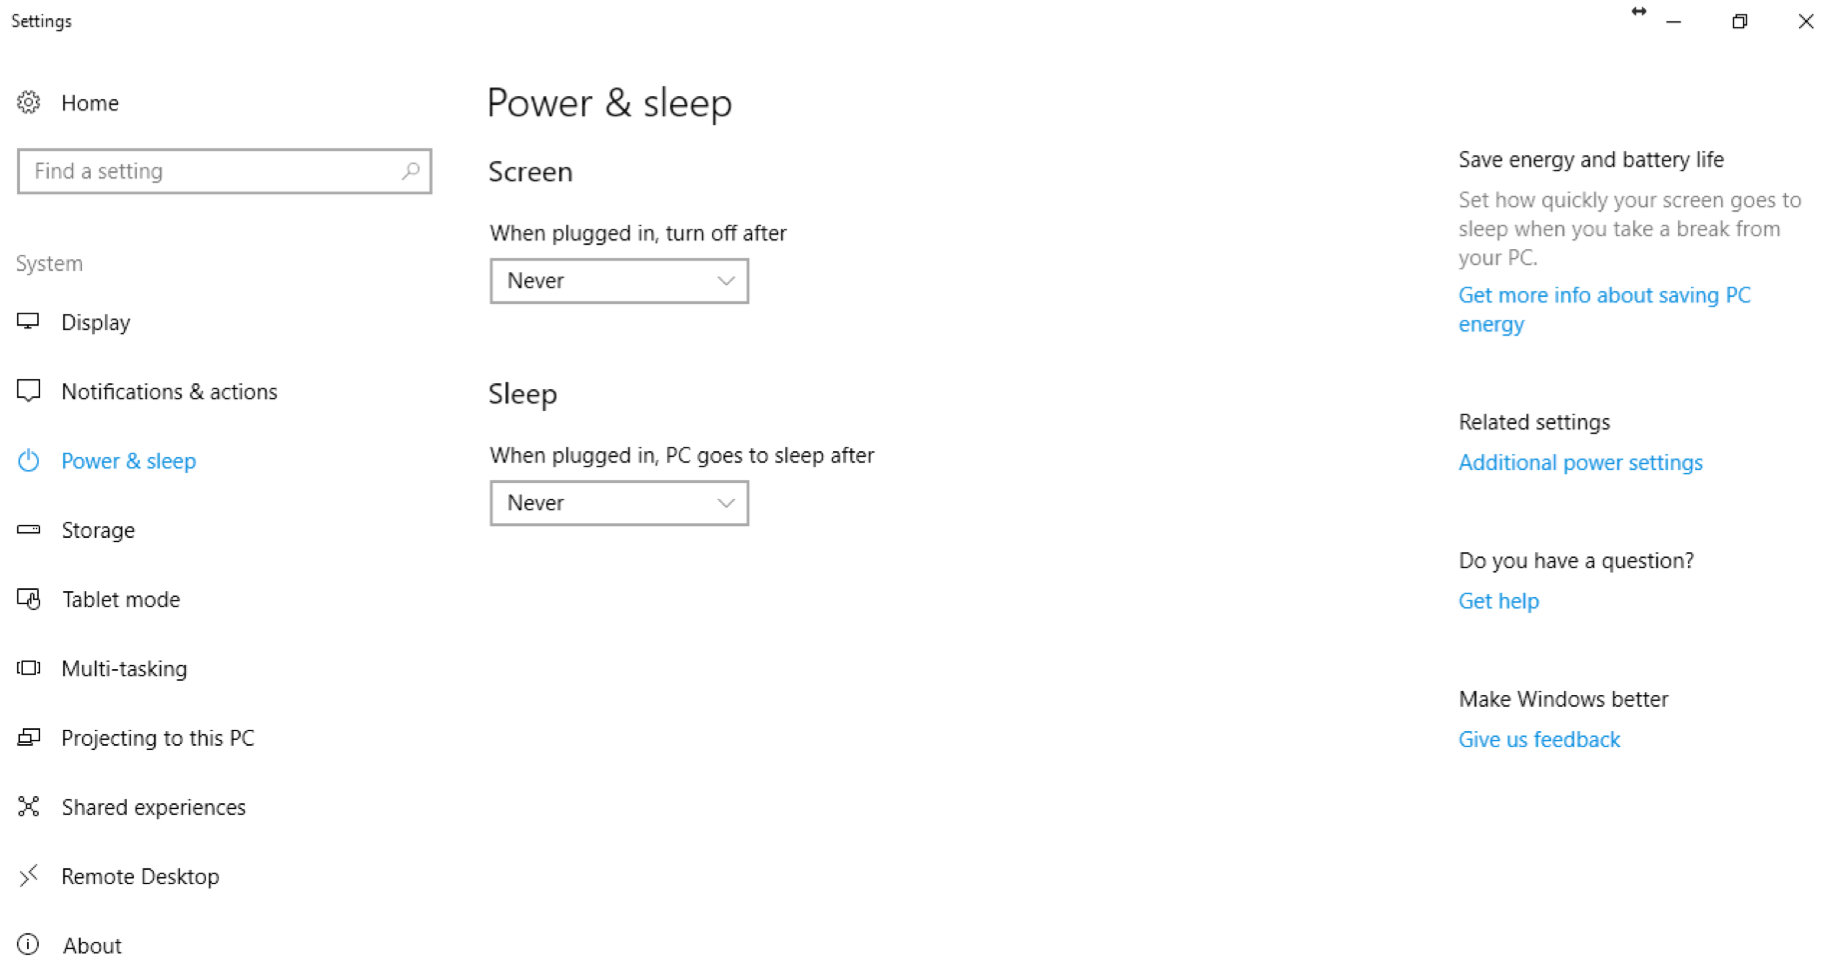
Next click on the “Additional power settings” on the right side. This opens another settings window.
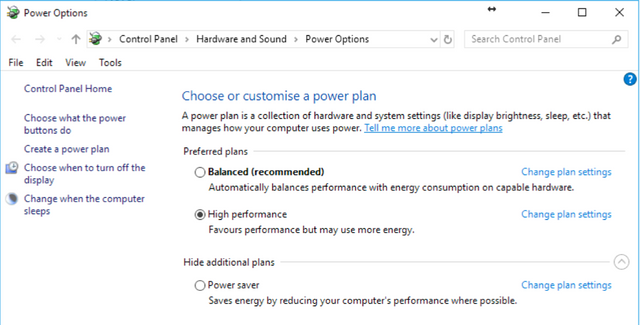
Here select the “High Performance” option, and click on the "change plan settings" link to it’s right. Make sure both the dropdowns are set to ‘Never' as well. Then click the link “Change Advanced power settings”. Yet another window opens.
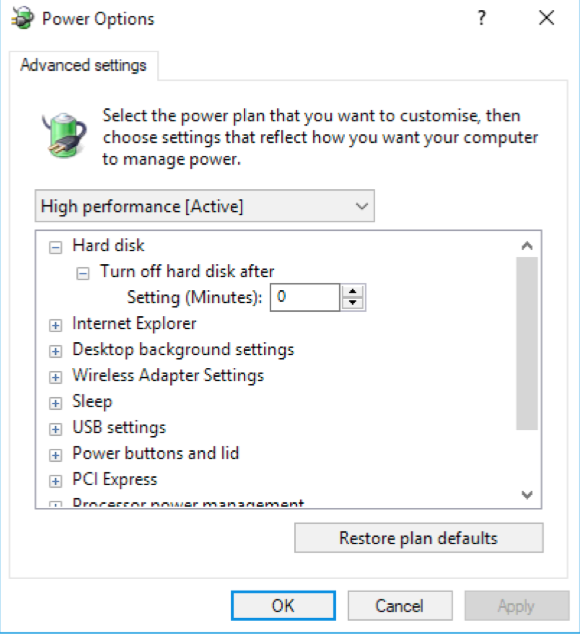
Here make the following changes:
- Turn off hard disk: 0
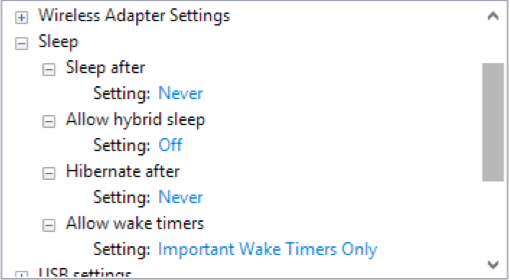
- Sleep after: 0
- Allow Hybrid seep: Off
- Hibernate after: 0
- Allow wake timers: Important Wake timers only
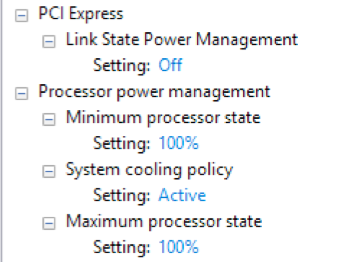
- PCI express > Link state power management: Off

- Processor power management > Minimum processor state: 100%
- System cooling policy: Active
- Maximum Processor state: 100%
That’s it, click Apply, OK, Save Settings and close the windows.
Now the mining run already shows an optimised 23.5-23.6 MH/s, with the temperature quite stable at 65-67 ºC.
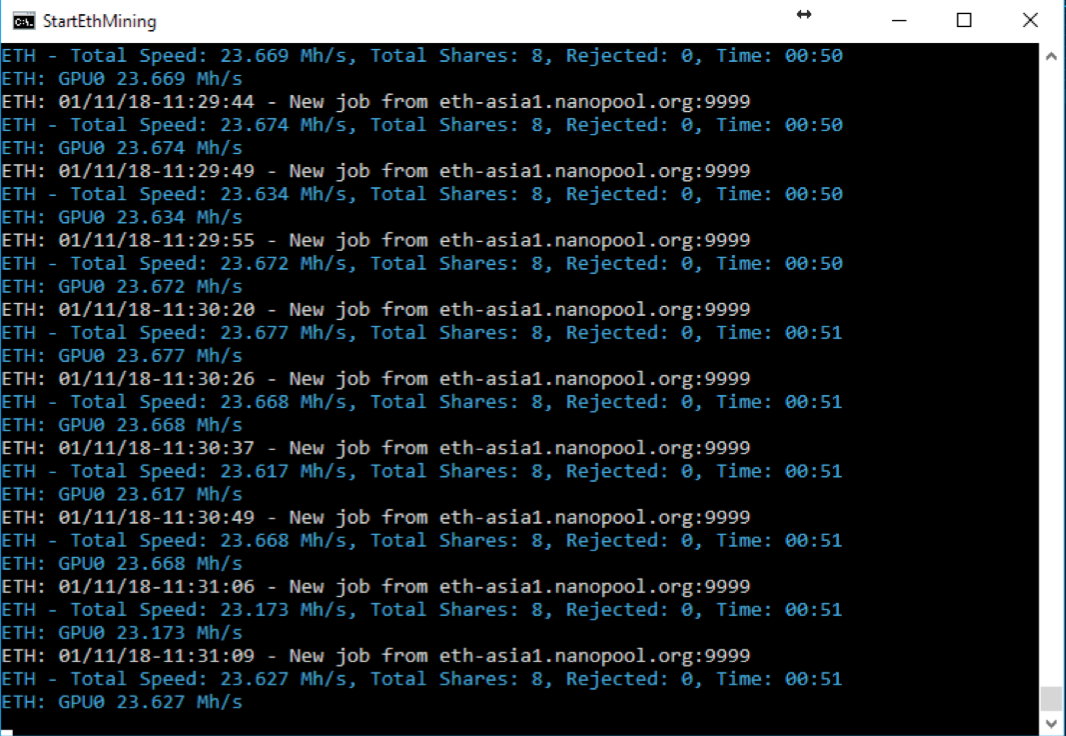
I did notice, however, that randomly after a few hours of running, the video card still freezes up at times, even though the temperature is not an issue. Upon searching further online, I still couldn’t really figure any specific fix, that I’ve not already done. Thus, just to achieve a bit more stability, I decided to make a few more tweaks to the Claymore’s dual miner command itself, in the start.bat file. With a few more parameters, here’s final version of the bat file:
setx GPU_FORCE_64BIT_PTR 0
setx GPU_MAX_HEAP_SIZE 100
setx GPU_USE_SYNC_OBJECTS 1
setx GPU_MAX_ALLOC_PERCENT 100
setx GPU_SINGLE_ALLOC_PERCENT 100
EthDcrMiner64.exe -epool eth-asia1.nanopool.org:9999 -ewal 0x3d244d2590efaabbbc05e53238eea8655b0b9626.mineworker/[email protected] -epsw x -mode 1 -ftime 5 -etha 0 -r 150 -minspeed 19 -tstop 80 -tt 65 -mclock 1750 -mport 3333
An explanation of the parameters on the last line, can be found here.
In addition to this, I also created another file in the same folder, called reboot.bat, with the following content, as explained in the same link above:
shutdown /r /t 5 /f
This file would be used by the EthDcrMiner64 to reboot the system, in case of any issues detected. And of course, you’d want the mining to auto-start after a reboot. This an be setup by running shell:startup in the run dialog.
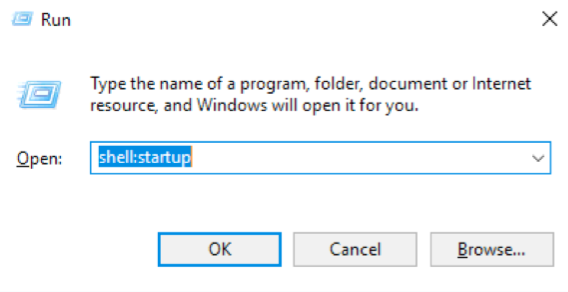
This opens the startup folder. Now create a shortcut to the start.bat file, into this folder and you’re done.

This is all I could figure out till now. If I get any more ideas to tweak it further, I’ll update this. And would be delighted to see any further suggestions from more experienced miners, or other beginners who’d have stumbled upon any other tricks to enhance the mining rates further.
Thank you for reading and appreciate a generous upvote from all of you.
Check it out @originalworks.
Thanks
Your Post Has Been Featured on @Resteemable!
Feature any Steemit post using resteemit.com!
How It Works:
1. Take Any Steemit URL
2. Erase
https://3. Type
reGet Featured Instantly – Featured Posts are voted every 2.4hrs
Join the Curation Team Here
Thanks @resteemable
Update: I downloaded the latest version of the Claymore's dual miner v11.6, and got a straight hashrate speed increase to 24.3 MH/s with no other change to configurations.