How to List your own Crypto Token on a Public Exchange - Crypto Academy / S5W4 - Homework Post for @reddileep
Introduction
It's a precious learning time at the academy and I will be attending the lecture presented by professor @reddileep which is a continuation of his previous week's lecture and this week's lecture is titled How to list your own token a public exchange. It's another impressive lecture, no doubt. Let's get into it.
Graphic designed using Canva
1. The Idea of Listing a Crypto Token on a Public Exchange
Every crypto token created must have a plan behind the creation and as well has its use case. In order to make sure that the purpose of creation of these tokens is met, either to serve its intended utility or commercial purpose, it has to be made available to the general public for adoption, which means newly-created tokens are not fully functional until it's made available to the public and this can only be done through listing it on a public exchange.
The process of listing these tokens on a centralized exchange can be a bit tedious as it requires proper validation of the product from the exchange's team who verifies the claims of the project before approving its listing while listing on DEX is less tedious (listing without verification, it only cost the providing liquidity expenses, thanks to decentralization). To take care of some cost, some project organizes Initial Coin Offering in the quest to raise the required funds to complete the project on the blockchain and also take care of listing cost (like providing liquidity for the token). That said, the main purpose of listing a token on a public exchange is to make it available for the general public for trading and that would make the token serve its use case as specified by the issuer. Take a look at some of the steps required to be followed when trying to list a token on a centralized exchange.
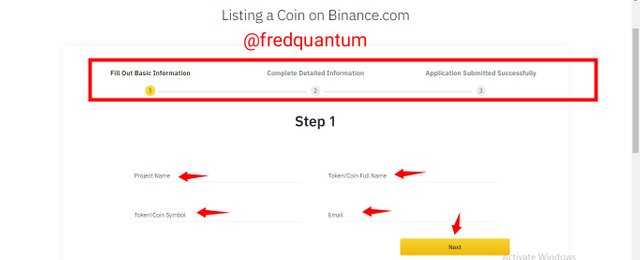
Screenshot Source: Binance
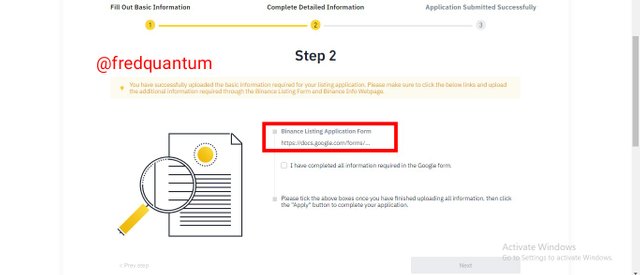
Screenshot Source: Binance
You can see in the screenshots above taken from Binance centralized exchange listing page, the basic information like Project name, Token/Coin name, Token Symbol and Email Address were required which is followed by filling the listing Google form to complete the application. That's how the listing of a crypto token starts on a centralized exchange while such steps are not seen in listing on a decentralized exchange.
The Significance of Listing a Crypto Token on a Public Exchange
- To make it available for the general public and as such, serve its intended purpose of creation.
- To make the crypto token tradable since these exchanges are used to facilitate the trading of crypto assets.
- Listing a crypto token on a public exchange helps to increase its value and as such, price is triggered. Interaction from the public creates demand and takes its price from the initial "0" to worth a few cents and even higher price in USD or any currency of exchange.
- And it enhances the adoption of the token for certain use case, as it's made available for the general public.
In conclusion in this section, the purpose of a crypto token cannot be fulfilled until it's made available and tradable for the public through an exchange, be it a centralized or decentralized exchange.
2. Demonstration of how to prepare the tools needed to list my newly created Token on a Public Exchange and its distribution to other wallets
Basically, I will be needing my MetaMask wallet for this task which would be connected to the DEX and that has been fully set up in the previous task. Also, it's necessary to get the new token's contract address which I've gotten earlier in the previous task and it is 0x7f26d83806b09490b721278ffefc5ac6e82da443, likewise, I have made enough deposit of BNB. In addition, I will prepare a Trust Wallet account in which part of the newly created token would be sent later in this context.
Decentralized Exchange
The exchange I will be using in this task is a decentralized exchange, PancakeSwap and my reason for choosing it is that I can list my BEP20 token at no cost and with no paper work at all, fully decentralized. That said, my MetaMask wallet would be used to connect with the exchange to get my assets listed, note that, my listing purpose is not for tradability of the asset at the moment as providing liquidity for the asset would cost a lot.
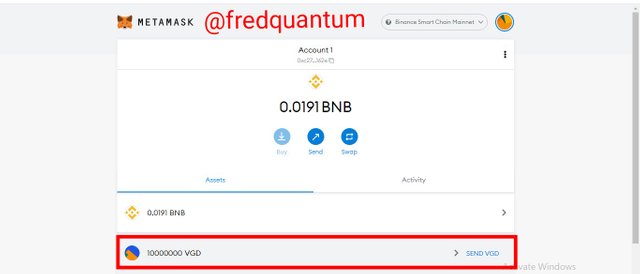
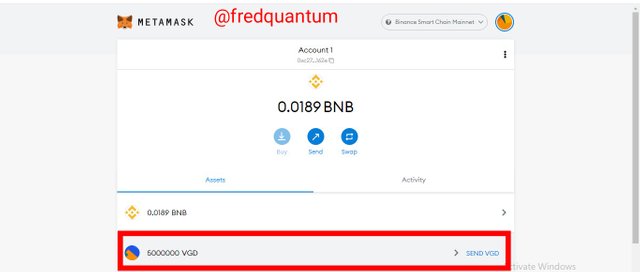
Earlier, I showed some of the requirements required for listing on a centralized exchange like Binance, paper work is involved and of course, KYC verification would be required with series of validations. But for the DEX chosen, these formalities are not there and I can speedily carry out my listing without waiting for any vetting from an exchange's team. My MetaMask wallet is fully ready as stated earlier, see it below.
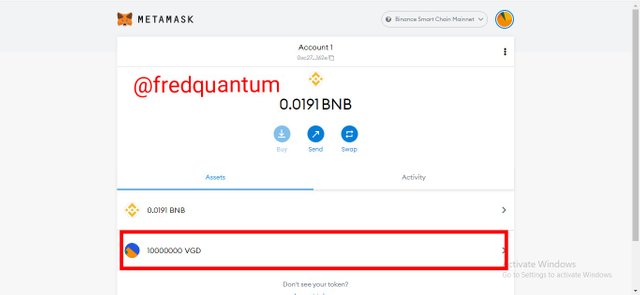
VGD in MetaMask Wallet- Screenshot from Metamask
How to Setup a Trust Wallet
For this purpose, I will be using the website https://trustwallet.com/ to get the wallet ready for usage in this task. Let's see the steps involved below.
- I visited https://trustwallet.com/ and from the landing page, we can see the list of the devices compatible with Trust Wallet at the moment.
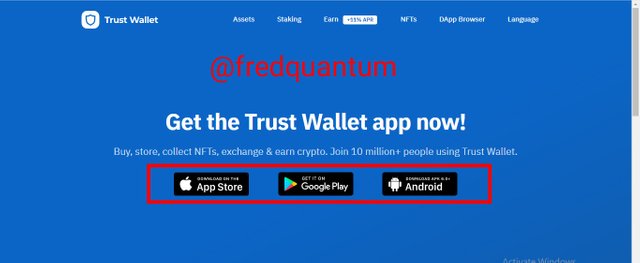
Screenshot from Trust Wallet
- The devices compatible with the Trust Wallet at the moment are mobile devices and I will be going with the Android version. Having it installed on my mobile phone before, nevertheless, I chose to make use of a new wallet.
- I launched the Trust Wallet, selected Create a new wallet and on the next interface, it's time to write down the recovery phrase such that I ticked the box to show my understanding of how important the recovery phrase is, then I clicked the continue button. See the screenshots below.
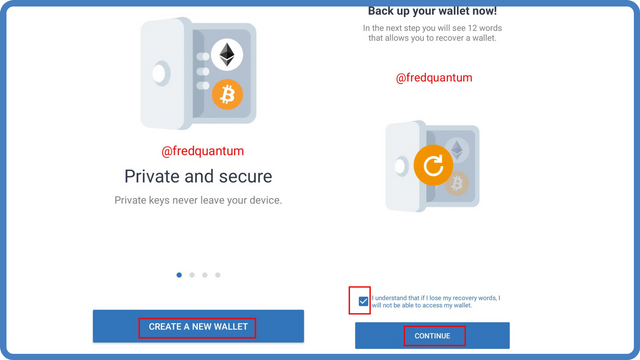
Screenshot from Trust Wallet | Modified in Canva
- On the next interface, the recovery phrase was displayed and I wrote it down. Then I confirmed the phrase in order at the designated field. The new wallet was created successively. Note that: I was unable to show the screenshots of the recovery phrase windows because the App doesn't allow it for privacy purposes, kindly take note of that. See the screenshots below.
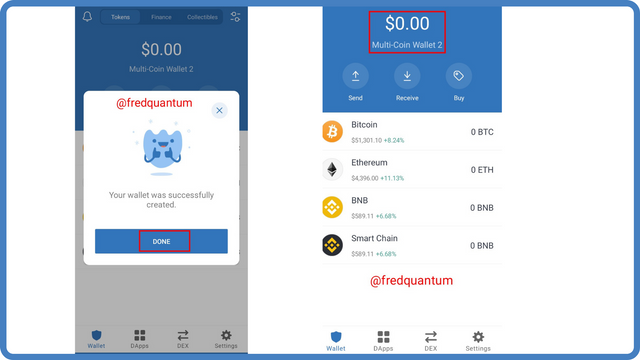
Screenshot from Trust Wallet | Modified in Canva
3. Demonstration of the steps involved in listing my Crypto Token on a Public Exchange
In this section of the task, I will be showing the steps that are involved in listing my token on a public exchange which starts by importing the token to the exchange, precisely the public exchange to be used is a decentralized exchange. The DEX I will be using for the listing of my token is PancakeSwap. Let's see the steps involved below.
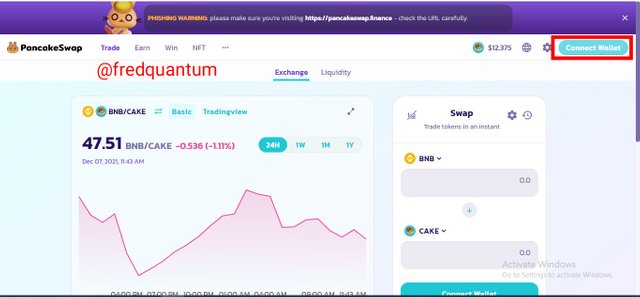
- I visited the website https://pancakeswap.finance/ and on the landing page, I selected Trade followed by Exchange.
- On the next interface, I clicked the Connect Wallet button in the quest to connect a wallet of choice with the exchange. See the screenshots below.
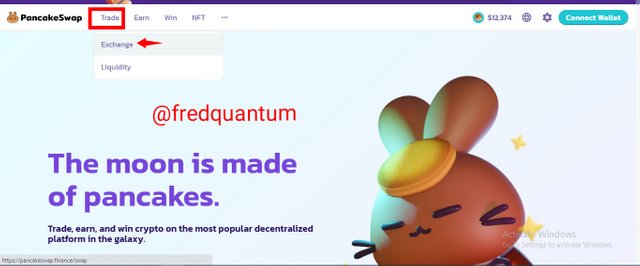
Screenshot from PancakeSwap
Screenshot from PancakeSwap
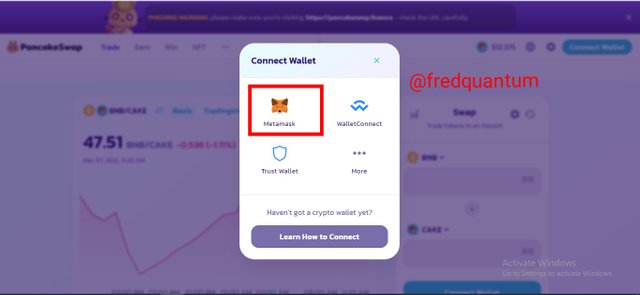
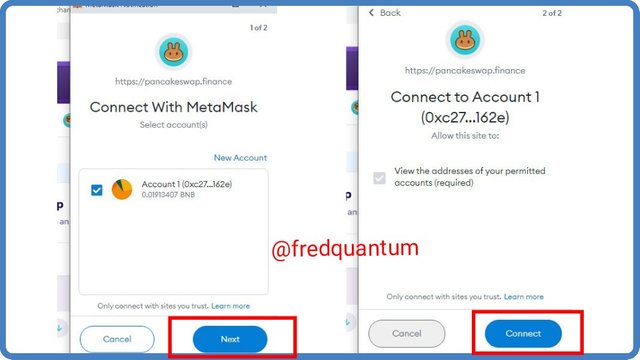
- Now to choose the wallet I am connecting with the exchange, I selected MetaMask Wallet. It's necessary to authorize the connection, so on the MetaMask wallet I clicked next then connect to the DEX. See the screenshots below.
Screenshot from PancakeSwap
Screenshot from MetaMask wallet
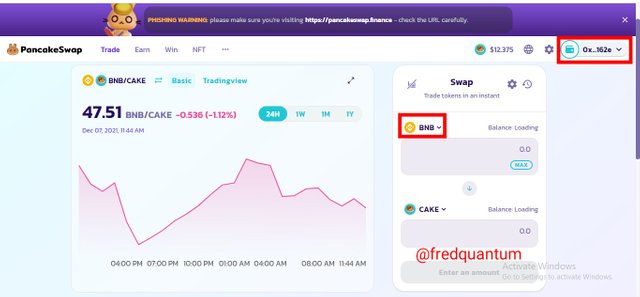
- I have been able to connect the wallet. I clicked the select a token on the swap interface of the DEX and pasted my token's contract address, my VGD (Vanguard) was displayed then I clicked the Import button. See the screenshots below.
Screenshot from PancakeSwap
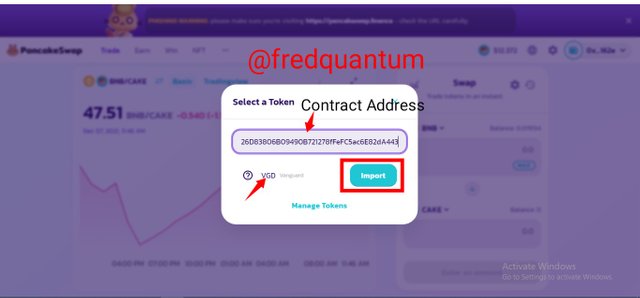
Screenshot from PancakeSwap
- On the next interface, there is a warning about how anyone can create a BEP20 token, this is to caution one about the probability of buying into a fake project if enough research was not carried out. I ticked the understand box and clicked import. See the screenshot below.
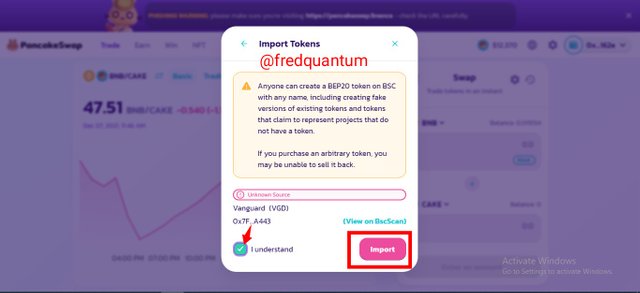
Screenshot from PancakeSwap
4. Demonstration of the Steps Involved in bringing half of my newly created Crypto Token to the Public Exchange
So far so good, I have been able to import the new token to PancakeSwap, now I will be sending half of the total supply which is 5,000,000 VGD for a public listing, although, with no liquidity yet.
For clarification, this listing of VGD token doesn't make it available for trading neither does it give it any value yet, it's just task-based. Nevertheless, it's the reality of a few things required to pass through in the quest to get one's token listed, one distinctive difference between this listing I am about to embark on and the ones that are listed earlier on the same DEX, and actively trading is liquidity, which I won't be providing in this task because of its huge cost. Let's see the steps below.
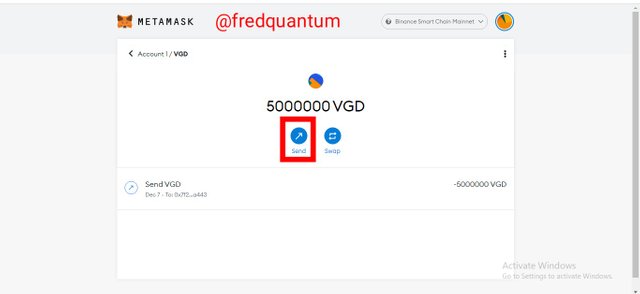
- I launched my MetaMask wallet and clicked on my VGD asset. On the next interface, I clicked on the send button. See the screenshots below.
Screenshot from MetaMask wallet
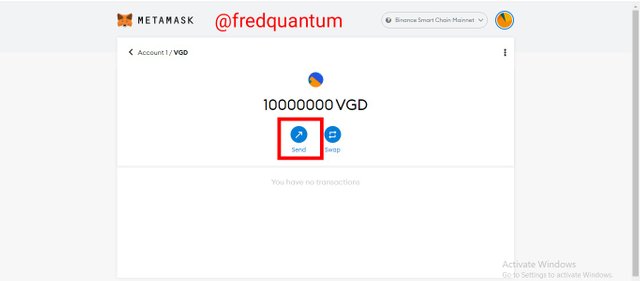
Screenshot from MetaMask wallet
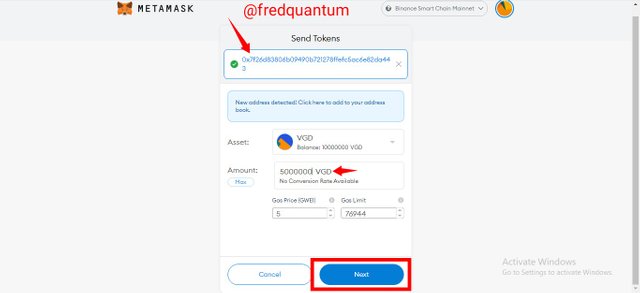
- Now, I pasted the token's contract address "0x7f26d83806b09490b721278ffefc5ac6e82da443", input the amount (half of the total supply) "5,000,000 VGD" then clicked the next button.
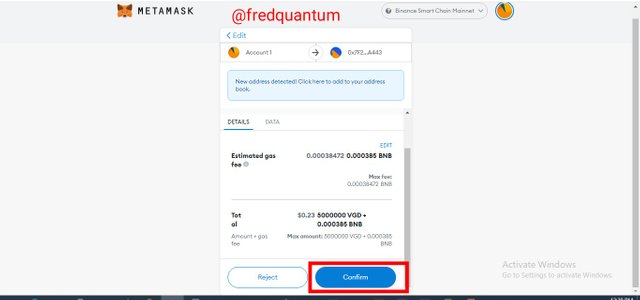
- The estimated fee for the transaction is 0.000385 BNB ($0.23) and I clicked the confirm button to complete the transaction. See the screenshots below.
Screenshot from MetaMask wallet
Screenshot from MetaMask wallet
- The transaction was successful as I have been able to list half of the total supply of my newly created crypto token on PancakeSwap. See the screenshots below.
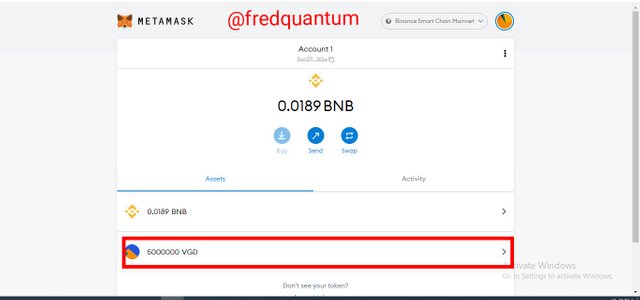
Screenshot of my token balance on MetaMask wallet after listing on PancakeSwap | Source: MetaMask wallet
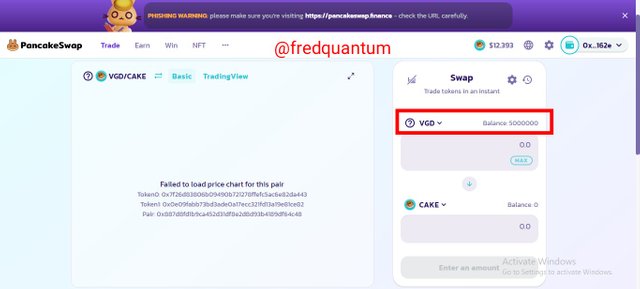
My listed token | Screenshot from PancakeSwap
5. Withdrawal of some of my Crypto Token into the Trust Wallet and Verification of the transactions
In this section of the task, I will be withdrawing some of the newly created tokens into the Trust Wallet created earlier. Let's see the steps involved.
Adding Custom Token on Trust Wallet
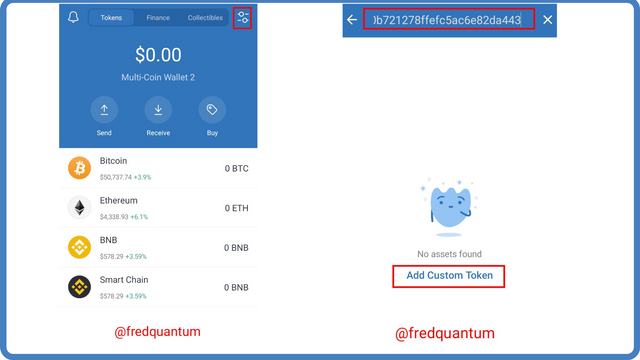
- The steps to withdrawing the token start with adding the newly created token to the Trust Wallet, as such, I launched my Trust Wallet and selected the Search and Add Token button at the top of the page.
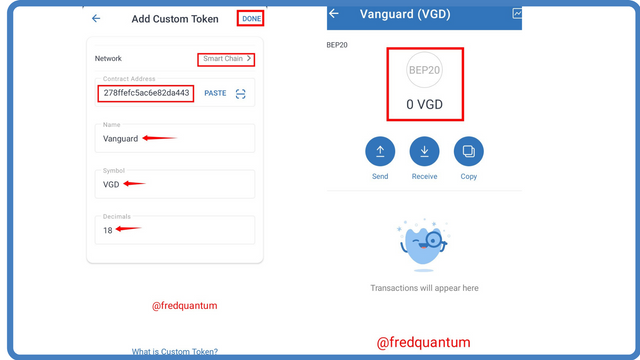
- On the next interface, I switched the network to Smart Chain, pasted the token's Contract Address which automatically generated the details of the token in the required field. Then, I clicked the Done button and the token was added to the Trust Wallet. See the screenshots below.
Screenshot from Trust Wallet | Modified in Canva
Screenshot from Trust Wallet | Modified in Canva
- To copy the public address of the wallet which would be used for deposit, I clicked on Receive on the wallet and the address was revealed, then I tapped the Copy button. The address is 0xBE83476b60464A6501A5a94035353d602b467926. See the screenshots below.

Screenshot from Trust Wallet | Modified in Canva
Withdrawal from MetaMask Wallet
- Now that I have gotten my Trust Wallet public key, I launched my MetaMask wallet, clicked on VGD asset, and tapped the send button. See the screenshots below.
Screenshot from MetaMask wallet
Screenshot from MetaMask wallet
- Now on the next interface, I pasted the Trust Wallet's deposit address, inputted the amount of the token (10,000 VGD), and clicked next. To complete the transaction, I clicked the Confirm button as the estimated gas fee is 0.000385 BNB. See the screenshots below.
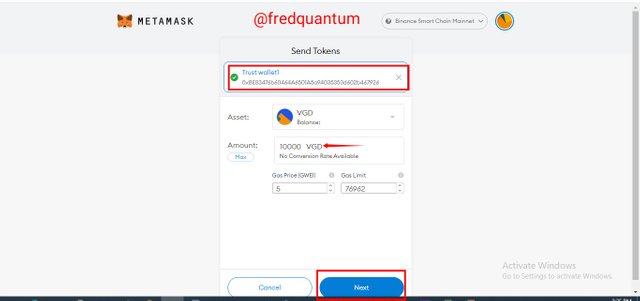
Screenshot from MetaMask wallet
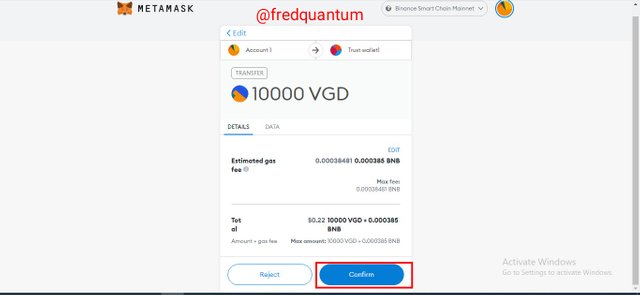
Screenshot from MetaMask wallet
- The transaction of 10,000 VGD arrived in the Trust Wallet and my MetaMask Wallet has 4,990,000 VGD as the remaining supply of my token in the wallet. The Hash of the transaction is 0xb05210af08494f407b92801e8780ce381a632330950bf2ff58db4d181f1366ae. See the screenshots below.
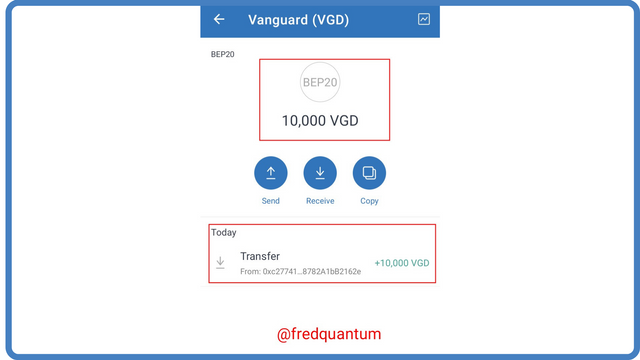
Screenshot from Trust Wallet | Modified in Canva
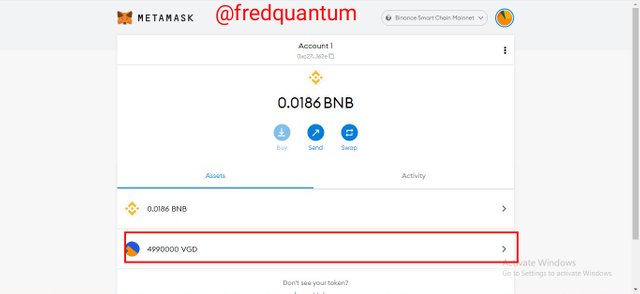
Screenshot from MetaMask wallet
Verification of the transaction details on BscScan
- The transactions that took place on the MetaMask wallet can be seen under the activity section. See the screenshot below.
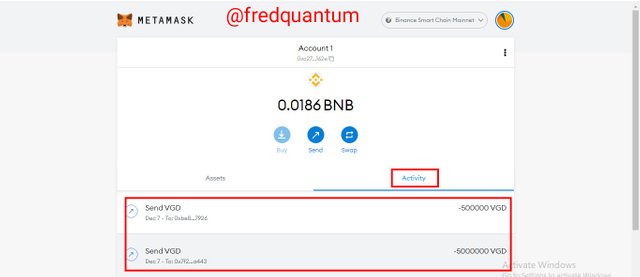
Screenshot from MetaMask wallet
Note that: The most recent transaction on my MetaMask wallet is the transaction of 10,000 VGD to the Trust Wallet. The -500,000 must have been a technical issue after my failed 500,000 transaction due to the network. It can be verified on the BscScan as I've shared earlier, the most recent transactions are 5,000,000 VGD for listing and 10,000 VGD transfer to the Trust Wallet.

Screenshot from MetaMask wallet
- The image below shows the transaction details of the listing transaction which includes the Hash (given earlier in this context), timestamp, addresses (to and from), block (13270851), transaction fee, assets in the transaction and so on. Take a look at the screenshot below.
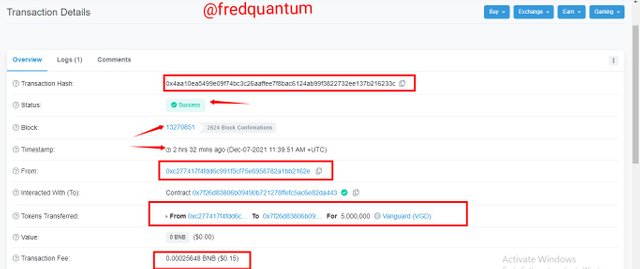
Link to the transaction details
- Likewise, below are the transaction details of the transfer of 10,000 VGD from MetaMask wallet to Trust Wallet. Notably, we can see the transaction Hash (given earlier in this context), block (13272710), timestamp, addresses, transaction fee, and so on.
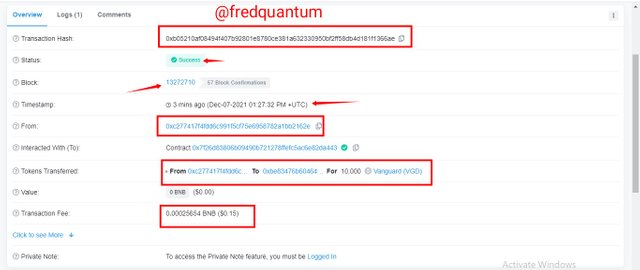
Link to the transaction details
Conclusion
In conclusion, in this article I have been able to list my newly created token on a decentralized exchange, PancakeSwap, and sent some of the assets to another wallet, which is quite great. So far so good, the effort in participating in this piece is worth it. Thanks to professor @reddileep for the great lecture.
Written by:
@fredquantum
Sort: Trending
Loading...
[-]
andry10 (14) 3 years ago