How to Withdraw Your APX and STEEM?
 Edited image is from Canva
Hi everyone!
For the first time, I am writing a blog about withdrawing your hard-earned tokens. I've never imagined there will come a time that I'll be writing this kind of blog since this is all foreign to me. But, I'm a curious newbie lately, and I want to learn more about cryptocurrency and trading. For newbies like me, read carefully the steps. I intended to make this one as easy to understand as possible since I struggled on my first withdraw. I hope this will help lessen yours.
Without further ado, let's get started on how to withdraw your hard-earned APX. This is also applicable to those who have a STEEM on their Steemit Wallet.
Unstake Your APX
You cannot immediately withdraw the APX you have earned from your post. What you have been earning are the staked APX tokens. You have to convert them to liquid APX, so you can withdraw and convert them to whatever cryptocurrency or currency you preferred.
In unstaking your APX, you have to power down first, and it will take 13 weeks to complete. Your APX liquid will reflect in your Appics wallet every week, straight for 13 weeks. The total amount of APX you want to unstake is divided by 13 weeks. The result is what you will be receiving per week.
For example, you want to power down a total of 3,900 Staked APX. Divide 3900 by 13, and the result would be 300. Hence, you will receive 300 Liquid APX for 13 weeks.
Convert APX to STEEMP
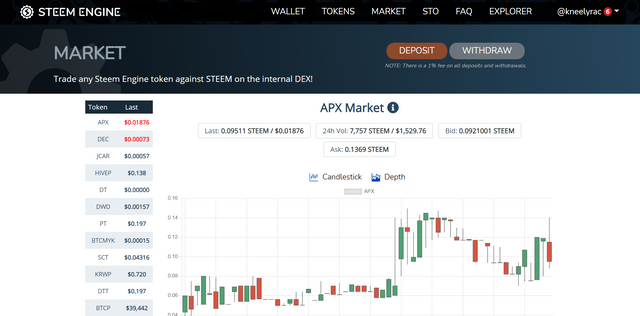
Once you have received all your liquid APX, convert them to STEEMP. To do so, execute the following steps:
1 Log in to Steem-Engine using your active key.
2 In the Menu Bar, click MARKET and select APX.
3 Scroll down and on the Sell APX section, click Your Balance and Lowest Ask. You can also higher the price if you want to.
4 Click the Sell APX button.
5 Scroll down, and you will see the My Open Orders section.
6 Wait until the transaction is complete. You can also cancel it and change the pricing again. Worry not, for the cancellation will not deduct your APX token.
7 Once completed, click WALLET in the Menu Bar.
You can see now your APX tokens have been converted to STEEMP.
Withdraw STEEMP to STEEM

After converting your APX tokens to STEEMP, you have to transfer them to your Steemit wallet by following these steps:
1 Click the WITHDRAW button.
2 A pop-up window will appear and choose STEEM as the TOKEN TO WITHDRAW.
3 Enter the total amount of your STEEMP you want to withdraw. Below is the total STEEM you will receive.
4 Check the withdraw address if it is correct, then click the WITHDRAW STEEM button.
Convert STEEM to PHP
In converting the STEEM to PHP or USD, Binance is used for the exchange. If you don't have an account yet, head on to Binance and create one. You can use my referral if want to. Use the referral code: EBAL7LY9.

Follow these steps and fill in the requirements to proceed with the exchange. If you are new to this, install the app instead for a user-friendly interface.
Transfer STEEM to Binance

1 After you log in, click Wallets on the lower right corner of the interface.
2 Click Deposit, then search STEEM.
3 Copy the STEEM Deposit Address and Deposit Memo.
4 Go back to your Steemit Wallet. Click the dropdown beside STEEM and choose Transfer.
5 Fill in the required details, then click Next.
To: deep******* (STEEM Deposit Address)
Memo: 10******* (STEEM Deposit Memo)
NOTE:
Double-check the details; else, you will lose your STEEM.
Convert STEEM to BTC
After transferring your STEEM, go back to your Binance wallet and wait for a few minutes. You will receive a notification that the deposit is successful. You cannot convert your STEEM directly to your preferred currency. You have to convert it either in BTC or ETH. As an example, converting STEEM to BTC is used.
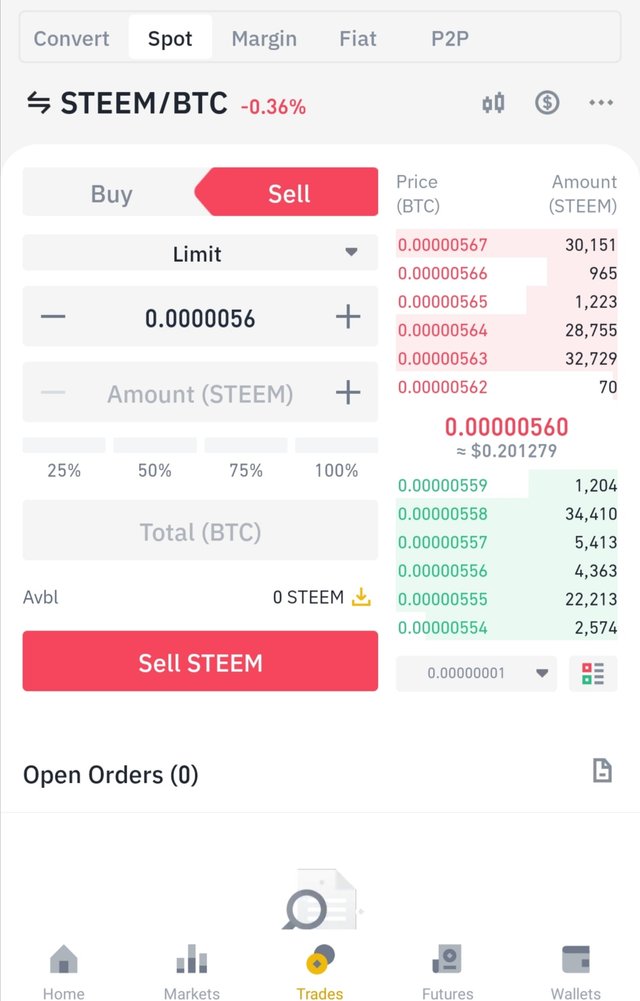
1 In the lower middle of the interface, click Trades.
2 Click the reversible arrow and search STEEM.
3 Choose STEEM/BTC. You will then see Buy/Sell Tab and Price/Amount Table.
4 Press the Sell button since you want to trade (convert) your STEEM to BTC.
5 Enter the amount of STEEM you want to trade and click Sell STEEM.
6 Below is the Open Orders section. If there is none already, then it means your STEEM is sold. If not, then you can either wait or cancel the order and change the price again.
NOTE:
- If you can wait for hours or even days, you can set the price higher than the market price. This will make you gain a bit more profit.
- Keep in mind the Buy Low, Sell High Rule.
Convert BTC to XRP
NOTE:
The following steps are intended for Filipino users only. You might want to trade your BTC for another coin. The steps are still the same.
After you convert your STEEM to BTC, convert it to XRP. BTC is high, and the fee, if you withdraw your BTC, is also high.
The steps on the previous conversion are the same. You need to search XRP and choose XRP/BTC.
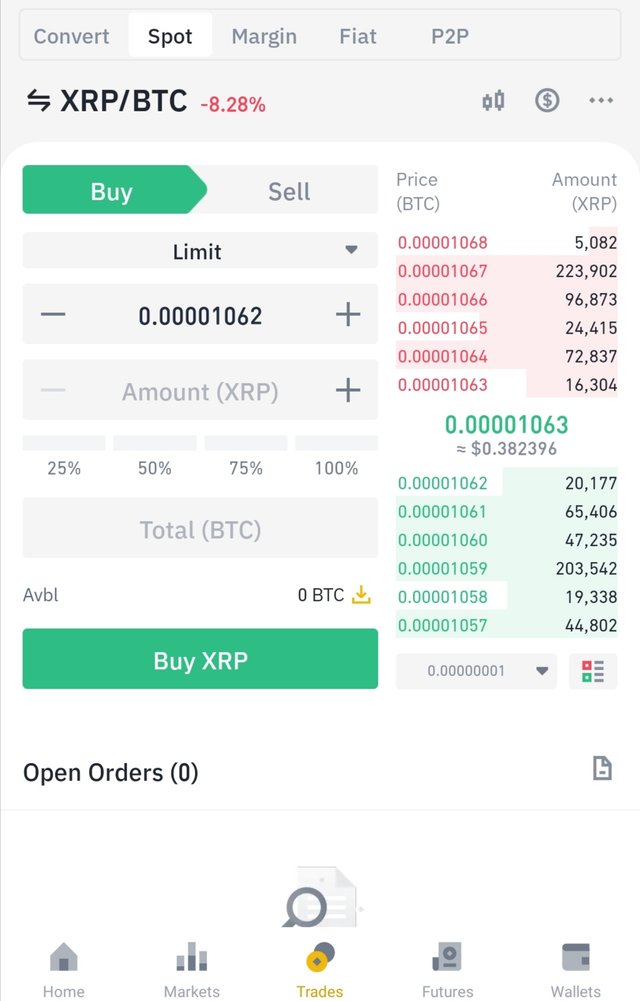
1 In the lower middle of the interface, click Trades.
2 Click the reversible arrow and search XRP.
3 Choose XRP/BTC. You will then see Buy/Sell Tab and Price/Amount Table.
4 Buy button is the default. This will trade (convert) your BTC to XRP.
5 Enter the amount of BTC you want to trade under the Total (BTC) and click Buy XRP.
6 Below is the Open Orders section. If there is none already, it means you have bought XRP using your BTC. If not, then you can either wait or cancel the order and change the price again.
NOTE:
- If you can wait for a few minutes, you can set the price lower than the market price. This will make you gain a bit more profit.
- Keep in mind the Buy Low, Sell High Rule.
Transfer XRP from Binance to Coins
NOTE:
The following steps are for Filipino users only.
For this step, you need a Coins.ph account. If you don't have one, install the app and create an account. It is recommended to have a verified Coins to avail of the cashout feature. Once done, follow these steps:
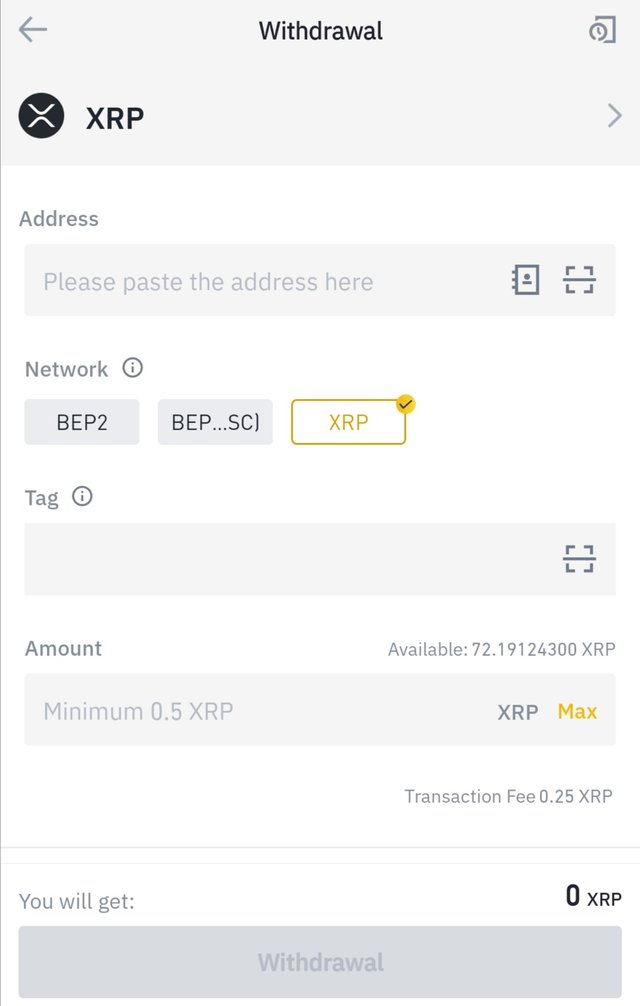
1 Go to your Binance Wallet.
2 Click Withdraw Button and choose XRP.
3 You will see Address, Network, and Amount. To fill this up, go to your Coins.ph App.
4 Press the XRP tab and click Receive.
5 A pop-up window will appear and select the Show my XRP address button.
6 Copy the Institutional wallet address and the destination tag.
7 Go back to your Binance wallet and paste the details from the Coins.ph.
Address: This is where you paste the Institutional wallet address.
Network: Select XRP.
Tag: This is where you paste the Destination tag.
Amount: Enter the XRP amount you want to transfer or click Max on the right side of the bar.
8 Double-check the details. Once done, click the Withdrawal button.
Convert XRP to PHP
Wait for a couple of minutes for your XRP to reflect in your Coins.ph XRP wallet. You will receive a notification when the XRP is received already. After that, click All (four-square icon) and select Convert. If you want to convert all your XRP, just click Convert all. On the receiving end, it will automatically fill the equivalent PHP, then slide to convert. You can then cash out your money via different cash out options.


And that's it. You have successfully withdrawn your APX and STEEM funds. The process is quite long, but I hope this blog helps you in your future withdrawal.
The amount depends on the current value of the cryptocurrency. At that time, I projected a total of 8,050 Php, excluding the fees. However, I was able to manage to make it 8,362.05 Php. I highly recommend transferring your funds to your bank account for a lesser transaction fee. Miguel @miggype doesn't have one, so he opted to send it via M Lhuillier.
Also, I would like to thank @loloy2020 for guiding me from the very start. I am so new to this, and since he is a Bisaya like me, I messaged him that I want to withdraw my SBD and APX and Miguel wants to withdraw his APX, too. He was very patient with a newbie like me. Thank you so much! May the good Lord bless you always!
Let me know if you have questions and clarifications.
Keep safe always!
K N E E L Y R A C
Congratulations @miggype! 😊 Mas malaki pa nawithdraw mo kesa sakin hehehe. Keep it up. Tell your friends, the newbies about this ok? As for @kneelyrac, thank you for this walkthrough.
You're welcome po. Nakalimutan ko tuloy itag si Mel. Edit ko muna. Siya yung naging karamay ko nito. Hahahah
salamat ani Sis. though wa pa nako jud na gets tanan. pero I will make this post of yours as a referrence in the future.
Message lang sis, if ever magwithdraw ka then naay gikalibugan. :)
Thank you for this, sis. Finally may guide na :) God bless po! Mejo madugo pero keri lang hehe.
Totoo sis. Madugo talaga ang labanan. Ilang oras ang nilaan para makawithdraw lang. Hehehe
You're welcome, sis!
Sa umpisa lang madugo pero pag nasimulan mo na..madali lang pala bsta meron kana APX liquid, madali na..
Wow, very detailed talaga. Congratulations again at least naa natay guide. God Bless 😇
Hehehe lage. Thank you sa pag-guide! :)
Hala kataas d ay sa process hehehe.. 3months pod d ay ta paabot..hehe...bookmarked n dai.. salamat kaayu
ahahah oo dai!
Great job, very detailed!! Happy to resteem for you ! 👍👍👍
Thanks, Karen!
reblog muna. para may copy. salamat mam.
Thank you rin! :)
nice one.
Thank you po.
Why sell APX ? Isn’t it better to keep it on APPics so that your upvotes are worth more ?
To have a small taste of your hard work and to try trading for once. That's why I was able to write this, so another newbie in the crypto world like me has something to follow with.
This is absolutely true! I have always been doing this to motivate me to push myself further because I do realize and actually feel the results of my efforts!