Basics to Utilizing Adobe Photoshop for Image Editing
Introduction
It's a great pleasure to be writing another piece in the community today and trust you are all good. In my article today, I will take you on a ride of simple image editing on Photoshop software. It happens that many have some of these graphic softwares on their computers and have not used it before, maybe you just need a push via a light tutorial and that's my aim today.
Overview of Adobe Photoshop
Adobe is graphic design software that was created way back in 1988, this tool is one of the leading software in the realm of the graphics designing utilized for image editing, art creation, photo manipulations, and so on. It's basically raster centered, that is it works well for pixel-based images where you can enlarge your image to see the least raster in faint square boxes (rasters), although it works for vector-based images as well, other software from adobe works well for vectors than Photoshop.
In addition, Adobe Photoshop is also based on layers whereby a certain project created in an Adobe Photoshop can be arranged in layers such that the least on the layer window remains at the bottom while others at the top appear above it if placed at the same position. This feature makes it easy to arrange projects' elements, group them, merge and do a whole lot of things with them. It's a great graphics design software.
Tools Layout
Tools layout is the section of the software where different tools that can be utilized for design can be accessed for the development of a project on the workspace of the software. Some of these tools are the Move tool, Lasso tool, Elliptical Marque tool, Magic wand, pen tool, brush, and so on. The list goes on and on, you get used to them with time.
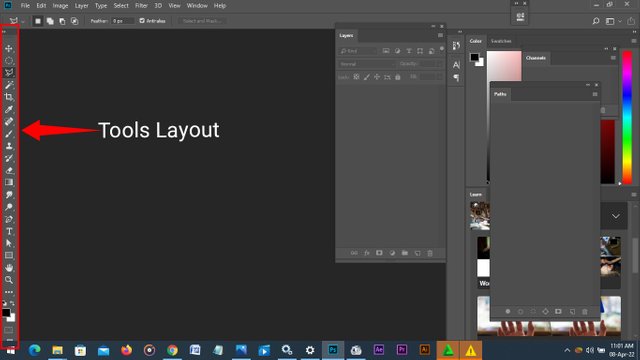
In this context today, we would be talking about two important edit tools which are great for image editing and some photo manipulations. These tools are Lasso tool and Magic wand.
Lasso Tool
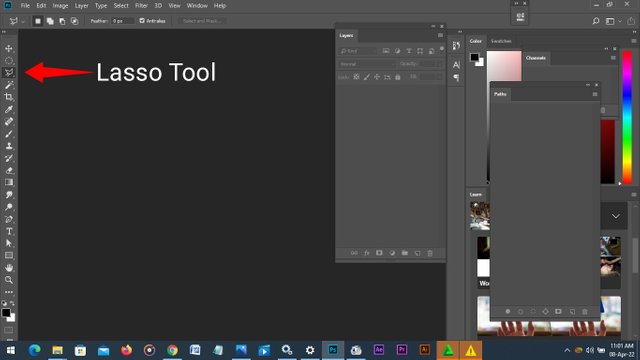
Lasso tool is basically a photoshop tool that can be utilized for the removal of an unwanted part of an image for editing to taste, photo manipulation and sometimes getting rid of backgrounds to fill with desired color/image. In this section, I will discuss how it can be used to eliminate parts of images. Let's see a few steps below.
- To start with this, go to your PC's folder containing a folder you'd like to work on, right-click the file and open with Adobe Photoshop.
- Right-click on the lasso tool layout and select Lasso.
- Using the Lasso tool, you must select a starting point and this point is also the ending point while the tool contains the area of the image under edit.
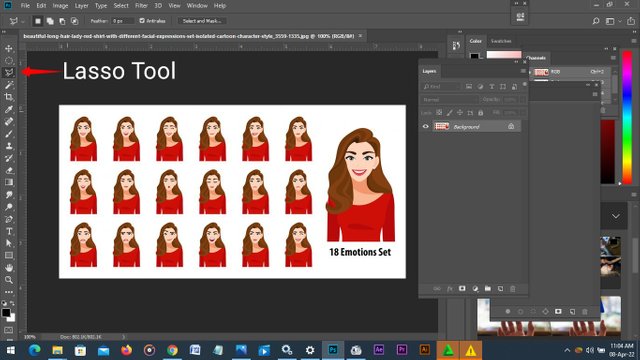
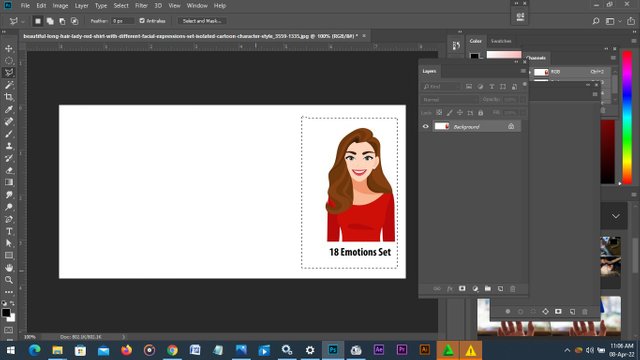
- Above is the image I'd like to work on, the aim is to get rid of the smaller pictures in the set. To do this, I selected the lasso tool, clicked on the edge (from the left), and held the shift key while I dragged along for a straight line (that's the work of the shift key). Let's see an illustration below.
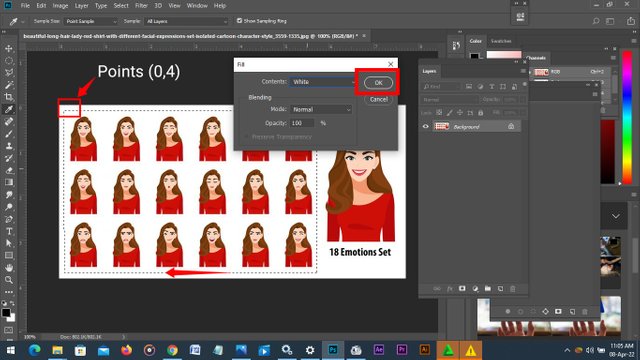
- On the right side when the lasso line has covered the length of the area, I clicked and changed direction towards the bottom then to the left then till the starting point was clicked on again, making it the endpoint. Clicking on that selects the entire area, click the Delete key on your keyboard, you will be asked to fill with a color and it was filled with white in my own case.
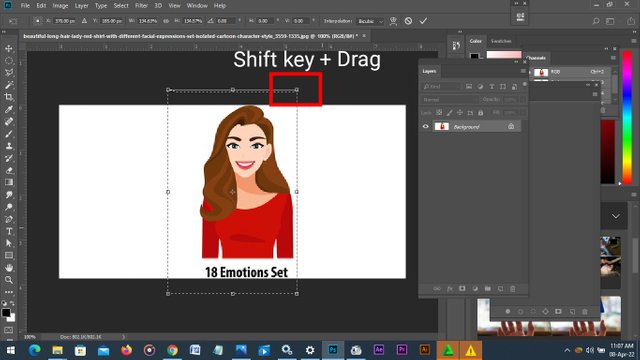
- To make the image bigger, click Control + T on the keyboard which open paths where the image can be enlarged or reduced. Then use the shift key and drag to enlarge the image.
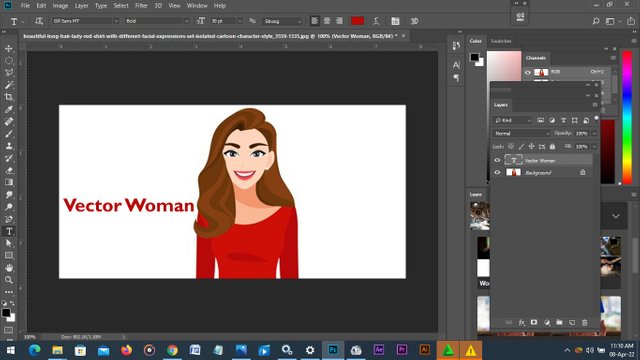
From the steps above, you have a new image defined, and to save it, click CTRL + Shift + S and save it as Png or Jpg, and this can be utilized it for the intended purpose.
Magic Wand
Magic wand is another great selection tool in Adobe Photoshop to select an area on an image for probable change of the area or modification. It's mostly used for solid colors where the entire area with the same color can be selected by clicking on a part while all other identical area gets selected at a go.
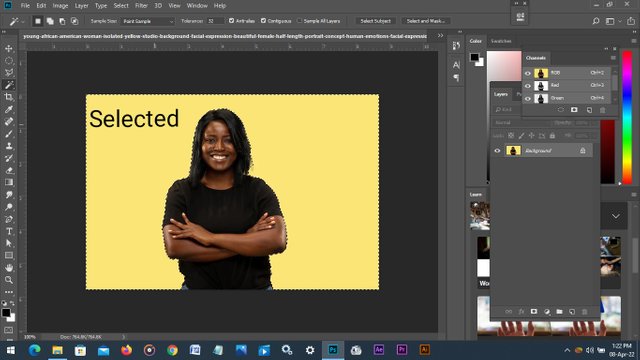
Contrary to the lasso tool where points are selected, using Magic wand, a selection on a section automatically selects all other areas. This tool makes it easier for quick elimination or modification of a part of an image with less stress. Pictures with solid color backgrounds can be easily changed using this tool, for example, a picture with a white background can be selected and changed to another color in a matter of seconds. Let's see how simple it is to do that.
- Open the file on your computer using Adobe Photoshop. And choose the magic wand tool from the layout.
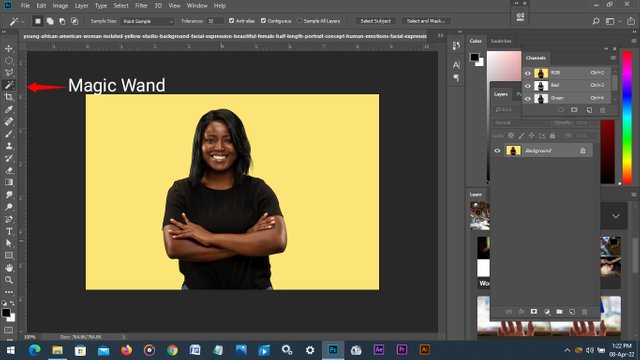
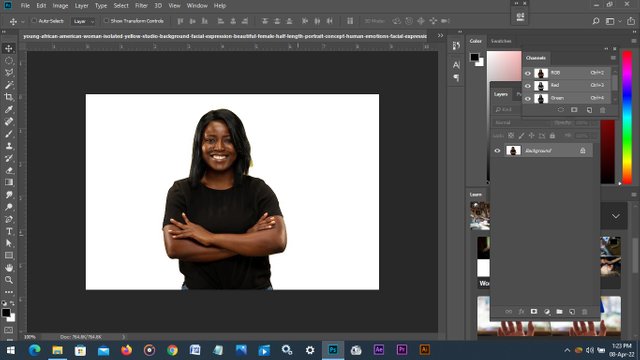
- The above picture of a woman would change from that yellow background to the desired background color in just a few seconds. Select any of the yellow background and it would select all identical colors on the image. After selection, click the delete button and fill it with the desired color.

Conclusion
In conclusion, we have been able to talk about a few selection/edit tools of Photoshop, in this context, such that it opens the basis to the utilization of this software for basic image editing/manipulation. In the next few articles, I will teach about other tools of this great design software and how to start a new project using your preferred dimensions, also you would be exposed to the layers window and how it works. I hope you have learned something today, thanks for reading this far. All the images used are screenshots from my PC and the pictures used on the workspace are free ones from https://www.freepik.com/.
Written by;
@fredquantum
Congratulations! This post has been upvoted through steemcurator07.
Curated By - @klen.civil
Curation Team - The7up
Thank you for the support.
This is indeed a great piece and skill from you @fredquantum. We hope you continue to share this great skill with all of us in #Steemi4nigeria community.
Thank you, @steem4nigeria. I look forward to doing more of this.
Excellent content my friend. Very useful for many who still do not have the necessary knowledge in handling these tools. I congratulate you. Happy and blessed day. Greetings.
Thank you, @gabylazarde. I'm glad to have you around on this. Do have a blessed day.
Amén🙏