SLC-S21W2: Creating an Amazon Affiliate Account & Adding Affiliate Links
The initial stage to complete the Assignment Task on SLC-S21W2 is to start by registering an Amazon Affiliate Account. To register an account, you can do it by paying attention to the steps below.
Before you sign up, make sure your blog is ready with some great posts. Your blog is super important for whether you get registered or not.
| Amazon Affiliate Account |
|---|
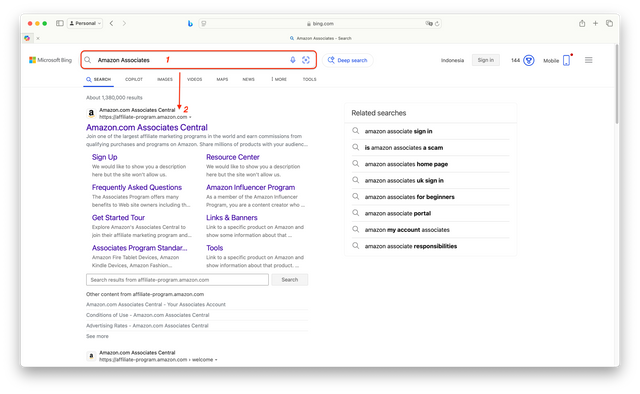
Step 1:
- Open a browser
- Type Amazon Associates or Amazon Affiliate Program in the search bar
- Click Amazon.com Associates Central, as I show in the image above (at the arrow).
- Then you will enter the registration/ login page
Note: If you already have an Amazon account, you can register directly by scrolling to www.amazon.com, then find Become an Affiliate, click and start registering for the affiliate program.
Step 1: (continued)
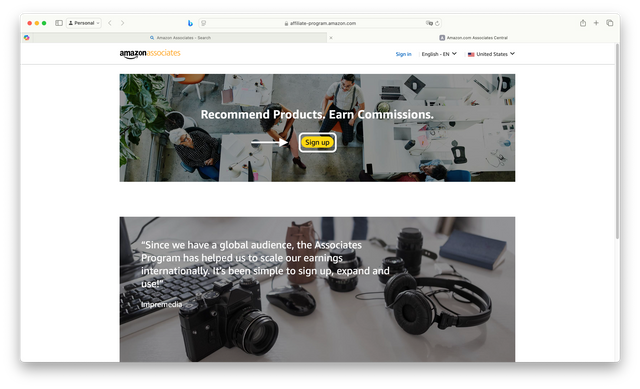
- Click the Sign Up button, this is the first step to register.
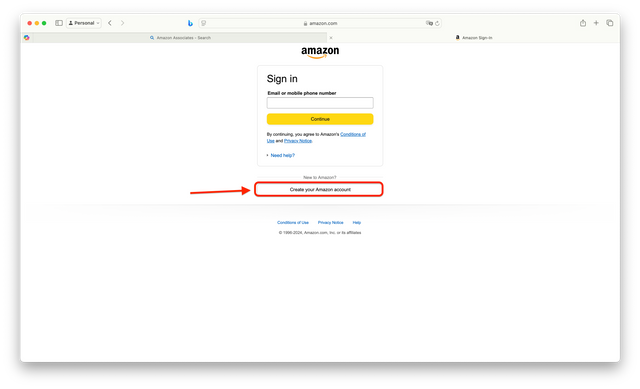
- Create your Amazon account, see the image below.
- Fill in your name in the first column, email, password and repeat the same password in the 4th column. (Enter a password character of at least 6 characters)
- Click Create your Amazon account if the required data has been filled in
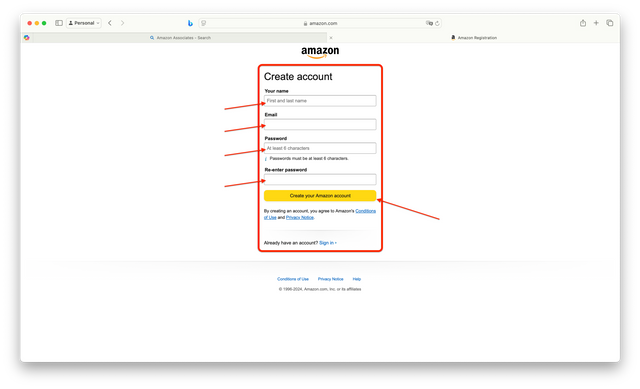
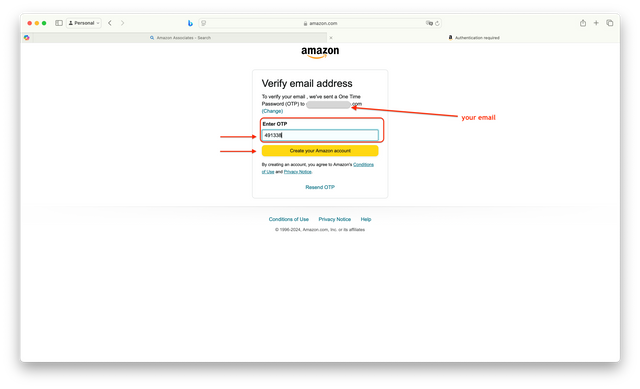
- After you click Create your Amazon account, Amazon will send an email containing the OTP Code.
- Enter the OTP Code from the email
- Click Create Your Amazon Account
Next, to complete Creating Your Amazon Associates Account, you must complete the following data entry:
- Account Information
- Website and Mobile App List
- Profile
- Start Using Associates Central

Get your data ready to sail smoothly through the registration process. No obstacles allowed!
Step 2: Creating Your Amazon Associates Account
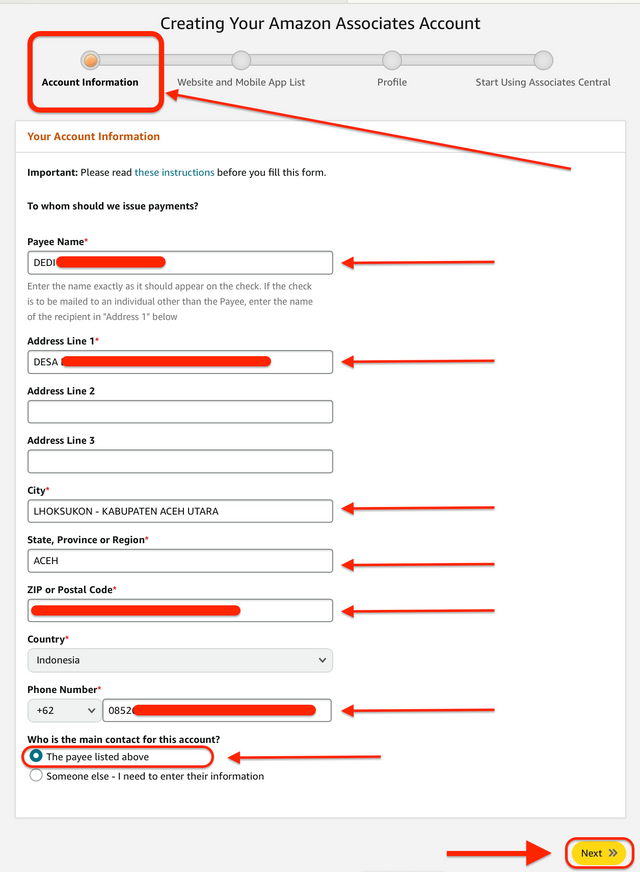
1. Account Information
Before you start filling out the account information form, take a moment to read the instructions carefully. This way, you can make sure that each section is filled out according to the rules. Also, pay special attention to the name you’re using. It should match the payment identity you’ll receive.
Fill out the form correctly according to your personal data
Select one for the main contact on the account you registered.
Click Next for the next form.
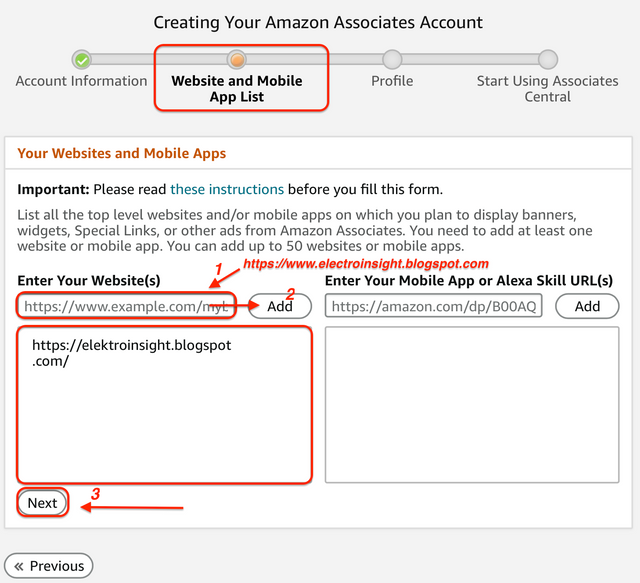
2. Website and Mobile App List
- On the second form sheet, you are required to fill in the website/blog link that you have prepared previously.

Enter https://elektroinsight.blogspot.com/ in the
Enter Your Website(s)column and click addClick Next
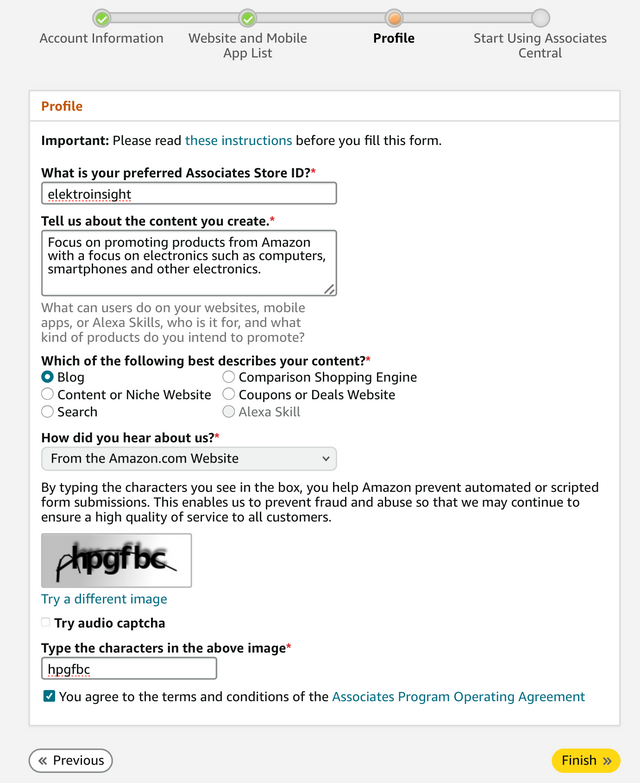
3. Profile
- Enter what is needed, for example in the third form.
- Enter What is your preferred Associates Store ID?
- Type of content to be published on the blog and fill in some other data
- Enter captcha
- Click Finish
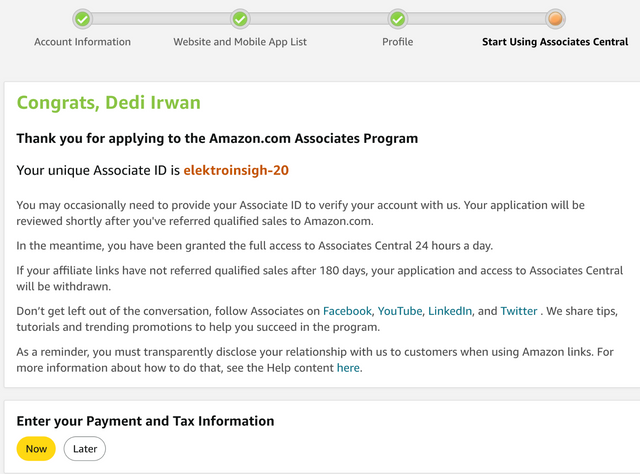
Amazon.com Associate Program has been successfully registered
My Associate ID is elektroinsigh-20. The associate ID is a system generated ID, you will get a different ID between 1 user and another user.
Next to prepare your Payment and Tax Information. The tax section can be entered now or later.
4. Start Using Associates Central
- To be able to use it Enter your Payment and Tax Information.
- Complete Two-Step Verification by entering your mobile phone number.
- Enter the OTP Code sent to your mobile phone
- Login again to complete the Tax profile data
See the image below:
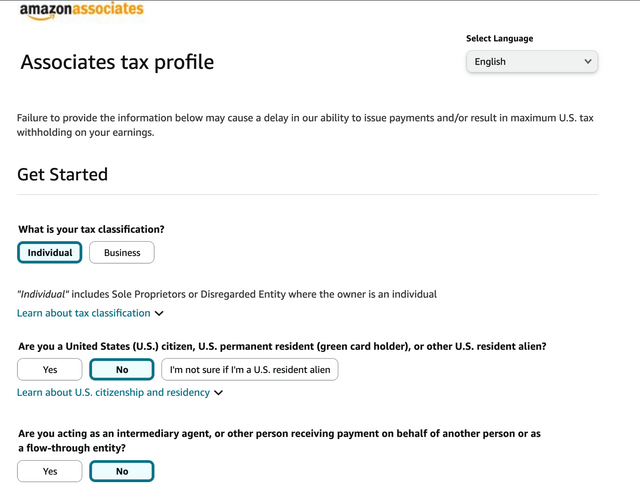
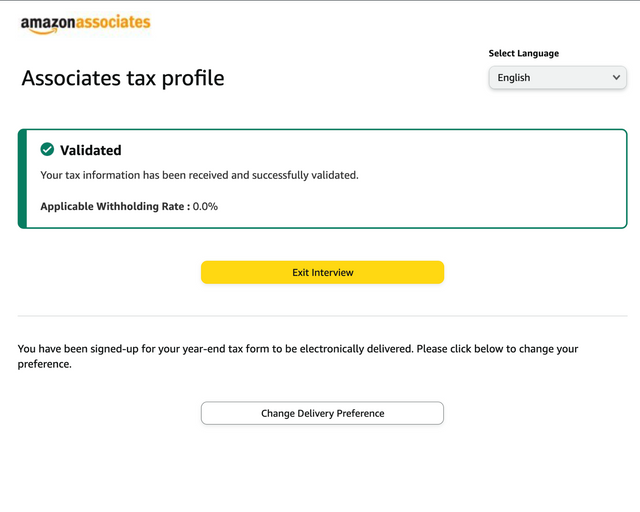
Here are two images showing a quick snapshot of tax data filling and validation. (Your tax info has been received and all good!)
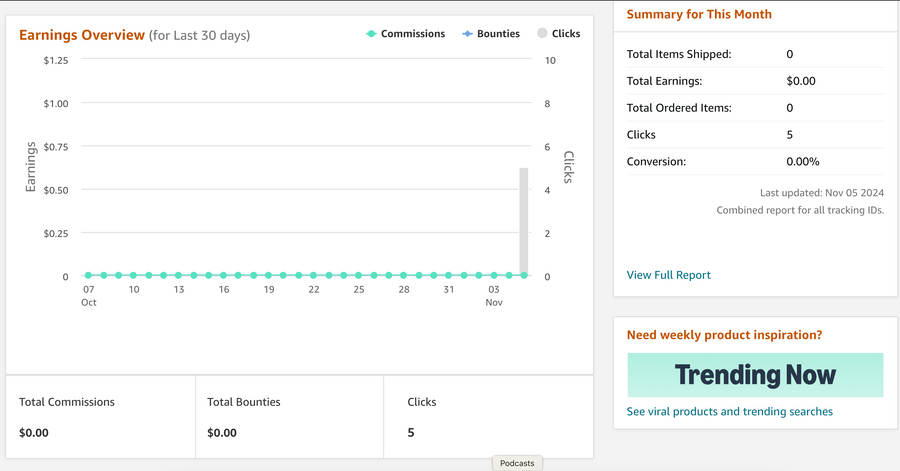
The final step in account registration is to fill out and submit your payment information. Not all countries offer payment options through bank accounts, but if your country isn’t listed, you can still make a payment using a gift card or check.
| List Products on My Blog |
|---|
I will start looking for products according to the orientation of the blog and then I will release it on the blog to link the Amazon affiliate link, to find the 3 types of products I want, go to amazon.com
The first product I will add to the blog is a Smartphone (Apple iPhone 16 Pro).
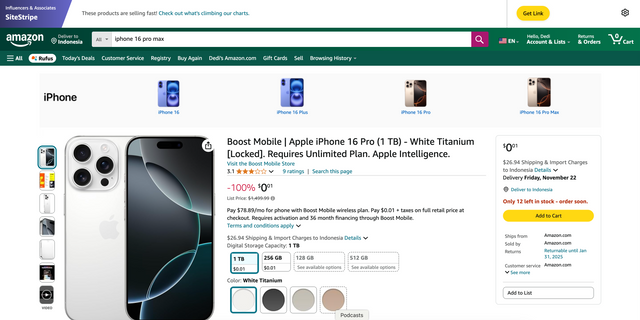
Once I locate the product, I’ll get cracking on preparing it for the blog.
- Open Blogger
- Select New Post
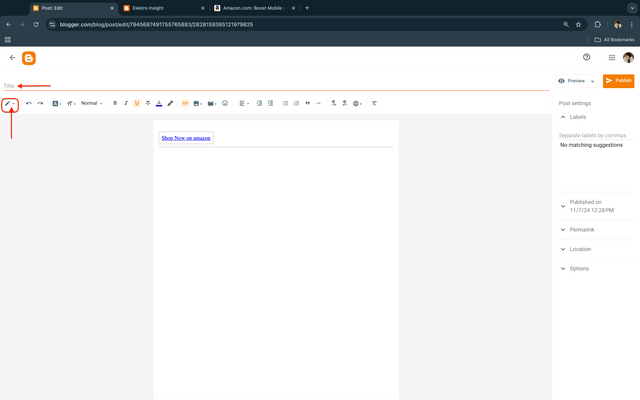
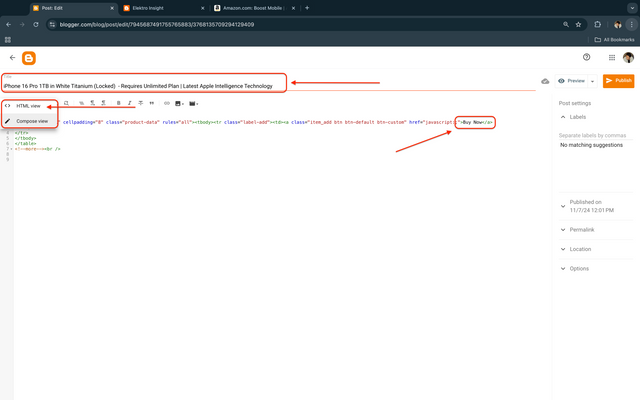
- Enter Title (Optional): (Can be entered at the beginning or after pasting the Amazon affiliate link)
- Select HTML View to change the display to HTML code.
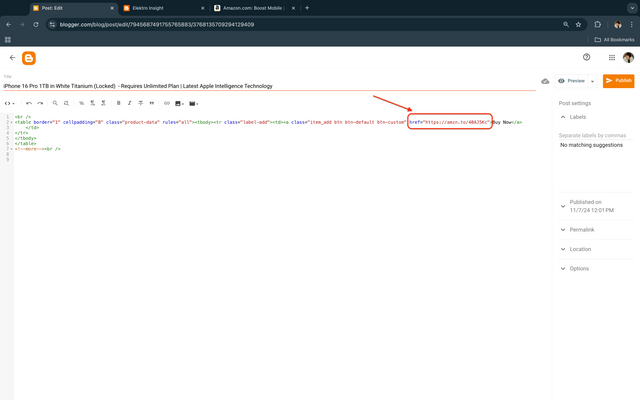
- Find Shop Now on amazon and change it to Buy Now
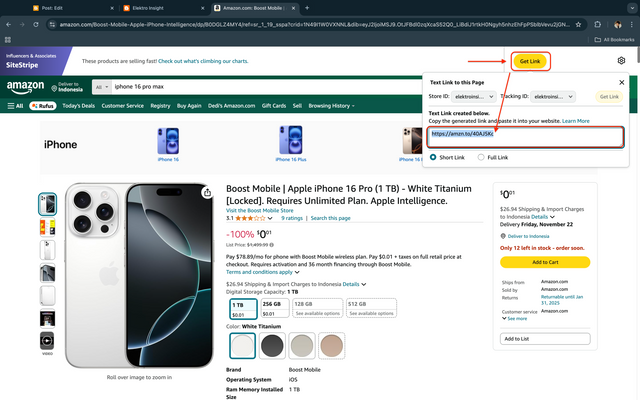
- Click Get Link on the product page that will be published on the blog, then Copy the generated link and paste it into your blog
- Replace
javascript:;with the amazon product affiliate linkhttps://amzn.to/40AJ5Kc - Return to Compose View mode to continue publishing the blog such as product descriptions, product appeal and relevant images.
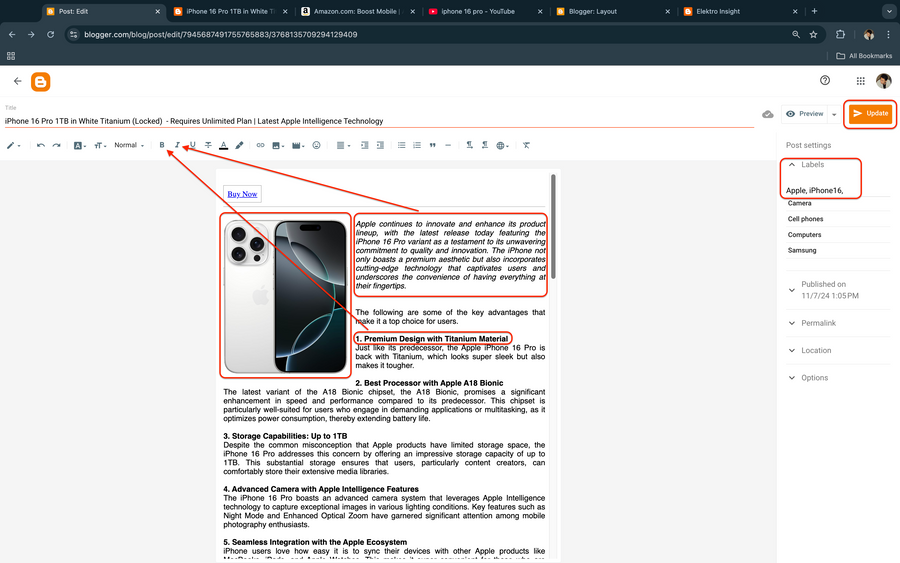
The appeal of a blog lies in the blog template and how the blog owner designs the blog layout well, then in preparing it also requires sensitivity to image size, position and writing style.
I chose Italic for the first paragraph which is the initial description, there it provides an overview and the main reasons for choosing this cellphone as their daily needs, I also use Bold on important points, then subheading on other additional references.
Add label to filter product searches, this is related to the menu and sub Menu blog. Visitors will find products that have been filtered from the use of this tag.
In the last section, click Post or update if you have made edits.
Look at the picture below.
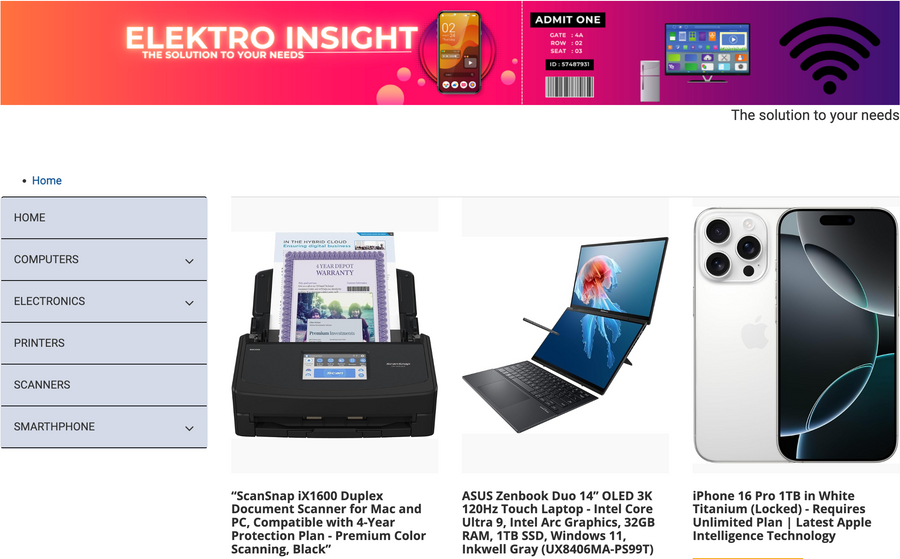
I’ve created three product lists for you on the blog, and I’ve added Amazon Affiliate links. I made a few small changes to the look, like changing the image layout, positioning, and using slide form.
 |  |  |
| Amazon Affiliate Links: https://amzn.to/48FtF9G | Amazon Affiliate Links: https://amzn.to/3Ax7dmw | Amazon Affiliate Links: https://amzn.to/3YCCtZl |
| Define My Niche |
|---|
I picked the computing and digital technology market, including smartphones, because it's a goldmine for the affiliate market on Amazon. The rapid advancement of digitalization and IT has had a huge impact on society. People are on the lookout for something that's perfect, efficient, and portable.
Embracing technology isn't just a trend; it's a necessity that can boost productivity in the workplace, entrepreneurship, and beyond.
I believe this segment is super effective because the demand for it is sky-high. Through "elektroinsight", I can write and review informative products, give recommendations based on my personal needs, and most importantly, everything is connected to Amazon through the affiliate program.
| Register My Blog on Google Search Console |
|---|
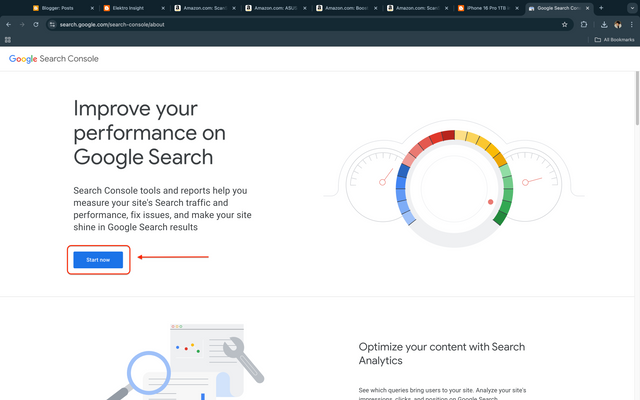
- Open Google Search Console in the browser
- Login with your Google account, use the Google account registered on the blog that will be registered on the Google Search Console
- Click Start Now
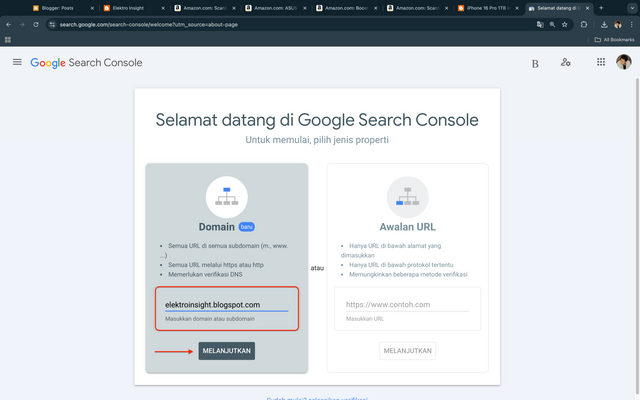
- Select Add Property
- Select one of the 2 Property Types (Domain or URL prefix)
- Paste your blog link, for example elektroinsight.blogspot.com
- Click Next
Look at the two images below
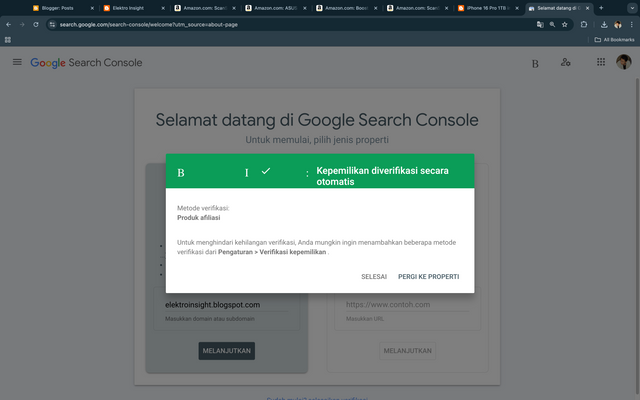
- After clicking Continue you will find a new page
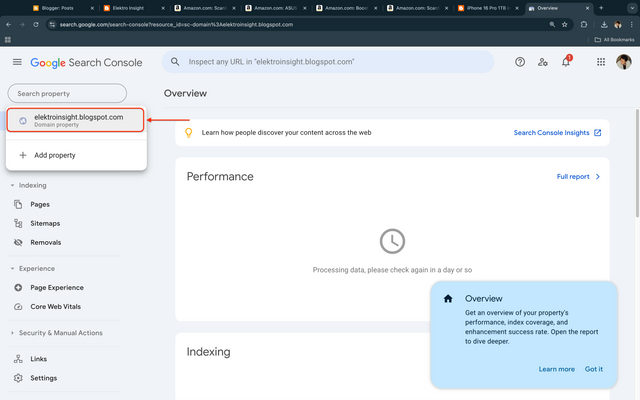
- Ownership is automatically verified, click Go to property
- Your blog has been registered in google search console
- The next step is to enter Sitemaps
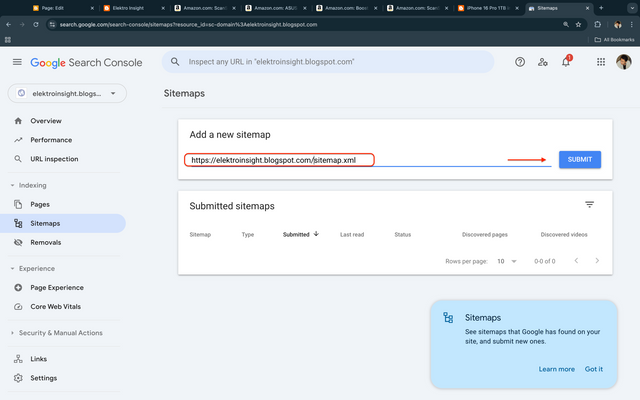
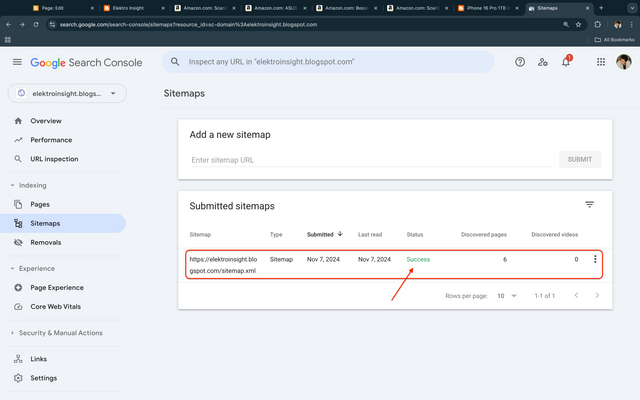
- To register a sitemap, search for Sitemaps in google search console
- Paste your blog address and add /sitemap.xml for example: https://elektroinsight.blogspot.com/sitemap.xml
- Click Submit
- Wait a few minutes and see if the sitemaps have been successful? Look at the picture above.
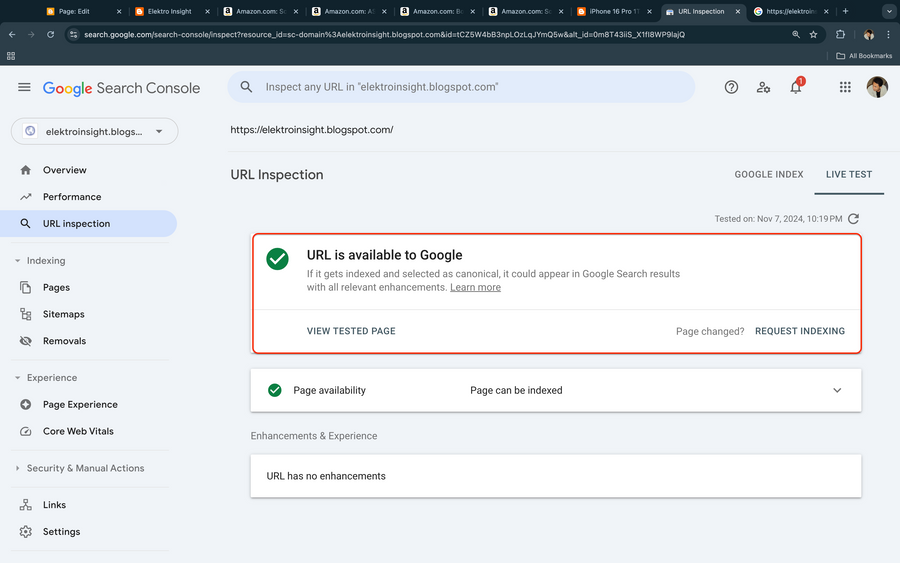
To ensure that your blog is indexed by search engines like Google, perform a URL inspection. Inspection can be done by:
- Google Index
- Live Test
Based on the search results using Live Test, my blog URL has been indexed by Google, but it will take up to 1 day to be found by search engines.
I’ve got a task that I can finish this week. I hope my other colleagues can join in too. I’d love for @kouba01, @stef1, and @wakeupkitty to participate in this learning experience.
Cc: @hamzayousafzai
Indonesia, November 07, 2024
@irawandedy
Upvoted! Thank you for supporting witness @jswit.
Hi, @irawandedy,
Your post has been manually curated!
Do you have the phone yet? Is this just homework or will you be actively feeding electroinsight with information?
I thought adding a sight to a search engine is not needed since years. 🤔
♥️🍀
I’m waiting for the perfect moment to buy it. Right now, I have a lot of pressing priorities to take care of, and other things are on hold.
How have you been? It’s been way too long!
I am put on a hold. My friend an eye operation and it looks as if blindness will follow. ☹️
So take good care of yourself and your eyes.
Long ago or not, you are still my friend.
🤗♥️🍀
That looks very complicated, you did very well with the detailed description of the process. Really nice work!