How to Edit the RoadShow Template with a Simple App called Add Text.


Introduction
For the Roadshow campaign, we have a template which our members are encouraged to use in the reports. The first image should be from this template which already has some basic elements in it. Promoters are expected to add thumbnail images, the day and date of the Roadshow. Unfortunately, many are not able to do that on their own. So this app will help them edit the template and add the desired elements. The app is called Add Text.

How to use Add text to edit Roadshow Templates
Note: Before you begin, make sure you have the Add text app installed in your devices. You can download it for free from playstore. After installing the app successfully, you can run the app and follow the steps below to edit the Roadshow template successfully.
To download the app, follow this link: https://play.google.com/store/apps/details?id=com.nand.addtext
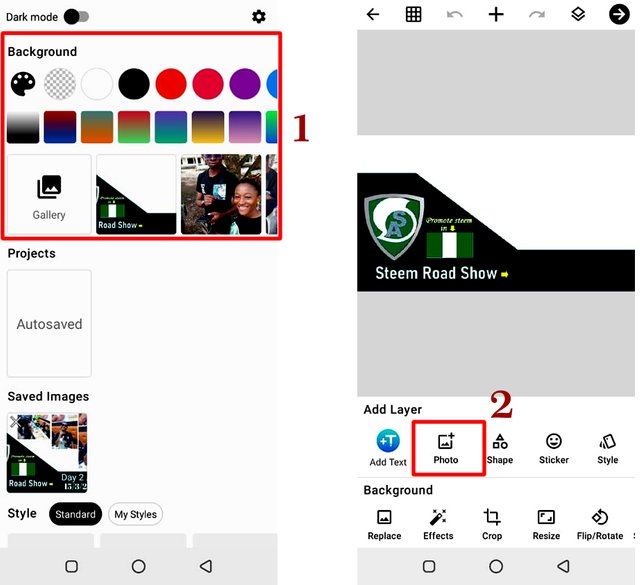
Step 1: Once the app is Open, you need to select a background to do your work. There are two options. Selecting a color as background or using an image. Since we already have a template, we are going to use it. So click on Gallery and location the template from your image folder. Your most recent images are displayed in the app. So I will just click on the template as shown below.

Step 2: Now that we have selected the template, the next thing is to add the pictures we want to use on the template. Click the photo item to go to your gallery. Select the picture you want to add and it will appear on the template.
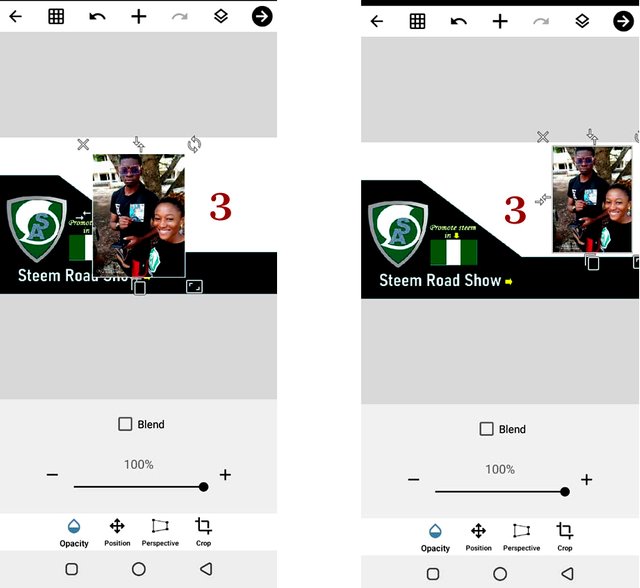
Step 3: The pictures appears with various handles around it. These handles can be used to edit the image. The resize handle is seen at the lower right hand side of the image. You can drag in or out on this handle to increase or reduce the image size. You can click, hold and drag on the image to move it to any location. You delete the image by click the X handle located at top left side of the image. If you want to add more images, repeat step 2 above.

Step 4: Now its time to add the text. For this roadshow template, you add the day and date. So you have to click on the Add text section of the app. It takes you to the area where you can type text. Type the text you want to add. Remember you need to add the day and the date of the roadshow including the city. (Check the image below)

Step 5: You will see the text appear on the image. Now, you can edit the text using the text properties at the bottom of the app. You can change the font and color it. Just like the picture, you can position the text by dragging it to any position you want. After that, your work is done and ready. Next this is to save it and use it in your post.

Step 6: To save the work, you need to click the arrow at the top of the page. There is a black arrow pointing right. Click this arrow to reveal the save dailogue box. Enter the name of your picture and click save to save it. congratulations the image has been saved. You can now upload it as you make your Roadshow report.

Conclusion
We have seen some people make their roadshow posts without the template image. This is wrong. Please download this app and follow this guide to make your images appear fine. If you find anything challenging or difficult in this tutorial, feel free to leave your questions in the comment section of this post.
Note: You can also use this app to make the graphics for your posts. This app can be used to do colorful and many text effects. You can play around the many features of this app. Learning is possible if you put in effort to do so. The cover image of your posts can look very beautiful if you use this graphics app or any other one to edit your work. Please if you use some other apps that are really easy like this one, you can recommend them.

The RoadShow templates
Here are the roadshow templates. Please download them and use them for your roadshow posts:


Here is how the template will look after you have finished adding text and thumbnail pictures using the app and guide as explained above. @steemitblog


Subscribe:::Discord.
:::join trail
This was really detailed and well explained, I can do this right away. Thank you @focusnow
Always having us in mind, thank you Sir for dropping this, I've really benefited from it. Long live steemAlive
Wow @focusnow, a leader like no other, thank you so much. This is so timely. I so much appreciate this
Thanks so much @focusnow, for this wonderful information. We can't thank you enough for always taking care of us.
It always gladdens my heart to learn under your tutulage. Thanks @focusnow for your unrelenting effort in educating us.
Nice one, thank you for this I will share it with my team
Thank you @steemalive for this tutorial… I will definitely do a dry run of it…. Thank you for always looking out for ways to equip your members
Wow.... good one.
This one is really helpful and will be easy for us to create and edit more designs.
Thanks once more.
Very very ..
This indeed is most commendable fa.
Thank you introducing yet another easier method of steeming hard, yet with cool features
I'm sure going to get this app as soon as possible.
Thanks for sharing boss.