Tech diary|| How to own a business website on Bumpa App: create, add products, record and track sales by @christnenye
Hello everyone, hope you'll are doing great? However, welcome back to my blog.
Today I will be working you'all through the process of creating, adding products, record and track sales using Bumpa App that enables one own a business website.

What is BUMPA APP?
 Bumpa App Interface
Bumpa App is an app that enables one create a store, manage orders and make sells online. Bumpa App eradicates the manual method of recording sales in books which is exposed to loss, fire outbreak and many more, it does help one to be in control and manage daily sales with proper documentation.
After downloading Bumpa business website App what next?
We often have issue on how to make sales but Bumpa App is available to help in solving this issue by having the capability of advertising products in social media platform: it involves creating and uploading products of which the user copies the link and attach it in his/her social media handle to enable friends and followers see what is being sold and make an order.
What if I don't have prior experience on how to make use of the BUMPA APP, what should I do?
Bumpa App management made it easier for users to learn how to go about everything in the app. One of the requirements of signing up is to input a functioning email address, once done mails containing Step by step guide on how to make use of the App is made available.
Having known everything on how Bumpa App works, how can I own one?
Let's get to business
BUMPA APP HOME PAGE
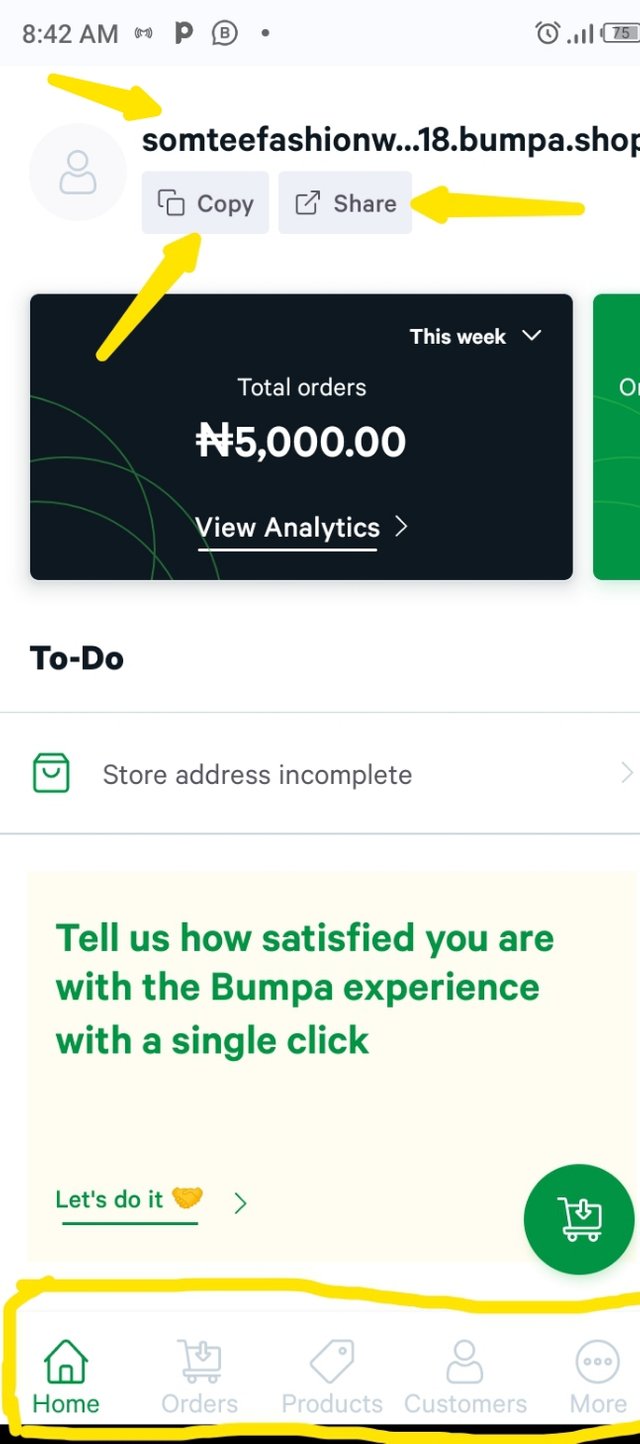
the website name, copy button, share button is seen at the menu bar, the home, orders, product, customers and more feature is seen at the footer.
TO CREATE A BUSINESS WEBSITE
~Step 1~
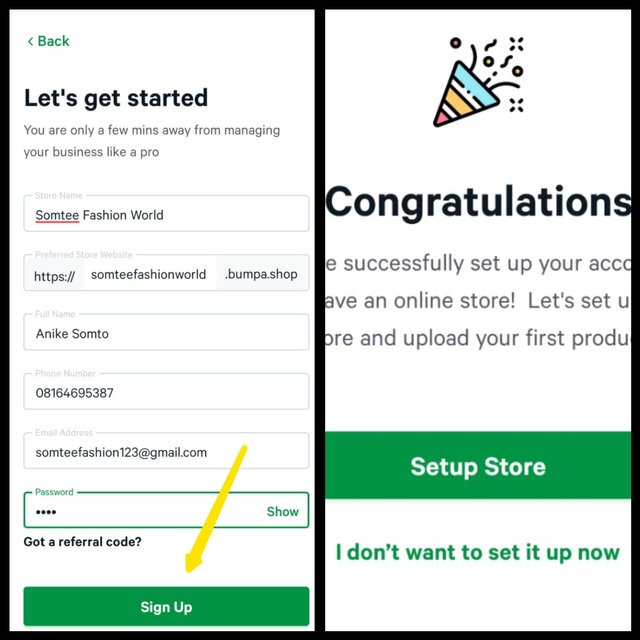
Download Bumpa App from play store and open the app, fill the details required and click on sign up as the screenshot displays from the left hand side after that a pop up as displayed on the right-side showing "congratulations".
~Step 2~
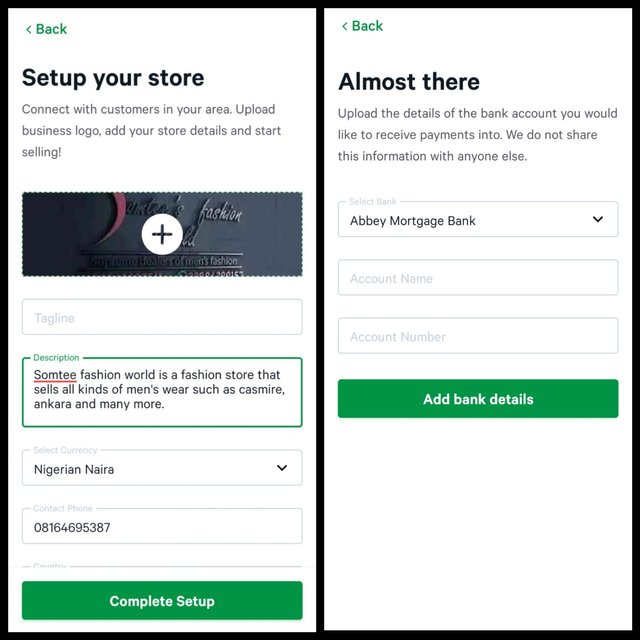
After successfully signing up, you create a store and add your bank details where the proceeds from sales will be paid. The screenshot below displays it
This is end with creating a website on BUMPA APP, the second phase is on how to add a product
TO ADD PRODUCTS
~Step 3~
After setting up the bank details, a pop up Interface of add product come up. To add product click on the section where there is add product icon, it will take you directly to your phone memory where the pictures of the product is saved then upload the picture as shown by the screenshot.
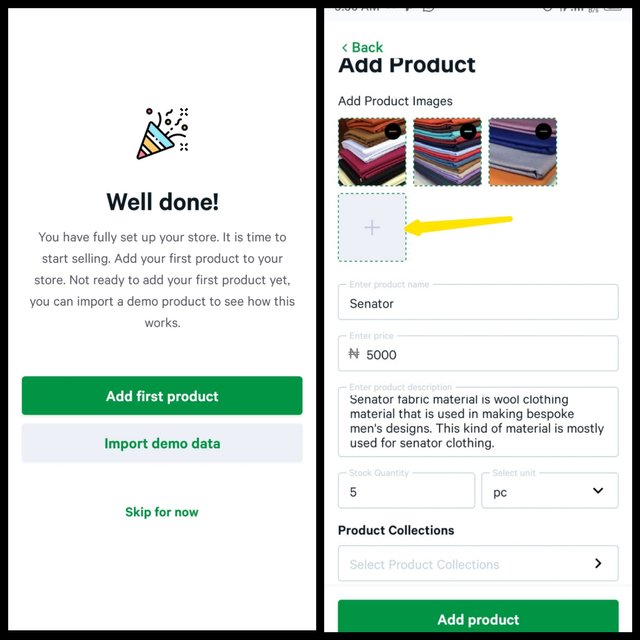
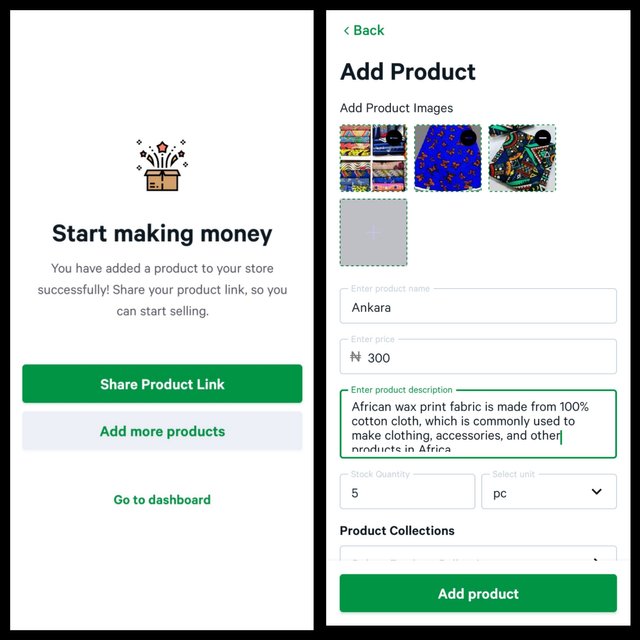
Once add product is clicked, an interface where one can copy link and share to social media platform and add many products as well pop up as shown below
TO RECORD SALES
~Step 5~
Firstly, you need to add your customer details
by clicking on select customer optional then input the details as the right hand-side despicts
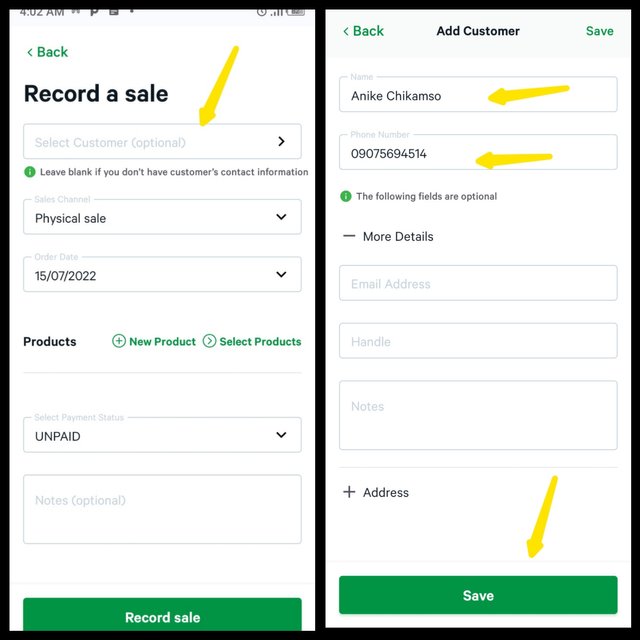 select customer on the left hand-side and add customer details on the right hand side
~Step 6~
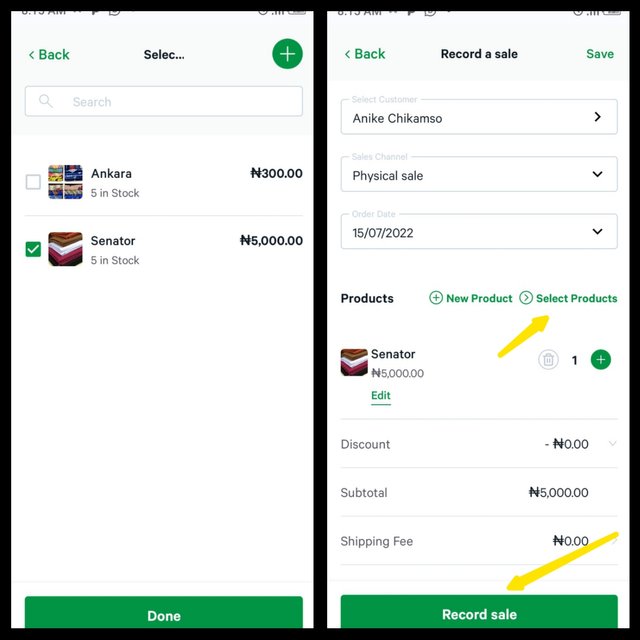
After adding customer details, select the material bought and click on record sales as shown below
Finally, TO TRACK SALES, PRODUCTS AND CUSTOMERS
~Step 7~
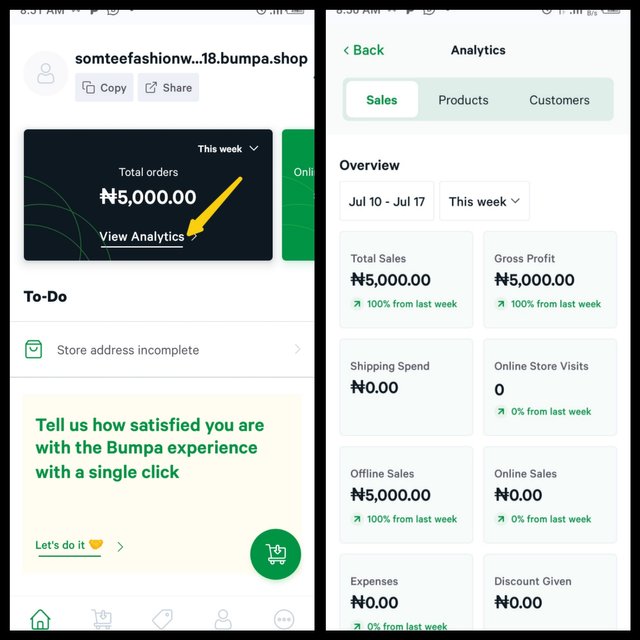
To track sales click on view analyticson the Home page as shown on the left hand side of the screenshot and the total sales record pops up as shown on the right hand side of the screenshot.
~Step 8~
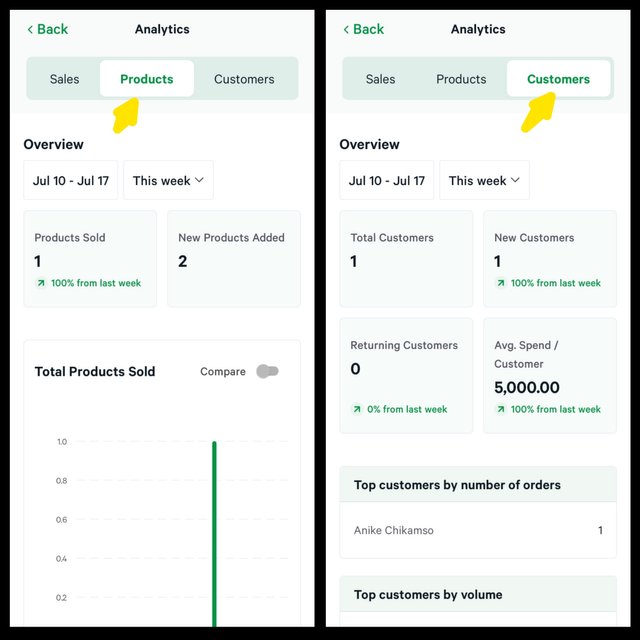
Click on product to see the number of products added to the App, and the number of customers added.
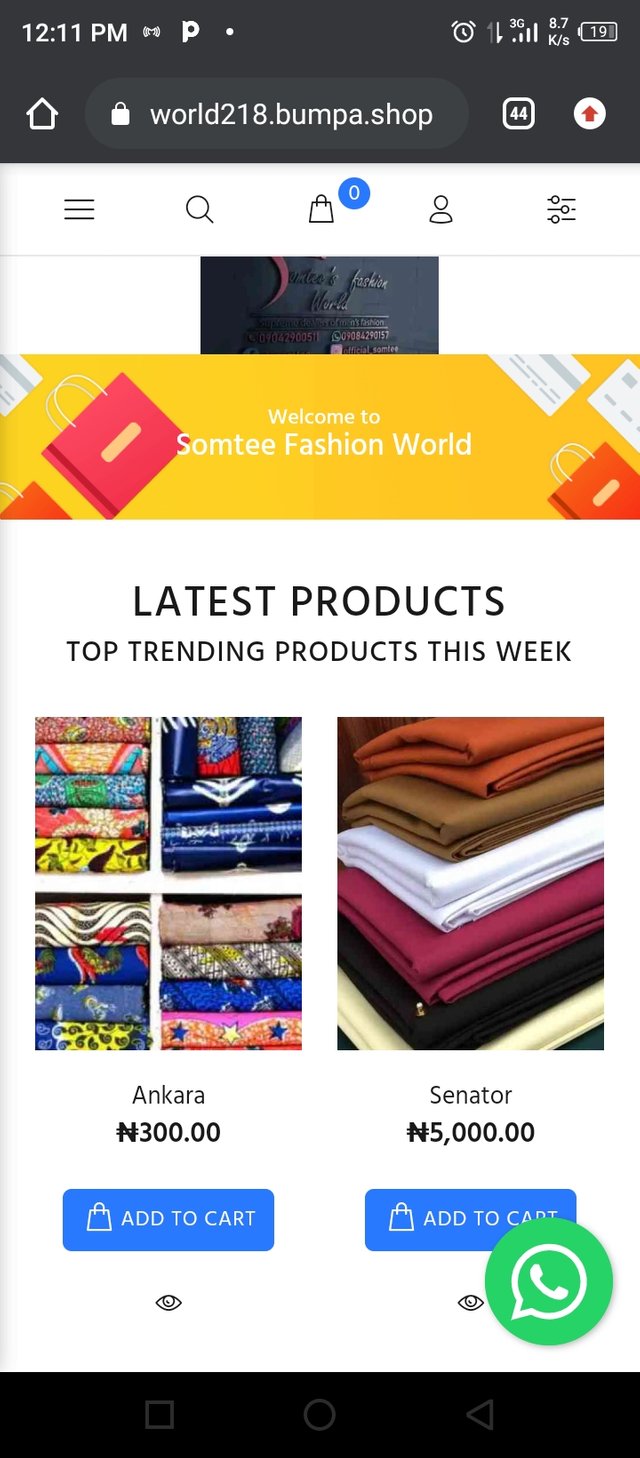
Lastly, when one shares link of the business website and customer clicks, it will open on a browser and the view is below
Conclusion
Bumpa App is a business app that enables users own their website in which after uploading their products can copy the link and paste it on their social media handle in all platforms. It is very efficient because there is no need of paper records and not knowing who bought a product, how much he/she bought and date bought, Bumpa App has the functionality to keep such records.
I am @christnenye, thanks for visiting my blog and I hope you learnt something you can download the app and try the steps out to own your business website today.
Best regards @siz-official and @suboohi
Your post was upvoted by @hustleaccepted
Hustle Accepted
We're inviting you to join our communities at:
Hustle Accepted III Quit Porn III Quit Drugs III Q&As III Life-Changing Quotes
Thank you for contributing to #LearnWithSteem theme. This post has been upvoted by @fabio2614 using @steemcurator09 account. We encourage you to keep publishing quality and original content in the Steemit ecosystem to earn support for your content.
Regards,
Team #Sevengers
Thanks @fabio2614, for appreciating me much 💕
Very informative content! I will like to know more about this bumpa App. How do someone receive payment, and is it based on affiliate sales?
It's not based on affiliate sales, just like having an offline store but you also want to have an online store Bumpa App helps you do that.
On the part of payment, during the setup of the website bank details where the proceeds of your sales will be paid is required of one.
In addition, take a proper look at the last screenshot of the browser look, once a customer clicks on the product he/she wants, payment options will pop up. Already your account details is there and the Bumpa App management will alert you through email about the order also you will credited.
You just need to have a functioning network, so you get notified and do the necessary like including the delivery fee and the rest.
Finally, Bumpa management is there to help you clear any difficulty you encounter with the app through mails. That is why you need a functioning email address before the setup.
It's very easy to setup, just follow the steps I used.
Steem on
Thanks for the explanation