Coding Class (HTML) - Creating our site! (Lesson 2)
Welcome back to lesson 2 of the HTML coding class! Today, we are going to create our first web-page with a bit of CSS to add some super-sexy decor! Get your text-editor ready, as today is going to be filled with lots of information!
In order to start our website, we need to go over some prerequisites. One is how to set out the code so that your web browser recognises it and the other is adding the files to our web server. Let’s go!
Open your text-editor (Atom)
1) First of all, create a new folder on the desktop and call it HTML Website.
2) In Atom, create a file called “index.html” (without the quotation marks) and save it in the directory.
3) Now create a file called “style.css” (without the quotation marks) and save it. This is the file where you can bring your designs to life!
4) Jump over to the HTML file and we shall begin coding! If you have all the packages installed from my last tutorial, you should simply be able to type “html”, press enter and the basic layout is sorted for you.
5) If you do not have the layout, you can copy it from the image below.
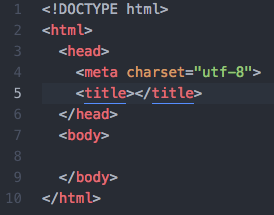
Explaining what everything means
1) <!DOCTYPE html> - This tells the web browser how to render the page. In this case, it is using the HTML format.
2) <html> - This tells the web browser the language that we are coding in, so things can be set out in the correct format.
3) <head> - This an an element which can include the title for the document, styles, meta data, scripts and other information.
4) <meta charset=“utf-8”> - This tag specifies what character set your website is written in. UTF-8 is capable of encoding all possible characters. It uses 8-bit code units.
5) <title> - This tag will allow you to give your website a name. You can see this by looking at your current tab, which is most likely my tutorial name!
6) <body> - This tag is where we write all of our code that we want our web browser to pick up and spit out at the screen. Here we can add heading tags, <h>, or other various tags.
Now, you may notice that near the end of the HTML document that the tags mentioned above are found again with a slash (/) in front of them. We use a forward slash to close the tags.
Now that I have gone through what the layout looks like and explained the functions, we can write some simple code to display “Hello World!”
Hello World!
1) In between the <title> tags, type your website name. For this example, I will use “My First Website!”
2) In between the <body> tags, I will type “Hello World”.
3) Your code should look something like mine below.
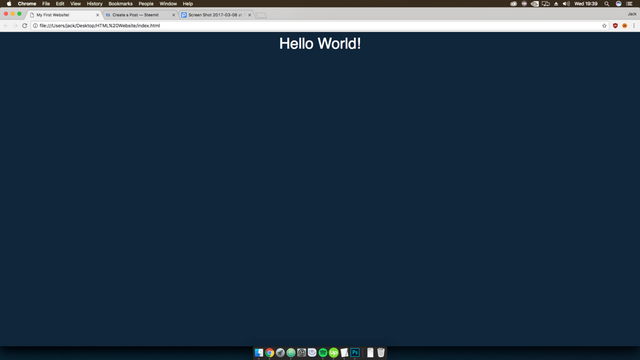
4) Save the document and open it with your web browser. I am using Chrome for my tutorial series.
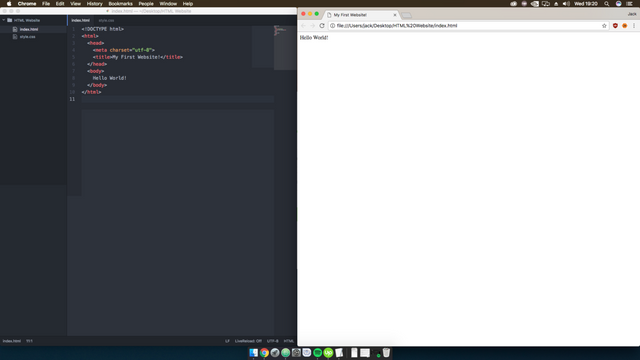
You may notice that our website is looking pretty dull and boring and probably thinking, “is that all?” I can assure you that my answer is no. We are going to fully pimp out this website so it looks unrecognisable! This is where CSS comes into play. CSS stands for Cascading Style Sheet and it allows us to change the colours, layouts, and fonts. Those are just a few things you can do with CSS. The opportunities are endless!
Spicing things up a bit
1) Before we start to change the way our website looks, we need to link the CSS file to our HTML document. We can do this by typing: <link rel=“stylesheet” href=“style.css”>

2) Ok, so now we are finally ready. Open up your CSS file. We are now going to change our font, background colour and font size.
3) So, we are going to type the following:
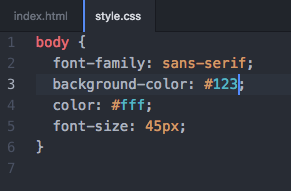
If you save the file and reload the HTML page in your browser, you can see that there is a total transformation! Just by a few lines of CSS, you can change a plain and simple website and add some interesting colours to it. Just because I am feeling picky, I will center the text on the web page by using:

Thats all for today, folks!
Thank you very much for taking part in today’s lesson. Next lesson, we will be adding some user input onto our website to get it responsive. If you enjoyed, please show your support by leaving a follow, resteem and an upvote.
Good stuff.
Thanks!
Finally got around to doing this. Not familiar with having site parameters in a css file. I put them in the html file in the past. Good stuff. Really like Atom so far. Looking forward to the next session.
Nice! I believe that it is good practice to keep the CSS in a separate file as it makes the HTML more easier to read. Glad you like Atom and are looking forward to my next session. Thanks!