Introduction to Excel filters and how to extract data
With the following article, I'll try to explain how to use number, text and date filters on your dataset to find exactly what you need, no matter how big your dataset is.
Filters represent certain conditions you specify your data and spreadsheets to extract only the specific information out from them.

For example, imagine a scenario where the IT manager wants to hire an applicant with a degree in Computer Science and experience using HTML, Java, and C++ languages. The IT manager will have to use the Human Resources spreadsheet database and based on logical operators to extract all the candidates who met the credentials.
To make it easier for you to practice the filtering tasks used in this article, I've created a downloadable Excel workbook with all the data you need.
In this Article, you will learn:
- How to use the Sort & Filter menu
- Types of filter
- How to use number filters
- How to use text filters
- Difference between AND/OR operators
- How to use date filters
Using the Sort & Filters menu
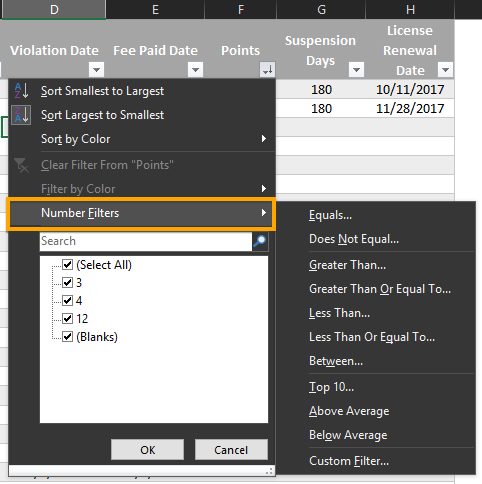
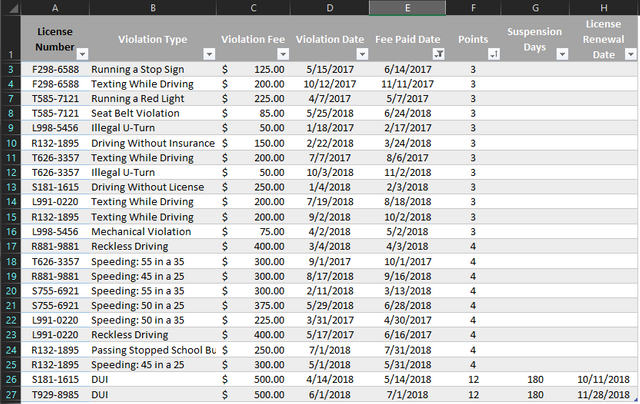
Access the Violations worksheet and click the arrow by the field column name "Points".
The drop-down menu begins with "Sort Smallest to Largest" and "Sort Largest to Smallest".
You can quickly sort columns by using this option.
In a small dataset like this, it's easy to determine how many points each Florida driver has just by looking at the raw table. In reality, this dataset would likely have thousands of records and by using the filters, we can determine much quicker in an efficient way, how many and which drivers have Greater Than or Equal To 12 points.

Types of Filters:
There are three main types of filters, which all work a bit differently:
Number Filters work with: Equals, Does Not Equal, Greater Than, and so forth.

Text Filter Include: Begins With, Contains, Does Not Contain, etc.

Date Filter use: Tomorrow, Last Week, Next Quarter, etc.

Using Number Filters
- Click the arrow by the field column called "Points". Select Number Filters and from the sub-menu choose "Greater Than or Equal To".

- When the Custom AutoFilter dialog box opens, notice the field name structure of the first input box; Show Rows Where > Points > Is greater than or equal to

- To see all the available Logical Operators, click the down arrow on the right side of the Input box and all will be listed for you.

- After you set the logical operator and a value is entered into the selection box, click OK and your dataset will refresh now showing only the records that match your selection.
- To clear this filter and see all the records in the dataset, open the Sorting/Filters drop-down menu and click Clear Filter From "Points".

Using Text Filters
- Open the filter drop-down menu beside the field column called "Violations Types" and Scroll down to select "Text Filters". From the sub-menu that pops up, notice the Text filters that are available: Equals, Does Not Equal, Begins With, Ends With, Contains, Does Not Contain, and Custom Filter.

- Open Custom Filter and notice that the dialog box has the following structure: Show Rows Where > Violation Type > Equals > Input value.
If you want to choose a different logical operator, Click the arrow on the right side of the Input box beside the Equals Input box and choose from the list. - Click OK after you set the desired logical operator and a value in the selection box.
- To clear this filter and see all the records in the data-set, open the Sorting/Filters drop-down menu and click Clear Filter From "Violation type".
**Using OR/AND functions: **
In a situation where you want to use multiple logical operators or search for multiple values, you can use AND/OR option in the filter dialog box. For example, let's say we want to extract all the records that show DUI's and/or Reckless Driving?
- Choose Equals in the top left Input box and then select DUI from the top right Input box.
- Click the OR circle (tick mark).
- Choose Equals (again) in the bottom left Input box and select Reckless Driving from the bottom right Input box.

Difference between OR and AND:
- OR means any record with DUI OR any record with Reckless Driving.
- AND means records that contain both of these violations.
Using Date Filters
Date filters are quite extensive allowing you to use a wide range of options to extract your data: individual and multiple dates by day, week, month, year, quarter, or year-to-date, plus dates within ranges. There is a so-called negative logic option as well, which allows you to exclude dates that do not equal 2019, or all dates that do not equal certain month.

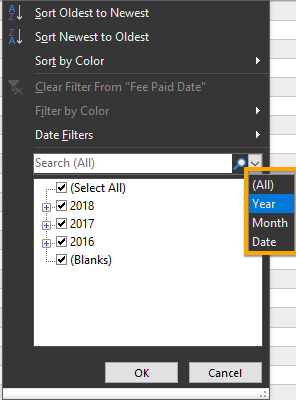
Open the "Violate date" filter drop-down menu, beside the Search box, open the small drop-down menu and choose YEAR from the options.

Uncheck Select All, then recheck 2018 and 2017 and click OK.
Excel eliminates all records with years not equal to those years.

Click Clear Filter From Violation Date filters sub-menu.
While you are on the same menu, select MONTH from the Search box drop-down menu.
Click the + plus sign beside 2018, 2017, and 2016, then uncheck March, April, May, and Blanks then click OK
Excel will display all records which do not equal to March, April, and May.
You can inspect the long list of Date filters such as Equals, Before, After, Between, Tomorrow, Today, Yesterday, Next Week, This Week, Last Week, Next Month, This Month, Last Month, Next Quarter, This Quarter, Last Quarter, Next Year, This Year, Last Year, Year-to-Date, All Dates in a Period (with four quarters and 12 months), plus Custom Filters.
Majority of these filters are a one-click process. You just have to click a filter, and the result will appear.
Filters which require more info from the user are Equals, Before, After, Between, or Custom Filters. After choosing them, a dialog box opens and prompts you for additional information such as Equals to, Before, or After a specific date or to create a Custom Filter.

If you want to extract data recorded between two days, choose "Between" from Date Filters sub-menu and Excel will add the conditions for this filter in advance, you just have to select the dates from the drop-down lists and press OK

✅ Enjoy the vote! For more amazing content, please follow @themadcurator for a chance to receive more free votes!
This post has received a 3.56 % upvote from @boomerang.
@exgap purchased a 5.49% vote from @promobot on this post.
*If you disagree with the reward or content of this post you can purchase a reversal of this vote by using our curation interface http://promovotes.com
Congratulations @exgap! You have completed the following achievement on the Steem blockchain and have been rewarded with new badge(s) :
Click here to view your Board
If you no longer want to receive notifications, reply to this comment with the word
STOPTo support your work, I also upvoted your post!