Beginner's Guide to Genesis Monero Mining
Living on a tropical island has many advantages, but for sure it isn’t the best place for running your own mining hardware. At my place on Phuket / Thailand the weather is hot and humid, we have at least 1-2 power outages per months and the cost of utilities (electricity, water, etc.) is high.
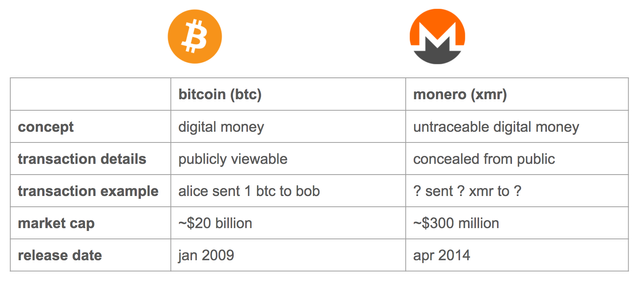
Interested in cryptocoin mining as a hobby venture, I looked at Genesis Mining hoping to generate a small income of a few dollars per day while learning more about cryptocurrencies. I believe Monero is serious about becoming a useful currency and wanted to mine Monero. This beginner’s guide to Monero should help you to understand the high level differences between the two.

Open an Account
I headed to Genesis Mining and opened an account. Opening an account is straightforward, it requires an email and a password. I highly recommend you to create an unique highly secure password that is difficult to crack or guess. Right after creating my account, I enabled the two factor with Google Authenticator (My Account -> Settings -> 2Factor Auth) to add an extra layer of security to my account.
Set Up the Miners
Choosing the ‘right’ 2 Years Monero Mining contract and estimating the ROI was not an easy task. By clicking on “Start Mining Now” and using the slider to select how much hashpower (MH/s) I want to buy and looked at the different price options. I decided not to spend more than 1'000 USD and made a small Sheet to compare the different pricing options.

To estimate the ROI, I used the calculator here. I added the MH/s amount I was planning to buy and checked the profit / year column for an estimate.

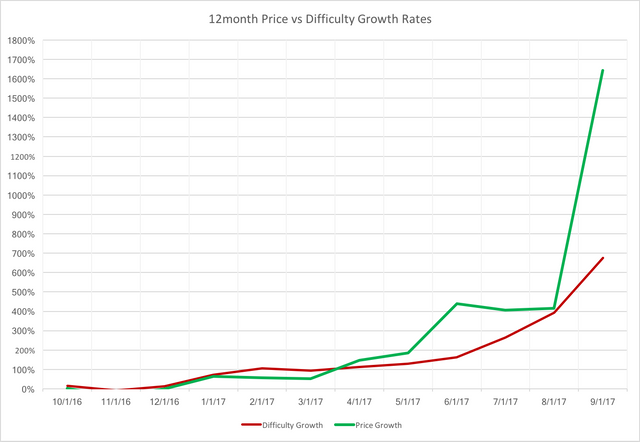
If the implied profits above seem too good to be true to you, then you'd be right. They represent what the profit would be if all variables remained fixed at today's levels. There are two key variables affecting profitability that we know will change - exchange rates and mining difficulty. We just aren't sure how they'll change.

The key bet you are making when buying a mining contract is that the price growth versus difficulty growth works in your favor. In general, if the the green line (price growth) is above the red line (difficulty growth), then your contracts will be more profitable than then implied values calculated here. This very useful site shows the contracts currently offered at Genesis Mining. It is updated approximately weekly, last updated September 9, 2017.
Always use an affiliate code when buying hashpower – even if you already have some, and are buying more. You can use the code EOztm4 to get 3% off any hashpower purchase. I made two purchases and you can pay with credit cards, Bitcoin or some altcoins.
Set Up a Wallet
The last step is setting up a cryptocurrency wallet, basically the cryptocurrency equivalent of a bank account. Finding a GUI-Wallet (I really don’t want to use a Command-Line Wallet) for Windows was a bit tricky, but finally I found one here. Make sure to read the installation instructions as the installation is not as easy and straightforward.
After I had the Monero GUI Wallet installed, I clicked on Receive, generated a new Payment ID and copied my Monero wallet address and payment ID. Back at Genesis Mining, I navigated to (My Account -> Settings -> Wallets) and pasted both into the Monero fields.
Genesis Mining will pay you daily. However, if you use a credit card to buy the hashpower, you’ll have to wait 30 days for your first payment.
That’s it – my miners are running and my payment details set. I will keep you updated on the generated income. If you have any problems or if the guide is missing something, please let me know in the comments.
I found this and stopped wasting time mining every new coin!
Computta
https://computta.com/?ref=268161
These guys have really figured this out. You can make money while you sleep, Just signup Download the free miner. There is never a fee. (not to sound like a shill) This is like a money drop! I will post again with details of my profit.