Making Arduino Music Player (Original Story By Ye Htet Kyaw)

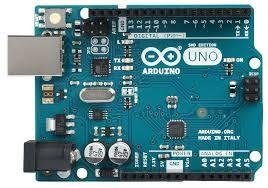
Arduino UNO
micro SD card
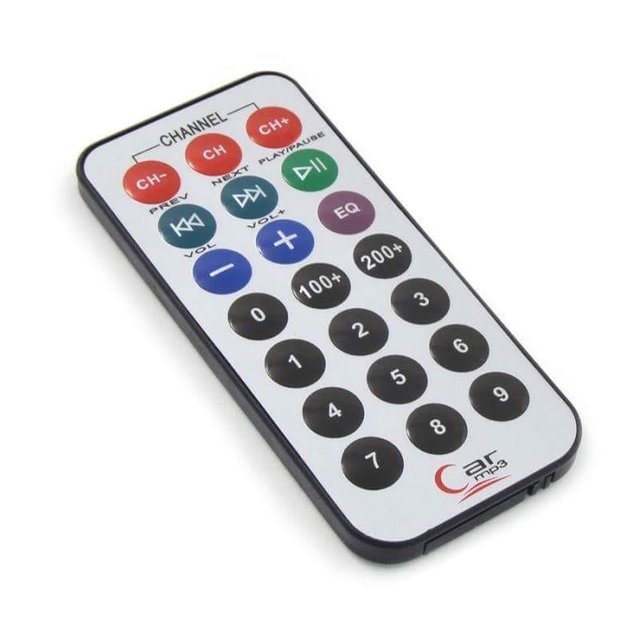
RF remote control
Audio Jack for Speaker

Arduino နဲ႔ သီခ်င္းေတြ ဘယ္လိုဖြင့္မလဲ သိခ်င္သူမ်ားအတြက္ (သို႕) Projects တြင္ ကိုယ္ပိုင္ Audio files မ်ားကို ထည့္သြင္းခ်င္သူမ်ားအတြက္ ရည္ရြယ္ျပီး ဤပို႔စ္ကို ေရးသားလိုက္ပါသည္။ အရင္ IR remote control post မွ RC ကို ဘယ္လိုျပန္ အသံုးျပဳရမလဲကိုလည္း တစ္ဆက္တည္းရွင္းထားပါသည္။

Digital Signal Processing နည္းပညာေအာက္တြင္ Vocalist၊ Instruments မ်ိဳးစံုတို႔၏ Signal frequency မ်ိဳးစံုပါေသာ Audio Music file ကို Analog Signal မွ Digital Signal သို႔ Algorithm/codec ပံုစံအမ်ိဳးမ်ိဳး ေျပာင္းျပီး သိမ္းဆည္းႀကသည္။ Wav , mp3 , mp4 , mp5, H.264, H.265 codec မ်ိဳးစံုကို ေတြ႔ဖူးႀကေပလိမ့္မည္။ တစ္ေန႔တစ္ျခား ပိုမိုက်စ္လစ္ေသာ၊ Audio and Video မ်ိဳးစံုပါေသာ codec မ်ားလည္း ေပၚထြက္ဆဲျဖစ္သည္။

Arduino board မ်ားသည္ သမာရိုးက် audio tone မ်ားထုတ္ေပးႏိုင္ေသာ္လည္း music file မ်ားအတြက္ Hardware စြမ္းေဆာင္ရည္ အမ်ားႀကီးအေထာက္အပံ့မေပးႏိုင္ပါ။ mp3 ကဲ႔သို႔ codec မ်ားကိုပင္တိုက္ရိုက္ မေမာင္းႏွင္ႏိုင္ပါ။
Step 1: Converting files to much detailed .wav file format for your Arduino Audio Player
mono 8 bps မွ်ေလာက္သာရွိေသာ music file မ်ိဳးကိုသာ ေမာင္းႏွင္ႏိုင္ေသာေႀကာင့္ မိမိဖြင့္ခ်င္ေသာ audio (music) file မ်ားကို္ codec လိုအပ္ခ်က္မ်ားပါေသာ .wav file အျဖစ္ ျပန္လည္ေျပာင္းေပးဖို႔လိုအပ္ပါသည္။ ေအာက္ပါ online software ကိုသံုးျပီး .wav အျဖစ္သို႔ေျပာင္းပါ။
http://audio.online-convert.com/convert-to-wav
အေသးစိတ္အားျဖင့္
- Upload a music file or enter a link for the song or music file to be converted. You can even choose files from Dropbox or Google Drive.
- In optional settings, change bit resolution to 8 bit.
- Change sampling rate to 16000 Hz.
- Change audio channels to Mono.
- Click on Show advanced options.
- Select PCM format as PCM unsigned 8-bit.
- Click on Convert and the files are converted!
Step 2: Formatting a micro-SD card
Arduino board မ်ားသည္ FAT16, FAT32, NTFS စသည့္ file system / directory structure အားလံုးအေထာက္အပံ့မေပးႏိုင္ေသးပါ။ ထို႔ေႀကာင့္ SD card ကို အသံုးမျပဳမွီ FAT16 structure ျဖင့္ format အရင္ခ်ေပးပါ။ SD formatter software ျဖင့္ လိုခ်င္ေသာ format type ကိုေရြးခ်ယ္ပါ။
Format ခ်ျပီးလွ်င္ မိမိဖြင့္ခ်င္ေသာ audio files မ်ားကို copy and paste ျဖင့္ SD card ထဲသို႔ကူးထည့္ပါ။
Step 3: Preparing the circuit
ဤ ပို႔စ္တြင္ Arduino board ႏွင့္ အဓိကတြဲသံုးေသာ module ၃ ခုပါသည္။ SD card module ႏွင့္ IR Remote Control module ႏွင့္ Audio Jack (Speaker) module မ်ားျဖစ္သည္။
Wiring between Arduino UNO and SD card module
SD card CS – pin 10 on Arduino
SD card MOSI – pin 11 on Arduino
SD card MISO – pin 12 on Arduino
SD card CLK – pin 13 on Arduino
SD card VCC – 5V on Arduino
SD card GND – GDN pin on Arduino
အေရးႀကီးေသာ library ဖိုင္မ်ားအျဖစ္ SD card ကိုေမာင္းႏွင္ဖို႕ Arduino IDE တြင္ပါလာေသာ “SD.h” , “SPI.h”မ်ားကို သံုးျပီး Audio file ကို ေမာင္းႏွင္ဖို႕ third-party developer ၏ “TMRpcm.h” ကိုသံုးသည္။Wiring between Arduino and IR Remote control module
IR receiver (IC) DATA pin -> pin 6 on Arduino
IR receiver VCC – 5V on Arduino
IR receiver GND – GDN pin on Arduino
အေရးႀကီးေသာ library ဖိုင္အျဖစ္ “IRremote.h “ file ကို declare လုပ္ဖို႔လိုပါသည္။ အရင္ပို႔စ္တြင္ IR RC အေသးစိတ္ကို တင္ျပခဲ့ျပီးျဖစ္လို႔ ဤပို႔စ္တြင္ အေႀကာင္း အေသးစိတ္မေျပာေတာ့ပါ။ Remote Control ၏ hex key table ကို သိထားျပီးျပီဟုယူဆျပီး ဤ Music player တြင္ ဘယ္လို အသံုးခ်မလဲကိုပဲ ေဖာ္ျပထားပါသည္။
Remote Control ေပၚရွိ Play button ႏွင့္ EQ button တို႔ကို Play and Stop command မ်ားအျဖစ္ သံုးထားပါသည္။
hex table အရ
Playbutton = "ffc23d" ;
Stopbutton = "ff906f";
မိမိ၏ လိုအပ္ခ်က္ေပၚမူတည္ျပီး က်န္ key buttons မ်ားကို Assign လုပ္ႏိုင္သည္။
- Wiring between Arduino and Audio Jack
Audio Jack Positive pin (Red) -> pin 9 on Arduino
Audio GDN pin (Black) -> GDN on Arduino
ဤ ပို႔စ္တြင္ Music Audio Signal ကို Audio Jack ႏွင့္ခ်ိတ္ဆက္ထားသည္။ Earpiece (သို႔) Headphone မ်ားႏွင့္တိုက္ရိုက္ခ်ိတ္ဆက္ျပီး နားေထာင္ႏိုင္သည္။ 8 ohm Speaker ႏွင့္ခ်ိတ္လွ်င္ေတာ့ transistor amplifier ႀကားခံေပးရမည္။
Arduino Code
#include <SD.h> // need to include the SD library
#define SD_ChipSelectPin 10 //using digital pin 4 on arduino
#include <TMRpcm.h> // also need to include this library...
#include <SPI.h>
#include <IRremote.h> // For IR remote control
TMRpcm tmrpcm; // create an object for use in this sketch
// Declaraion for IR remote control
int RECV_PIN = 6;
IRrecv irrecv(RECV_PIN);
decode_results results;
String Playbutton = "ffc23d" ;
String Stopbutton = "ff906f"; // Assign EQ button as Stop button
unsigned long time = 0;
void setup(){
tmrpcm.speakerPin = 9; //Assign speaker pin to UNO
Serial.begin(115200);
pinMode(13,OUTPUT); //LED Connected to analog pin 0
irrecv.enableIRIn(); // Start the receiver
if (!SD.begin(SD_ChipSelectPin)) {
// see if the card is present and can be initialized:
Serial.println("SD fail");
return; // don't do anything more if not
}
else{
Serial.println("SD ok");
}
tmrpcm.play("lat.wav"); //the sound file "music" will play each time the arduino powers up, or is reset
}
void loop(){
//blink the LED manually to demonstrate music playback is independant of main loop
if(tmrpcm.isPlaying() && millis() - time > 50 ) {
digitalWrite(13,!digitalRead(13));
time = millis();
}else
if(millis() - time > 500){
digitalWrite(13,!digitalRead(13));
time = millis();
}
// Checking IR rmote for ON/OFF signal
if (irrecv.decode(&results)) {
if ( String(results.value, HEX) == Playbutton ) {
Serial.println(" Play button is pressed ! " );
tmrpcm.play("lat.wav");
//dataFile.close();
}
if ( String(results.value, HEX) == Stopbutton ) {
Serial.println(" Stop button is pressed ! " );
tmrpcm.stopPlayback();
//dataFile.close();
}
irrecv.resume(); // Receive the next value
}
} 
you handsame
Thank you
I'm overwhelmed !!!....A wonderful post ever.
Thank you
yes