Automatic Window Blinds - Part 2
After having fiddle-faffed around with the Arduino and the Servo a little bit in [Part 1](https://steempeak.com/palnet/@synrg/automaticwindowblinds-part1-s2ubd414m9) I saw that I could indeed operate the continuous servo in both directions. I saw also that there was a bit of 'speed control' that could be attained as well - although from what I saw the operation was a bit 'quirky' for all intents and purposes it does what it needs to do. So for the second part of the build, I didn't concentrate much on the Arduino aspect although I will have to work out many more details in regards to that. I worked on improving my Solidworks skills for designing some parts to be 3d printed.
design revisions and evolution
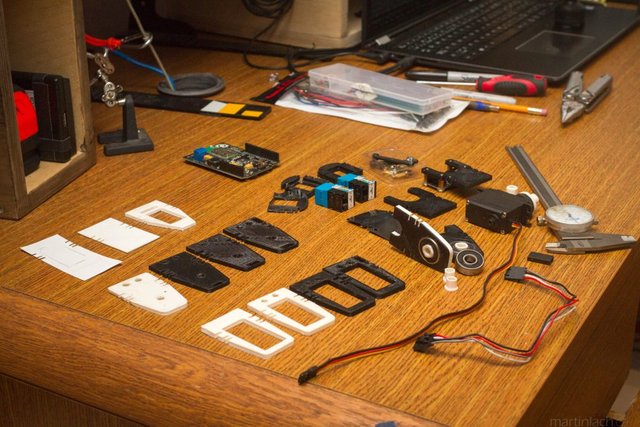
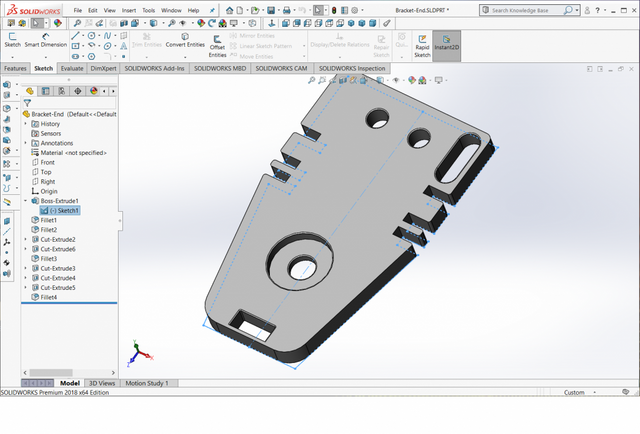
I spent a number of days designing, printing, re-designing, tweaking, re-printing several parts for this project. Along the way I had to figure out several things in the cad software I am working with, but it is an amazing program when you start to get the hang of it. As well, sometimes you print a part and something might not quite fit right, it's hard determining exact tolerances. Other times you might think of an improvement on the design. I was using an old caliper that I had lying around to make measurements with.
These things are super useful for 3d printing
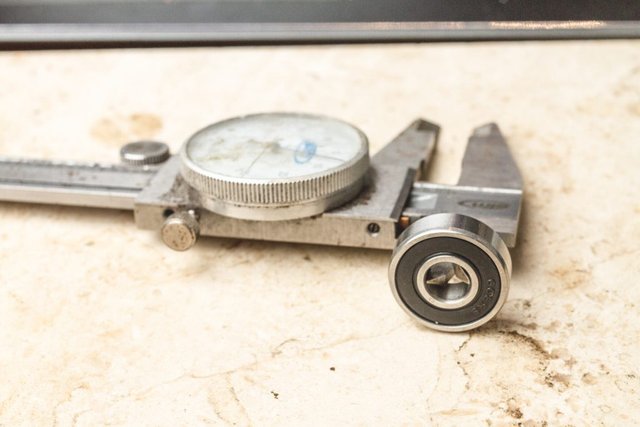
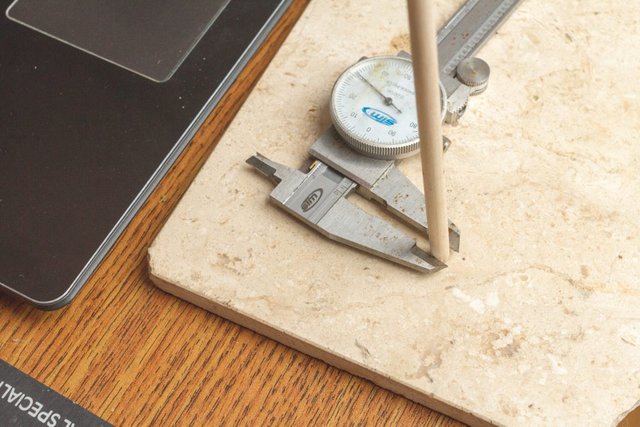
Calipers can help you easily, quickly and fairly accurately make various measurements
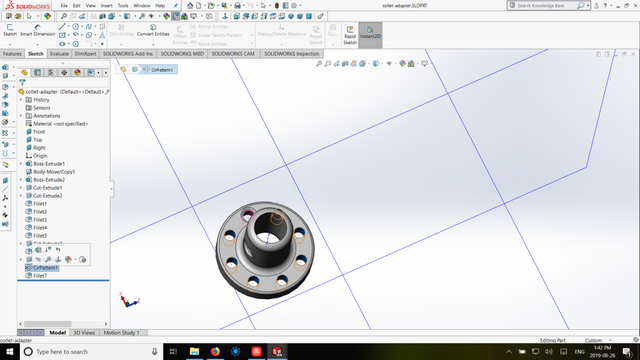
A journey into the lands of solidworks
I had a lot of fun making some things with this software. I was daunted by this project not knowing exactly how I would begin to create the parts I needed using Solidoworks. I had some rudimentary knowledge from a few of their tutorials I did. Here and there I got stuck, but seems to be always somebody that has had the same problem before answered online. Creating these simple forms gives me an appreciation for not only the software but also the more in depth designs that people create using it... Not to mention parts assemblies, which I have not tried playing around with yet. However creating these parts left me wanting to find other things to need to 3d-print!
Servo-Dowel "adapter"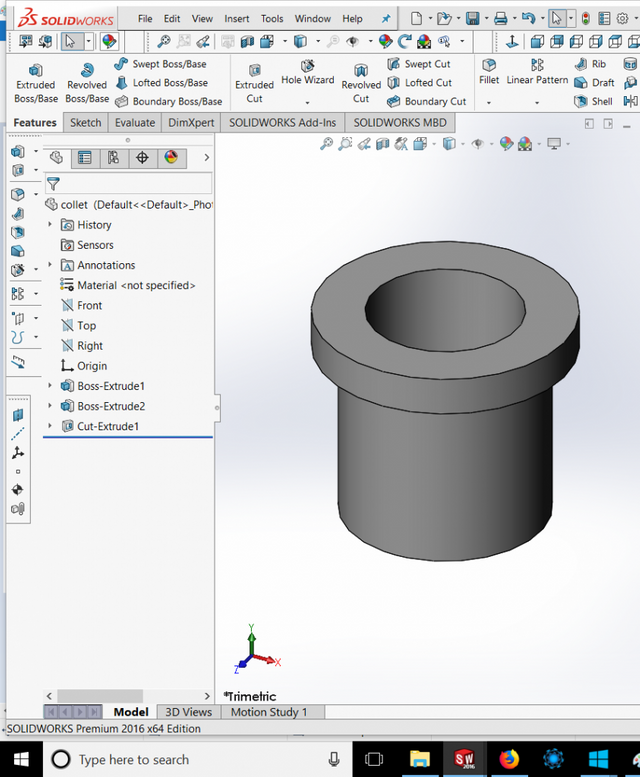 Spacer for dowel in ball bearing
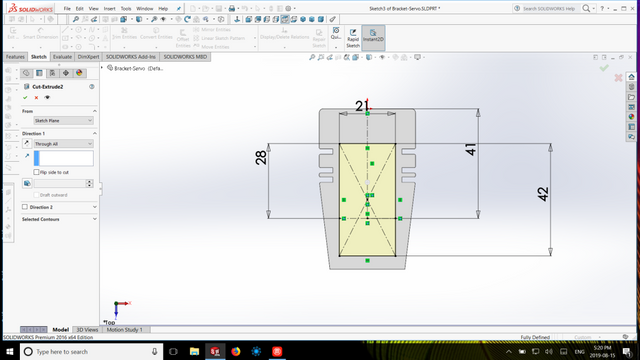 Servo Bracket assembly-Forward Section
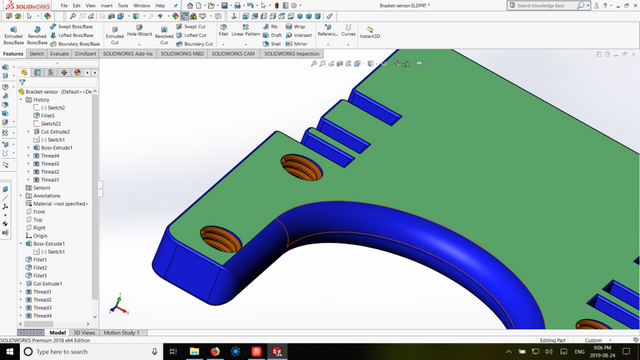 Sensor Bracket - With 3d Printed Threads that really worked!
An Odyssey in 3d printing
3D printing is far from perfect - throughout the process I had several mishaps with the printing. However, anyone familiar with 3D printing knows this is the way it goes. Fused Deposition Modelling is the most common form of 3d printing. It uses a technique similar to a hot glue gun, and makes thin two-dimensional layers repeatedly until a 3d object is made. Using a filament of most often ABS or PLA plastics, the material gets extruded through a hot end and nozzle a precise bit at a time. Depending on the design of the printer, there are various configurations of "X-Y-Z" layouts, but essentially each layer is formed on-top of the last. Complex, amazing shapes and forms that would otherwise be impossible to traditionally manufacture are possible with this technique. However, the process for the home hobbyist is still a bit rudimentary at times and in certain respects - relatively speaking of course. Many things can and do go wrong during the printing process, and the process is admittedly slow at times in itself. Some parts can take hours if not even days depending on their size, complexity and print settings. Sometimes mishaps can fail near the end of a print resulting in having to start over, if not with a tweaked printing strategy.
The Joys of 3D Printing
 Repeatedly taking the thing apart to get it cleaned up
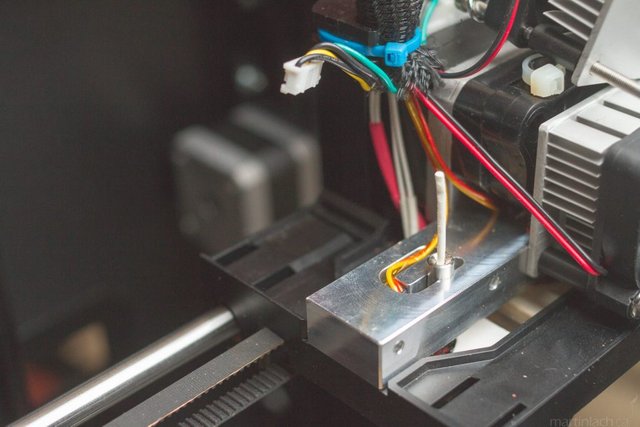 Jammed filament
Although, with some patience and even practice, very high-quality results can be had. The vast majority of the first objects I ever tried to print failed, but with repeated attempts you learn what's happening and why, often with some searching online. Although I wouldn't consider myself a 3d printing wizard by any means, I'm glad that I'm finally starting to better utilize the 3d printer. For a while, all I printed were things from Thingiverse but eventually, started designing simple things and this is the first 'major' project I design-built using Solidworks and the 3d printer. I'm happy because the possibilities of creation with 3d, to be able to design and manufacture your own custom-fit parts, items, objects, tools, adapters, spacers, etc. The possibilities are almost endless. And creating things from scratch is totally doable! But to fully know the software, much time and dedication is required. However there are also simpler programs, some of them are even free and/or online based, or like I mentioned before, thingiverse has a lot of amazing things that people have created. I may even decide to upload this project if I can find some more info on the blinds.
Exporting files for 3D printing
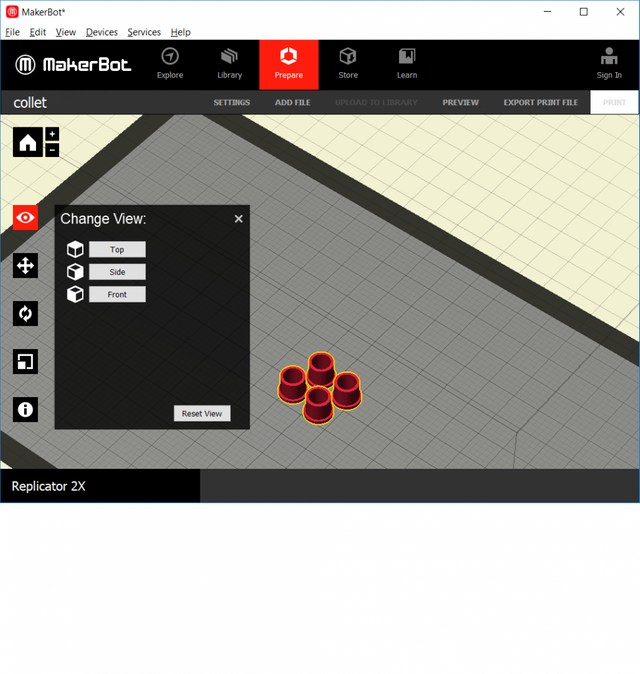 Arranging parts
 Model setitngs
The process unfolds
 1 - Design
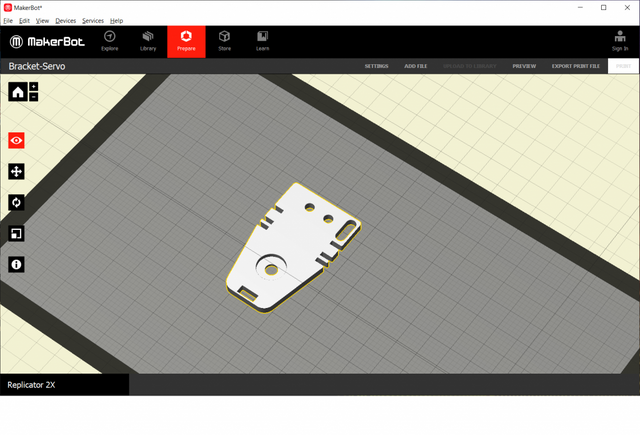 2 - Slice
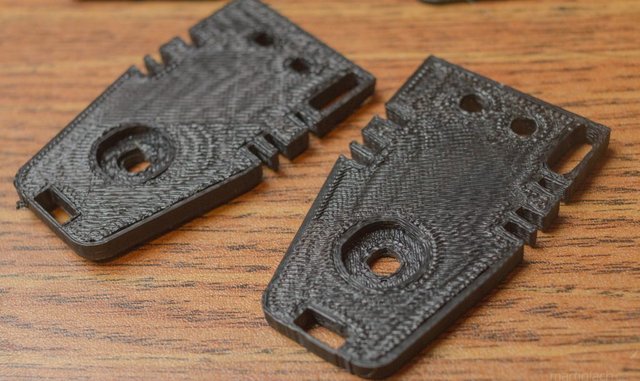 3 - Print
The final printed object is always a little bit 'imperfect and some might say even a little bit ugly. They end up with interesting 'artifacts,' ridges appear where there where none in the model, holes are never perfectly round, fills happen with interesting patterns. The objects have their own little bit of character. Usually you can get things to work right out of the printer, sometimes you need to do minor touch ups such as drilling holes or slightly sanding down things. You want to get things of course as perfect in your model dimensions as possible, but certain things are better to do afterwards, such as perfectly circular through-holes is better done drill and bit, if possible/necessary for the application. There is a speed/quality trade off as well in the settings, higher more precise prints are possible but it's no surprise they take longer. I tried making threads in via solidworks, and admittedly, plastic is pretty easy to thread stuff into regardless, it's pretty soft, but it seems do think it actually worked! It's amazing that threads can be created layer by later and end up still working. Sometimes the process is quite impressive.
Time to print
When printing parts, you have the option to do multiple parts at once, but I haven't had much success doing this. I find I get the best results when printing one part at a time, when giving the printer the ability to 'focus' on one object. The slicer software I'm using is not perfect, and for a while there was much gnashing of teeth while I was trying to get the outdated, no longer supported crappy makerbot® fail software to work - the current Makerbot Print software doesn't support their Replicator 2X printer which I am using. Admittedly though, it does the job, and one day I will try another program like Simplify3d or slic3r[which I actually already tried briefly] but for now I just used the Makerbot Desktop to export my print files. Regardless, here is some time lapse of the printing process:
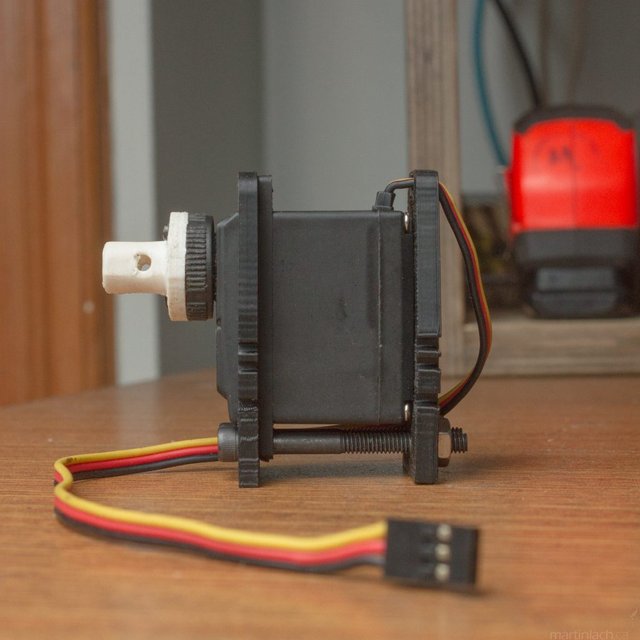 Completed servo bracket
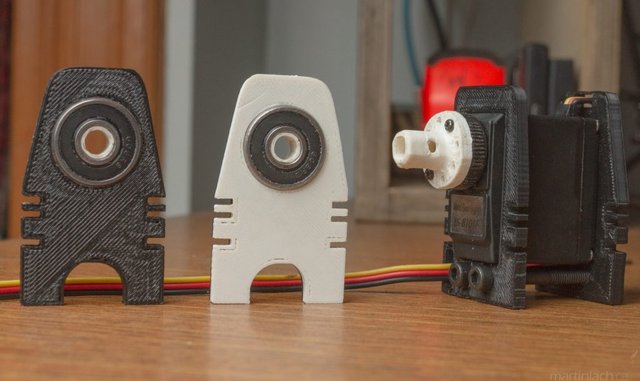 Servo and bearing brackets
JUST MAKE THE DAMN THING ALREADY
Sometimes it's hard not to get carried away with feature creep: As work progresses on a project, new ideas can spring up, leading to the project becoming more and more complex. Project starts to get out of hand, deadlines can get missed if adherence to some key-list of features needing to be done. I started off with a vague idea of something I wanted and worked towards that, brainstorming as I went along. Coming up with solutions for what I needed to do, I made parts as I saw necessary. However, after reaching a certain amount of progress, I found that the project lay in a bit of a state of limbo, so I decided to make a 'final' to-do list. Some times it's a bit hard to particularly narrow down a task but a general run down of next steps is as follows:
- Fix issue [if possible of uneven] lifting - Sometimes one side 'spools' faster than the other. I think I may have something that will fix this - actually two ideas. If it ends up being a bit uneven, I don't think that will be the worst thing, I'm moreso focused on the other components of the system and if my blinds end up opening slighly crooked, I and going to have to grin and still love it. Because right now, they're not even opening.
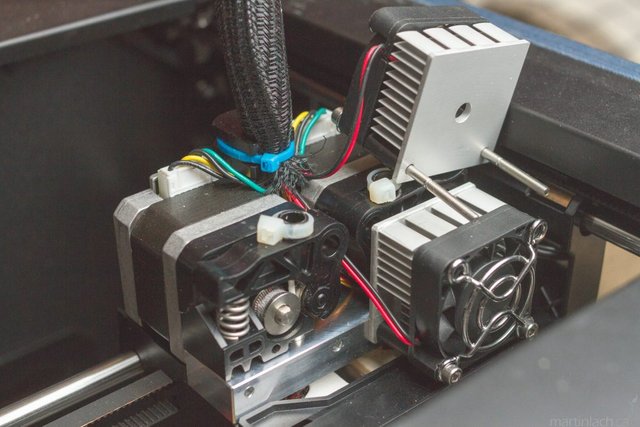
- Better wire up the moving carriage - yes that's right, moving carriage? How crazy is that?! I hummed and I hawwed over 'design considerations' with this project and there were two logical ways(some would say only one) to approach the project. I guess you could call them 'inverted' or 'not.' I mean that there seems like a bit of a logical way to put this together, namely having the motor, the moving components, requiring moving wiring, having more 'weight' to lift while opening the blinds. But for what it is, trust me, I considered a lot of angles on this one and I'm going to do it the 'weird way,' it may come out beautiful and steampunk or nonfunctional and a piece of junk... although this whole thing is a bit of a protype/work in progress, so I'm saying go with it. Not like I can't just tweak it a bit later, if this is really that bad. I've laid most of the groundwork, if I want to modify it later it won't be impossible to do so.
- Code preliminary "sensor loop" - In order to provide 'location data' for the system to know when to stop moving, I'll have to implement I'm hoping this IR line sensor that I have. I need to fiddle with not only the code for this, but making sure that the code is also compatible with the Arduino servo libraries! I heard something about the Arduino servo libraries being unusable when using I2C, which is what the sensor I'd like to use operates on. If I can't use the ir sensor, if for whatever reason it doesn't work I can always switch to mechanical end stops. But it might be cool and may offer the ability for various 'speeds throughout the range of motion.
- Aquire photo resistor and "code light-detection loop" - I did say at the start of the project autmatic window blinds and a photo-resistor is probably the easiest way that I can think of automating this thing. But I will worry about that later.
- Find a way to switch the servo power off while it's not in use - While I could just leave the servo 'powered on' all the time, something inside me would just feel more warm-and-fuzzy on the inside to know that the Arduino interrupted the power to the servo when it's just sitting 'idle.' I have some 'OptoMOS Solid State Relays' that would do the trick I'm pretty sure, they are small however I believe they should handle the power handling capabilities of the servo quite easily. I will check into that. Otherwise I know I have some transistors lying around... The Arduino uses an Atmel Atmega328p microprocessor which cannot directly power the servo without 'burning out one of it's digital pins so we have to do the switching through another component, this is standard practice for anything drawing higher than the 40mA or that the Arduino pins are rated for.
- Create a 'guide' system for the carriage - This should be a pretty simple affair, I just want to have the blinds stay relatively stable when there is wind coming in. I will just use some thread with some sort of eyelets at each side. I am just worried that in the even of the blinds closing with wind, the IR sensor will not 'see' the markings and continue past the where it should stop.
While I did actually get the blinds moving up and down, there is still a lot of work to be done... catch up with that in [Part 3!] Thanks for checking this out! :)
Hey @synrg
This is awesome content I would love to see featured on STEMGeeks and rewarded with our STEM token.
Have a look at https://stemgeeks.net, it is a Steem-Engine tribe for Science, Technology, Engineering, and Math.
All you need to do to publish there as well is to add the stem or technology tag, even engineering might be a fit for your content. Doing that will allow our site to index it and make you eligible for STEM tokens in addition to your steem/sbd you earn.
Have any questions or want to join in the fun, join our Discord.
Hi @themarkymark, thanks a lot for stopping by, I will update and use that tag from now on for this type of stuff! Appreciate the tip and keep up all the hard work 👌
I want to let you know that this type of content is exactly what https://stemgeeks.net, a SCOT tribe focused on STEM is looking for.
The tags are #stem #science #technology #engineering and #mathematics.
Find out more on this post: https://stemgeeks.net/@stemgeeks/what-content-to-publish-on-stemgeeks-using-the-stem-tag
Hi @enforcer48, thanks a lot for stopping by, I will add and use that tag from now on! Good to know :)
Informative second part like the first one. Thanks for sharing.
Thanks @deepu7, thank you very much for visiting! Glad you enjoyed it, I am having fun working on it... truth be told, the blinds haven't been working for a while now - and this is my attempt at fixing them. They are expensive to replace and when I saw I had some components lying around I thought better come up with something yourself ;)
Great initiative friend. Keep the good work doing.
Hi synrg,
Visit curiesteem.com or join the Curie Discord community to learn more.
Really cool project! I look forward to following it.
Thanks @bflanagin, appreciate it! Glad to be finally tackling it, I thought of this originally a while back but never got around to working on it... Still more to be done though!
If the first part was very wow imagine this, excellent friend, I liked your post because of how well detailed and organized it is
Thank you, I think it helps me get clear in my head too! Thanks for the comment @iamsaray :)
Congratulations @synrg! You have completed the following achievement on the Steem blockchain and have been rewarded with new badge(s) :
You can view your badges on your Steem Board and compare to others on the Steem Ranking
If you no longer want to receive notifications, reply to this comment with the word
STOPHi @synrg!
Your post was upvoted by @steem-ua, new Steem dApp, using UserAuthority for algorithmic post curation!
Your UA account score is currently 3.436 which ranks you at #7299 across all Steem accounts.
Your rank has not changed in the last three days.
In our last Algorithmic Curation Round, consisting of 118 contributions, your post is ranked at #97.
Evaluation of your UA score:
Feel free to join our @steem-ua Discord server