RBI Ban don't worry Skrill an option – Opening a Skrill Account in India

How to use Skrill in India
Skrill in India Skrill (formerly known as Moneybookers) are a large financial services company based in Europe. They are one of the best Paypal alternatives for Indians. This is for a number of reasons. Firstly, their currency conversions fees are cheaper than Paypal, so when converting from USD to INR we get charged less.
Secondly, withdrawal fees are also cheaper, so when you want to withdraw to your bank account, you will pay much less with Skrill.
The rest of this article below will take you through each step of the process, from signing up, right through to verifying your account, your bank details and of course how to withdraw money to an Indian bank account.
The Easy Part – Opening a Skrill Account in India
Getting started with Skrill is extremely easy. All you need to is visit their website www.skrill.com and click the “Sign Up” button in the top right corner. It is extremely important that you fill in this form 100% accurately.
The details you will need to fill in on the form are:
Account type – personal or business. If you are a registered company and want to do business with this account, you should choose personal. Likewise if you receive a lot of payments from companies or individuals for services you provide, you should choose the safe option and pick “business account”.
If you want to use your Skrill account to deposit to an Indian betting site, to pay for goods or services, or to transfer money to other people, then you should choose personal.
Next is:
Country of Residence – Assuming you are based in India, select India.
Currency – I recommend choosing USD. This is to avoid double currency exchange fees. For example if you cash out from a site in USD to Skrill, you will be charged a conversion fee. However, if you choose USD, you will not be charged anything. Of course when you withdraw to your Indian bank account you will have to pay the fees to convert from USD to Rupees. If you receive a lot of payments in Euros or other currencies they may be a better choice.
Make sure you are happy with the currency you have chosen. Skrill do not allow users to switch currencies after their account has been created.
Language – select English.
Personal Details
Make sure everything here is spelled correctly. Skrill will check all the details and you will need to verify your name and address with scans of your identification and a utility bill.
The fields they ask for here are:
First name
Last name
Address line 1
Address line 2
City
Post code
Phone number
Again, I cannot stress enough that you MUST fill these fields out correctly.
Important note: Skrill only allow one account per person. If you try to create a second account they will shut it down and might also close your first account. Do not under any circumstances try this.
Account Credentials
The final fields to enter are:
Email address
Date of Birth
Account Password – This should be obvious but just in case, make sure you choose a very secure password. Don’t go for something like pass1234 or 123456.
The Most Important Part – Correctly Verifying Your Skrill Account
Once your account has been created, you should begin the verification process as soon as possible. This will make life much easier for you in future, so get it done as soon as possible. This is a 4 part process – first you need to verify your email address, then your physical address, third you must verify your credit or debit card and last your bank account.
The first thing to do is extremely easy – verify your email address. As with any email verification system, Skrill will send you an email. You click the link in the email and boom, email address has been verified.
The next stage in verifying your Skrill account is to verify your physical address in India. Skrill will send a letter to the address you entered when registering. I live in Bangalore and it took 7 business days to arrive at my home.
The letter you will receive contains a 6 digit code. You must then login to your Skrill account and enter the code on the account verification page. Once that is done, your limits for sending money to other Skrill users will be raised, as will the amount of money you can withdraw.
Verifying your Credit or Debit Card
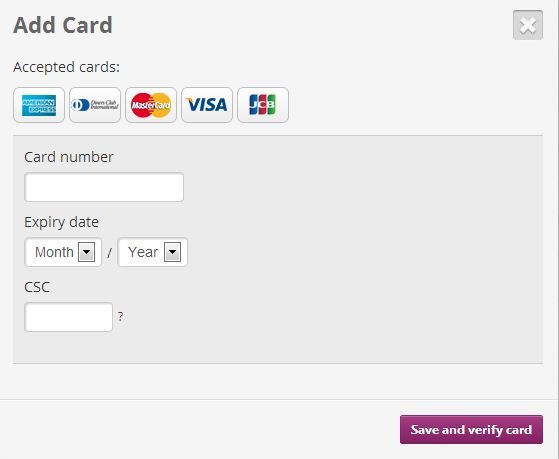
The third part in getting verified with Skrill is to set up your debit or credit card. Again, as I outlined at the beginning of this article and in my general Skrill review, the name on your card must exactly match the name you used when registering your Skrill account.

The two images above show how to add a debit card or credit card on the Skrill website
Skrill will charge a small amount to your card – normally between $0.00 and $2.00. Once you verify it they will refund this amount back to your card.
Very Important Note
If you select USD, EUR or another currency for your account, when Skrill charge your card, they will charge it in that currency. So for example, if you choose USD, they may charge your card $1.71. If this was the amount you would simply fill in $1.71 in the verification area on Skrill.
However, I bank with HDFC and my bank statement showed the transaction amount in Rupees, not in USD. DO NOT use xe.com or another currency conversion site to guess the amount. This will disable your ability to verify the account for 24 hours. If your bank statement does not show the USD amount, simply use the live chat option on the bank’s site or even easier, ring them to ask. They will tell you the exact amount.
I have also read reports of Indian’s having issues using debit cards from AXIS Bank and ICICI. Supposedly the “B2 branch banking account” option available with ICICI is a good way to get around this issue.
Once you input the correct amount your account limits will be increased again. Nice.
The Final Hurdle – Setting up and verifying your bank account
Ok so the email, address and card verification procedures should all have gone smoothly by now. So we’re onto the bank verification process.
This is generally the hardest part, but hopefully with the help of this guide it shouldn’t be too difficult. You have two ways of confirming your bank details. You can either deposit money to Skrill by bank wire or you can withdraw money.
I chose the option to withdraw money. When you withdraw, Skrill will tag the bank wire with a unique code. Again, check your bank statement, copy down this code and enter it in the verification area on the Skrill website when logged in to your account.
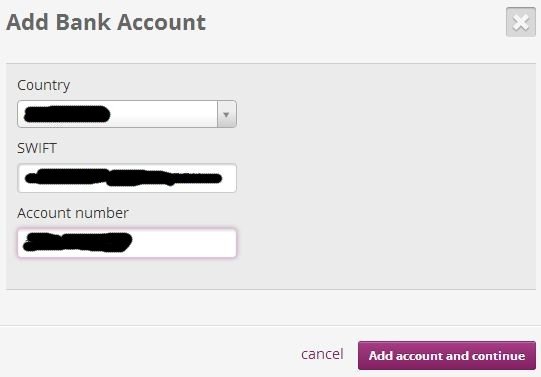
If you want to withdraw money, you should first select the “Add bank account” option. For this you will need to know the SWIFT code of your bank. If you know your bank’s SWIFT code awesome. If you don’t again you will need to either speak to one of their online reps or give them a call. Not all Indian bank branches have SWIFT codes, so you may be given a general code to use. My branch in Bangalore did not have an individual SWIFT code so I was given a general one to use instead.

This shows the area for adding a new bank account on the Skrill site
Important: If the rep asks what currency the funds will be sent in, tell them INR. This is because Skrill first converts the amount from USD to Rupees and then sends the money.
After you have added your bank account correctly, simply click withdraw and choose the amount of money to send to your account. Withdrawals normally take about two working days.
Manual Verification
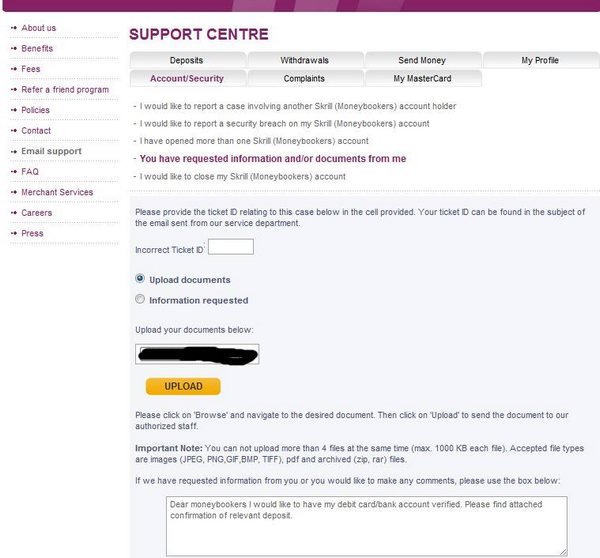
On very rare occasions, withdrawals from Skrill may not show the code in your bank statement. If this happens, Skrill do provide a third option whereby they will manually verify your Indian bank account. However, in order to do so, you will need to send them on some more details.
You will need to email them a screenshot of your online bank account statement or else a scanned copy of a statement from your bank.
These must clearly show:
Your name (ie the account holder)
Your account number
The item on your statement that shows the withdrawal from Skrill in your account.
If you have trouble with this, you will need to go down to your local bank branch and get a physical print out of the actual SWIFT transaction to send to Skrill. Your bank will supply you with a copy of this on request.

To upload verification documents to Skrill, click email support, then account/security
Verifying your bank by uploading funds:
In order to do this, you will most likely need to visit your local bank branch. Simply copy down Skrill’s bank details and fill them in on an international wire form. If you have the ability to send money internationally online, you can do this using your internet banking account.
Sending wires internationally can be expensive and may cost up to $50 per wire, though most banks charge $20-$30.
All Set
So now if you’ve followed all of the above you should be 100% verified and good to go on Skrill.
Congratulations @ajaym0010!
Your post was mentioned in the Steemit Hit Parade for newcomers in the following category:
I also upvoted your post to increase its reward
If you like my work to promote newcomers and give them more visibility on Steemit, consider to vote for my witness!
what is the difference between Skrill vs Paypal?
PayPal account is best for smaller transfers or when we pay at e-commerce sites like Ebay. But when it comes to bigger transactions, especially for online gamblers, crypto traders & Forex traders, Skrill is the way better option
PayPal existing from long time in India . Now Skrill will be it's competitor
Hello Ajay,
This your artical will help to everyone even RBI ban in Indian.
If RBI not allow us then we will all trend #isupport crypto.
You picked very good artical Thanks for this useful blog.
Follow [email protected]
Thanks bro & will follow you sure
Skrill charges r too high.but is a lifesaver at tine of crisis
Right bro
@ajay0010 bro RBI ban karde cryptocurrency Ko lekin INR withdrawal karne ke bahut sare tarike he jaise aapne kaha Skrill he netteler remitano local Bitcoins and Wazir x ki pear to pear service....
Ya RBI can't stop us
Thanx Guys for upvotes and Comments
Skeill want to be cryptocurrency exchanger in india that will be most best thing @ajaym0010
Right bro
i m already use skrill but his charges is very high any alternetive option pls guide bro
Will research & definitely guide bro
informational and helpful post .
I will check skrill
Sure you can try
Informative post people will come to know more about this option and panic less with rbi decision
Thanks bro & absolutely right it will help peoples to know more