Canva - My First Impressions - Part 1 of 2
I recently did an article on image sizes, this got me thinking it's all well and good talking about the size of the image but what products do people actually use to create them?
I have used many products over the years starting off with photoshop at university which stuck with me professionally through my first few jobs adding illustrator along the way. Now I use Figma for most of my compositions and affinity designer and photo for any extras I need.
But whilst I use these packages professionally it made me think about what the everyday user use, people who want to do the basics of image editing or putting together a banner or graphic for their social and want to do so without spending a penny.
So I asked my kids and they, in turn, asked their friends, at first I got a list of apps all sounding the same, all variations with photo in the name, and noticeably it was almost always apps they mentioned as if ever I needed confirmation of a mobile-first lifestyle there it was plain as day!!
The few that weren’t apps were browser-based cloud services but every one of them was free or freemium. Eventually, amongst the desktop user one name rose up above the others and that was Canva. I had heard the name but never used it, I mentioned it to a fellow steem user and they also said they too used it and in their opinion, a lot of people used it for their posts.
So there it was my first lead so now I am going off to see what is it about this particular software that people found most appealing.
The Canva Website
So like many my first impression of a product, usually comes from the quality of the website. I am not ashamed to say it but if the website is horrible or cheap chances are I will walk away unless I am absolutely held to ransom by it being the only place offering me what I needed. So what did the Canva website say to me?
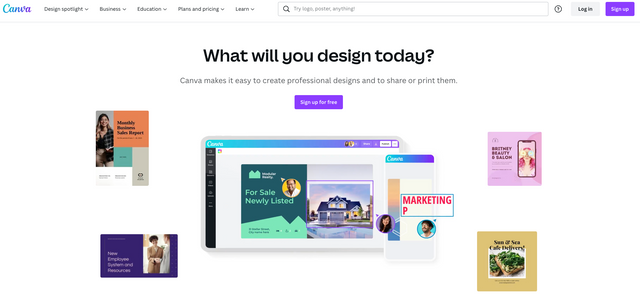
Well, it was professional, clean, informative and engaging, so far it ticks all the boxes, my first click was 'Plans and Pricing' I want to know how much they are going to offer before I run face long into the payment wall, and if I do how much damage will it do to me. The dropdown was great big bold and informative before I even have to click through, not just a text link.
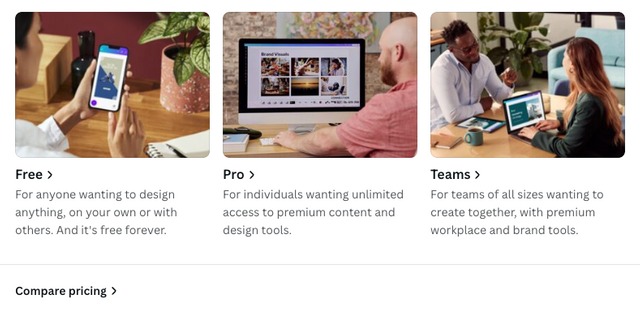
And look at that design anything, free forever. Can’t argue with that, and the paid-for content on offer is premium content and some features or teams collaboration. I am not interested in teams but it's a freemium product the best stuff will obviously be behind the payment wall so the next question is just what can you do for free and how good is it?
The Interface
After signing up with one of my google accounts, I was presented with a homepage that was a little cluttered for my liking, I am used to being offered a blank canvas or a choose your canvas size approach but this was much busier than that. However, I recognise this is my personal preference and not necessarily a reflection on them, in fact, after a few moments looking around its clear to see that Canva is casting a very wide net in which audiences it is trying to appeal to so this gateway page does a pretty good job of curating that.
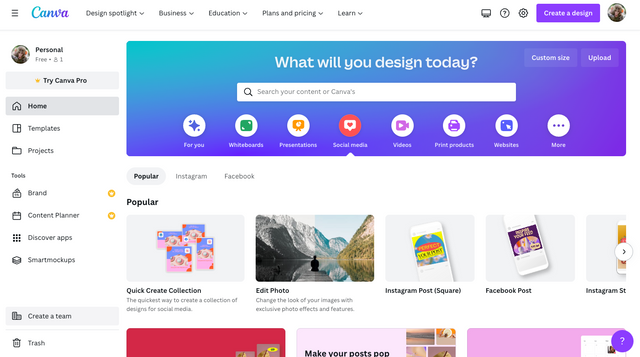
The bold create design button in the top right gives a direct route into content creation but this is mimicked in the large call to action box in the centre of the screen which offers a selection of presets to get us started as quickly as possible, and a handy search facility front and centre so you never feel lost in how to begin.
The suggestions section underneath offers a list of common entry points again reinforcing the several avenues into the same content that this site seems to have available to you.
I am going to start with the ‘Custom Size' button in the right hand corner of the call to action section as I know my needs will not hit on any of the presets options it is trying to offer. This brought me straight to the familiar question, height, width and lock aspect ratio toggle everything I wanted just an extra step further on than I am used to. One thing I didn’t realise til later though is these choices are significant as resizing a ‘design’ as they refer to it is a premium feature so it's very useful to know what size you want before you start, otherwise you have to start again with a new size design.
So for this I am going to pick 2560x320 and for those who did me the honour of reading my previous post may recognise this as the size I think should be used for the banner on my steemit profile so that is what I am going to experiment with.
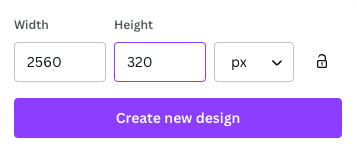
Hitting the Create New Design button after my dimensions gave me my first look at the editing interface.
However, I am going to go deeper into this in my next post so that this one doesn’t get too long.
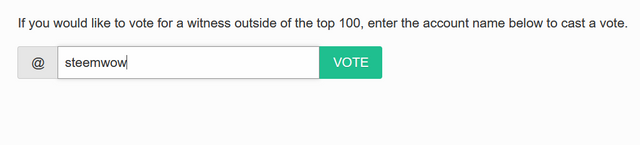
SteemWOW
If you would like to show your appreciation please support the @steemwow team and vote for our steemwow witness, you can do this by heading over to the Steemit Wallet Witness list, and scroll to the form at the bottom of the page. Just type steemwow into the box and hit vote as illustrated below.