Tips and Tricks: Making Different Headers in Microsoft Word
Howdy everyone!
Every since 2 weeks ago, my office has been challenged with a lot of hurdles to get things organised; especially getting everyone to standardise their documentations together.
You see, my office deals with a lot of letters and instructions; and most of the time, although there is a pretty standard documentation template, colleagues tend to make their own design (and not getting from the main one).
And most of the time, because of that, there are many standard formatting issues, especially reference numbers (because these are all official documents addressing to recipients) often get left out or just totally done out of place.
Hence it was my task and challenge to make a standard template in Microsoft Word that will be deployed and used for many other projects we handle for clients and consultants.
Over the course of researching, I found there were several ways that could work, but is not efficient.
One of them was REF command in Fields object
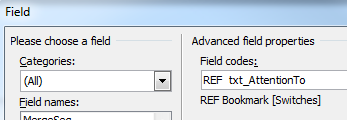
The good part of using form fields are that you could actually bookmark your fields and then have another field to refer to it; but the bad part of it is that it will not update the referred information between the master field and the sub field on the fly, until you press print preview. This is very inconvenient especially for those who are creating a Save As soft-copy document into PDF files and email out because it doesn't automatically update it.
So I went to search around and look for other alternatives.
Hallelujah to Presearch.org ! Oddly this search engine although ties to Google search results but its accuracy is way much better!
(psst! It also allows you to earn crypto while you search!)
And there is where I found a way to control it via Styles.
Using Styles to Make Reference Pointers between Document Body and Footer
According to what I have read through and watched the tutorial video, it is stated that the easiest way to control referencing via styles is to place the reference source into tables format, so that if there are any changes in the cell, the style is never effected.

I have decided to use the Microsoft Word Controls for other programming purposes, and I will make this entire reference into a customised style.

I am using Microsoft Word 2010 where it is sitting at the ribbons of the application; and I think the more recent version is also the same; and you click on the expand arrow to see more. Alternately, you can use Alt+Ctrl+Shift+S keys (I am not certain of Mac machines) key shortcut to launch it.
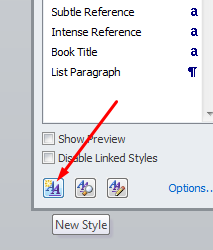
So over here you will need to add a new style; a unique new style that will not be used by any other parts of the document so that whichever refers to it, will not get confused of the value inside.
Make sure the name of the style is not too common; and since I am creating a reference number value in the cell, it is unique enough because it is not frequently used by others.
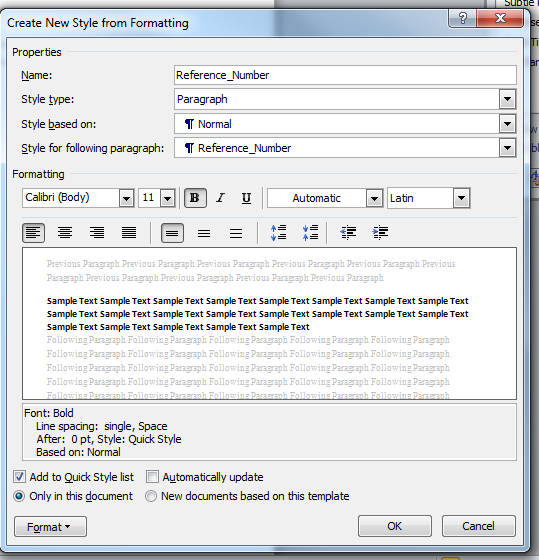
So as you can see, I have decided to add an underscore to the name of the new style so that I personally will know that it is my customised style; and you can even change the font size, spacing, font types and paragraph format as well.
Once you are done, click OK.
Now, the test
So according to the video I learned from, if I create a header or a footer, as long as I point that data to the customised style, it should automatically update as well.
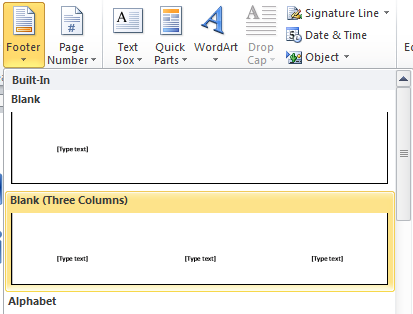
So at the footer, I wanted the reference number to be at the middle of the footer page; so I will just insert a basic 3 column footer and delete the sides.
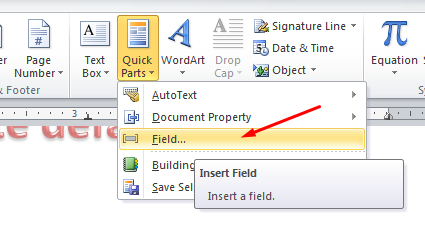
After that I go to the Insert Tab and choose Quick Parts then select Field.
Note: You cannot just update the current container to the style. It doesn't work.
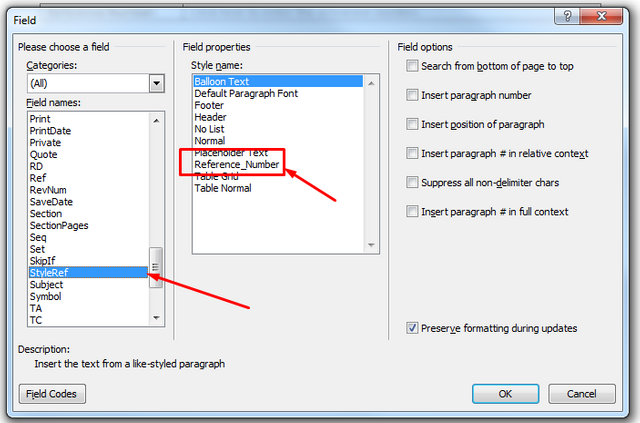
So inside the Field window, StyleRef (Style Reference) is the one you need to choose from, and select the customised style you have chosen. For me, my unique customised style would be Reference_Number.
And voila! this is the content field default value that I have original made in the body of the word document.

And I have moved the table closer to the footer so that you can see that as I typed the content field, the footer updates on the fly!
So there you go! A really cool trick to make sure that your important information that needs to be at the footer automatically updates to avoid typo / spelling mistakes.
Oh one more thing!
Do you know that you can have a different first page header and footer, or you can even add in odd and even page customised footers at one go?
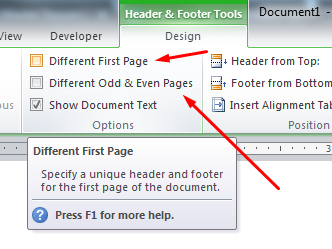
At the Header and Footer Ribbon section, you will see the option check box that will allow you to add on extra header footer settings into the document / template you would like to customise in order for a better control of what you want to display. Most people use New Section at page setup; (I used to do that too) but that is when you need to create more than 3 types of header and footer set, which comes in handy if you are writing your reports, proposals, thesis or a book even.

And to give you a better understanding, here is how it looks like when I have clicked Different First Page checkbox; where immediately you will see the footer has changed and the reference I created is hidden until second page is made.
I hope this entire tips and tricks process has given you a better understanding and a new thing to learn on how to make your Microsoft Word document more standardised and effective presentation with references you can avoid making mistakes.
Until then

Thank You for Your Time

Thank You for Your Time


Oh! This is interesting... I will have to re-read this on laptop.
Posted using Partiko Android
yeah it is. I got to get it up and running a little more and work the macro of it if needed.