"Fountain of Youth" - Micro:Bit Python Control Software
"If there is magic on this planet, it is contained in water."
- Loren Eiseley
Summary: These articles describe how I've modified an acrylic polishing machine for use as a hydrogen/oxygen gas inhaler, based on the work of George Wiseman. Not a hand-holding "How To Do It," this is a "How I Did It" series. But—if determined—you can do it too. Or, you could simply order an HHO health machine "off-the-shelf" from Eagle-Research.
Series Index
- Part 1: "Fountain of Youth" - Embarking On A New Maker Adventure
- Part 2: "Fountain of Youth" - Figuring Out How To Build It
- Part 3: "Fountain of Youth" - Inside an Acrylic Polishing Machine
- Part 4: "Fountain of Youth" - ~Euphoria!~
- Part 5: "Fountain of Youth" - Standing On Giant Shoulders
- Part 6: Building the "Fountain of Youth" - Mechanical Modifications
- Part 7: Building the "Fountain of Youth" - Tower Cap
- Part 8: Building the "Fountain of Youth" - Electrical Modifications
- Part 9: "Fountain of Youth" - Micro:Bit Python Control Software
Running the HHO show!
The Micro:Bit is a sweet little beast. For the most part, I'm pleased that I chose it as the controller for my HHO project, although I have ideas for some alternatives going forward.
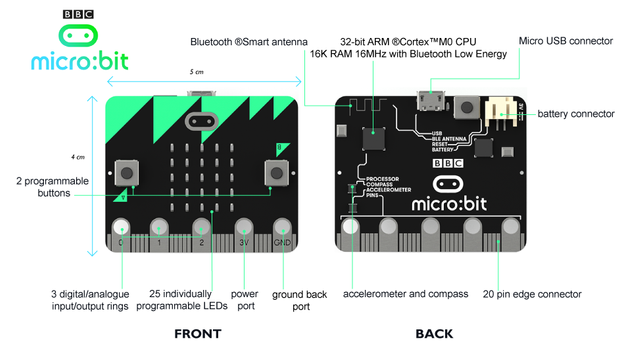
BBC micro:bit layout... ~ Image courtesy of Gareth Halfacree
At this point in the project,
I feel that I've achieved all my primary design goals.
Let's quickly review the three functions I want the HHO controller to perform.
First and foremost, the controller must regulate the flow of HHO gas. This is done by generating a PWM (Pulse Width Modulation) signal and varying the duty cycle. Lower percentage on the duty cycle results in a reduced amount of power to the HHO cell and consequently less gas production. The nice thing about PWM is that it is a digital method that effectively produces analog results. The electronics is simple, and most modern microcontrollers have built-in hardware support for PWM.
The second function is timing. The controller must allow the user to set the amount of run-time desired. I've written the program to allow this to be set as a number of minutes... You, the user, do the math to convert minutes to hours.
Finally, the controller must keep a record of the total amount of time that the machine has run. This total elapsed time is logged for maintenance purposes because the HHO tank must be emptied and flushed once in a while in order to keep the machine working at peak efficiency. Surprisingly, it turns out to be most practical to maintain this record by logging total operating time as a number of seconds.
By programming these functions into the Micro:Bit, I was able to replace three separate devices (Pulse Width Modulator, Timer, and Hour Meter) used in the Wiseman-designed machine.
Turning the Micro:Bit Into A Controller
It's pretty easy to set up a programming environment to load code into this device. All you need is a personal computer, one or two freely available apps, a Micro:Bit, and a USB cable.
The "standard" Micro:Bit programming language is Microsoft MakeCode. I've written about MakeCode and how to get started using it here:
"How To Program "I ❤️ Whaleshares" On The BBC Micro:Bit"
If you're new to the Micro:Bit, it may be worthwhile playing with a few coding examples and getting familiar with how things work. I used MakeCode to do some of my initial experiments with the HHO machine. For example, I verified that the Micro:Bit could generate a PWM waveform with easily adjustable frequency and duty cycle. However, I soon discovered (to my dismay!) that MakeCode is missing some important functions.
Fortunately, because of its popularity, there are alternative languages and programming environments available. After searching for something that would allow me to save parameters after power-off, I found that Micro:Bit Python has functions for storing information in FLASH memory.
There is an online Python editor, but I prefer whenever possible to be able to develop offline. I was happy to discover Mu Python. I ultimately downloaded the Mu Python editor, wrote the control software in Python, and have been happily using Mu Python since then.
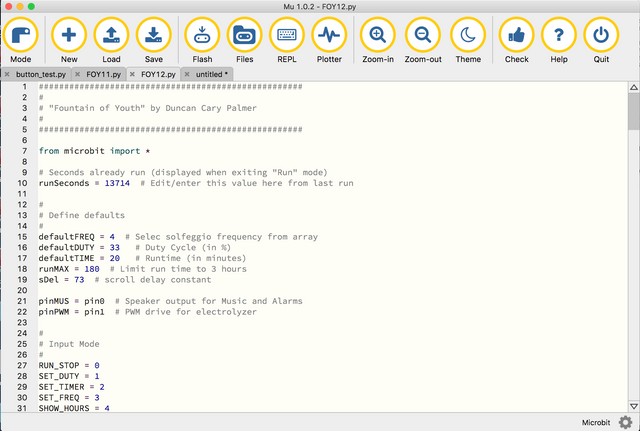
The Mu Python Editor ~ Image captured by author
The image above shows the Mu Python editing window. Most functions are intuitive and easy to find in the row of icons at the top, and I haven't even used them all. One minor frustration is that, in order to rename a file, you must double-click on the file tab, and save a copy under a new name. Also, you need to be cautious not to name files using Python module names.
Important Note: See the little gear on the lower right hand corner of the Mu Python window?
Be sure that you click on that gear, and then on the tab labeled "BBC micro:bit Settings." Then check the box beside 'Minify Python code before flashing?' or else your compile will fail.
You'll find the Fountain Of Youth source code appended to the end of this article. Highlight, copy, and then paste that code into a blank Mu Python editor tab. If you have a Micro:Bit connected to your laptop, you should then be able to Flash the code.
I've tested all this, and it has worked successfully in my Macbook environment. If you have trouble, you might try going through an intermediate "plain text" file. The Mu Python IDE also has a "Check" function that is pretty good at spotting errors. Good luck!
System Operation
Now that you have the code up and running on a Micro:Bit, you can run it "stand-alone" to see how it works. You don't have to hook it up to a machine in order to test it. If you have an oscilloscope, you can see the PWM waveform. But you don't really need fancy equipment...
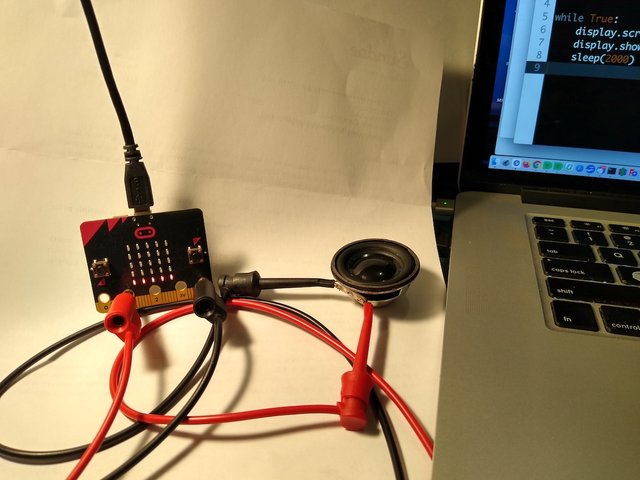
Simple Audio Test Setup ~ Image by @creatr
If you're really curious,
you can even do something as simple as connecting an earphone or a small speaker between pin1 (1) and ground (GND), as illustrated in the image above. You can then actually hear the PWM waveform output in action. Changing the Duty Cycle and the Frequency as you learn how to operate the device will then become much more exciting.
I don't think I can recommend this "hands-on" approach enough. The best way to understand how to operate the "Fountain of Youth" system is to get your hands on a Micro:Bit, program it, and run the code, even if you haven't built a system yet.
The following images and descriptions will guide you through the basics of using the software.
|
|
|
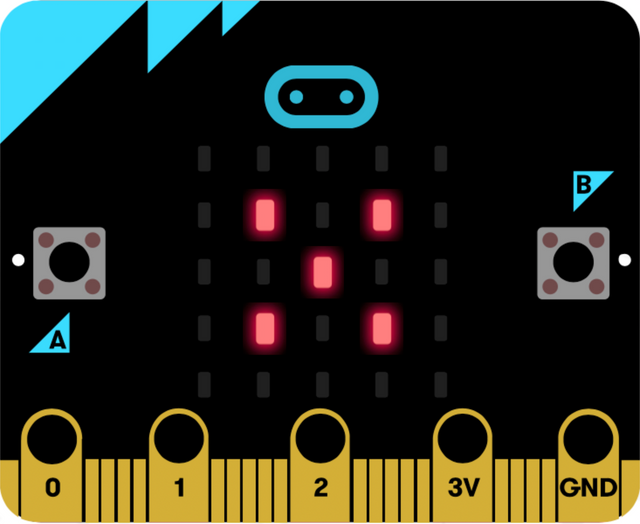
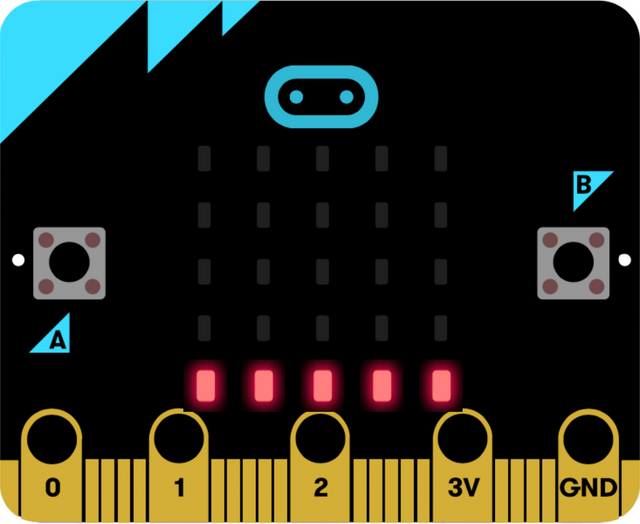
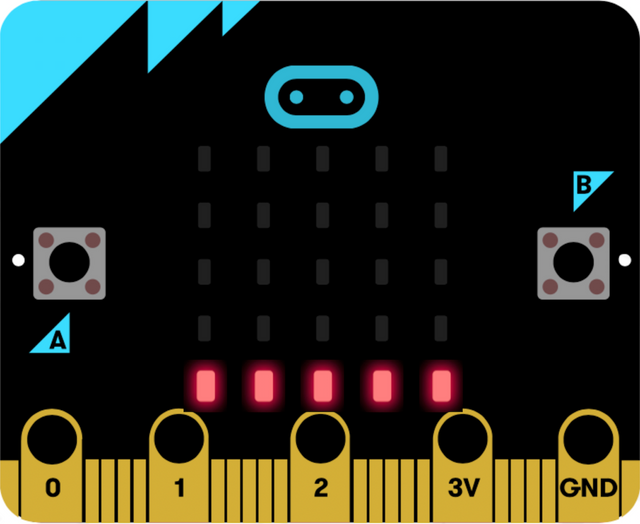
When you power up or reset the Micro:Bit, a small 'x' is displayed momentarily in the center of the display. Immediately after the initial 'x', the '_' (underline) is displayed to signify that the machine is in 'Idle' mode, i.e. that gas production is "OFF."
There are two pushbuttons on Micro:Bit, Button A on the left and Button B on the right.
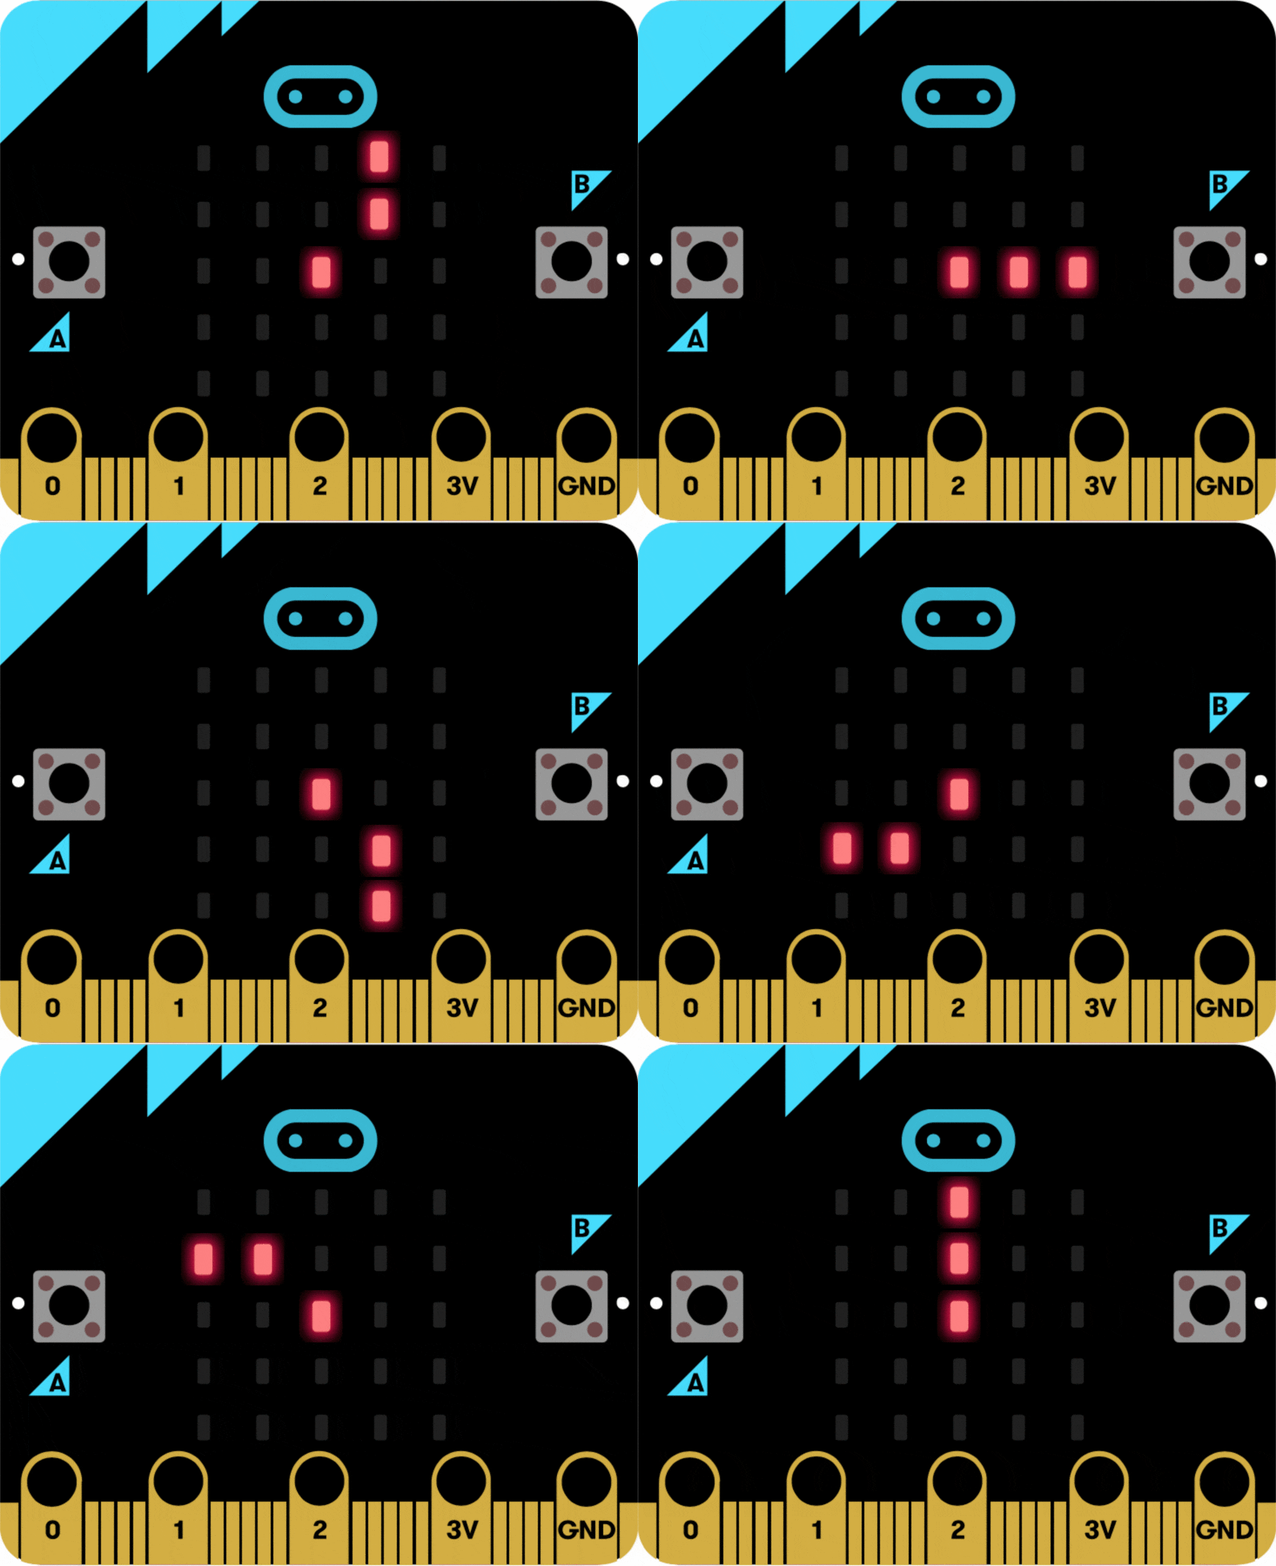
To start gas production, PRESS and RELEASE Button A. The display will start 'spinning' as shown in the 'Running' image on the right above. The PWM output pin (Micro:Bit pin1) will begin pulsing, and the machine will begin to produce Brown's gas.
To stop gas production, PRESS and RELEASE Button A once again. The PWM will stop, and the total number of seconds that the machine has run will scroll across the display.
Changing Modes
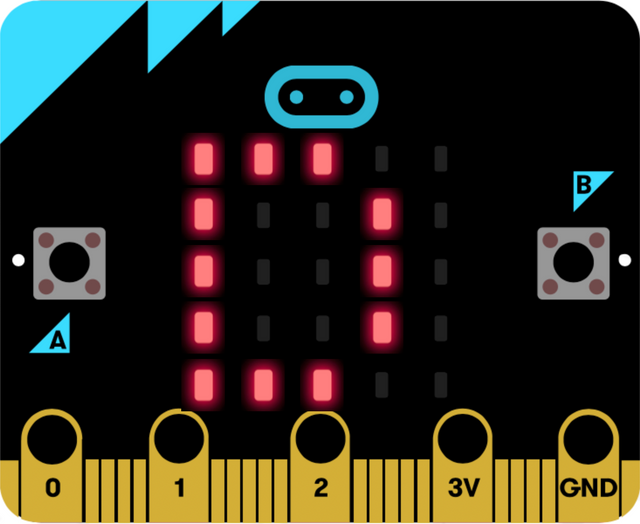
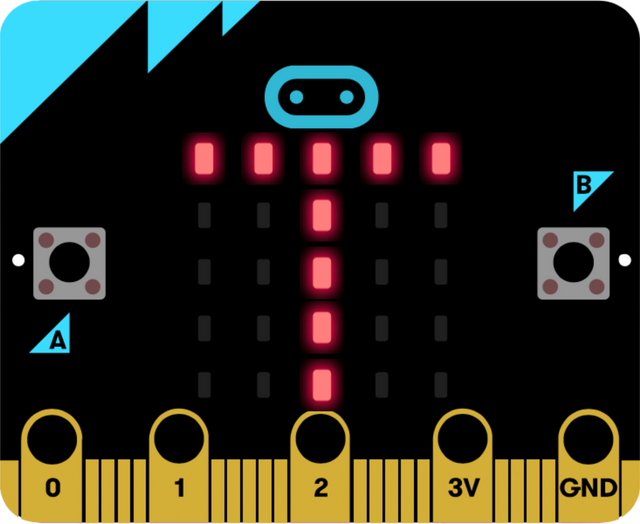
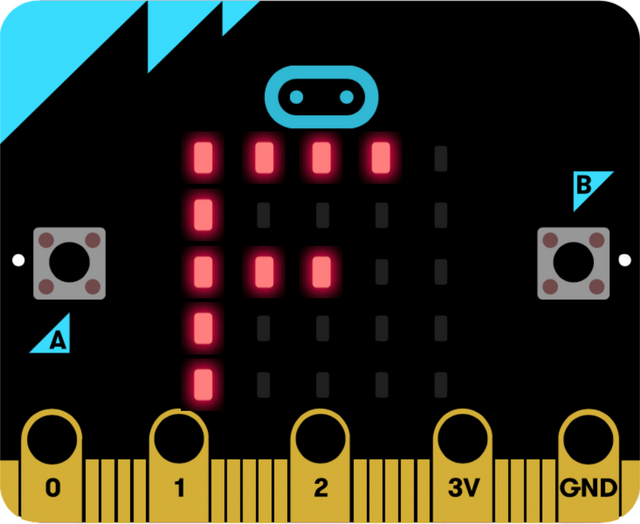
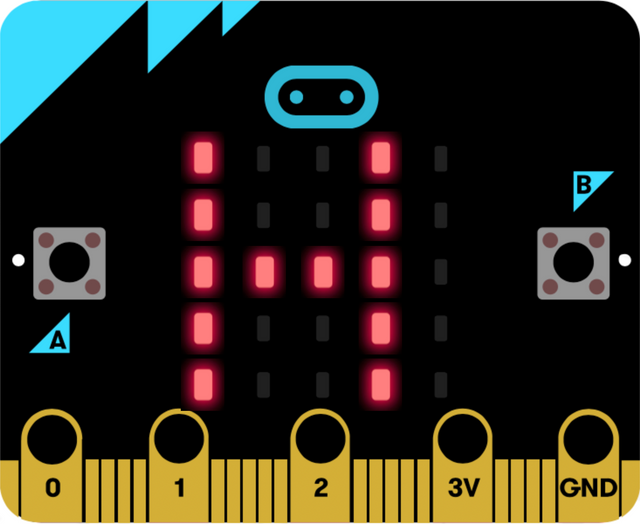
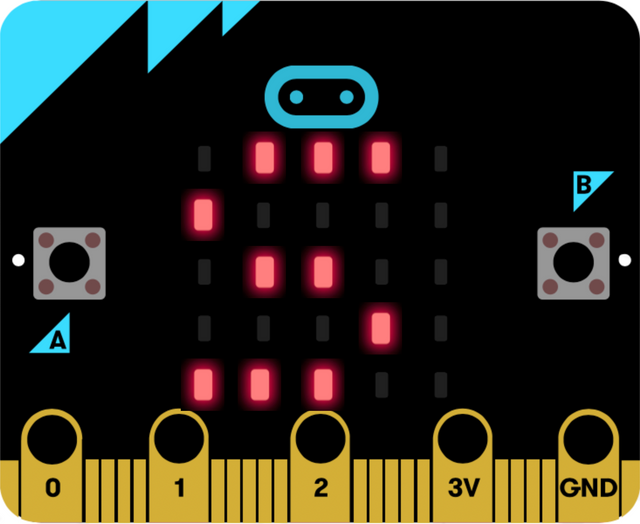
If you PRESS and HOLD Button A, you can cycle through all the system setting modes. While holding down Button A, each time you PRESS and RELEASE Button B, the system will advance to the next mode. Each mode is designated by a letter as illustrated below.
|
|
|
Observing Settings
When you see the letter (i.e. "D", "T", "F", "H", or "S") for the mode you want, if you RELEASE Button A, you will see the current setting for that mode scroll repeatedly from right to left across the display.
Duty Cycle is in percent (default is 33%), Time is in minutes (default is 70 minutes), Frequency is in Hertz (528 Hz), and Hours will be the logged number of seconds the machine has run divided by 3600. These defaults can be changed by editing the source code.
Setting Parameters
In modes "D" and "T", if you MOMENTARILY PRESS and RELEASE Button B, you will increment the count by five (5). If you MOMENTARILY PRESS and RELEASE Button A, you will decrement the count by one (1).
In mode "F", if you MOMENTARILY PRESS and RELEASE Button B, you will cycle to the next solfeggio frequency.
Modes "H" and "S" are different.
In Mode "H", if you RELEASE Button A, you will see the total accumulated hours displayed. The system keeps track of the hours in order for you to know when to empty and flush out the electrolyzer tank.
|
|
|
Saving Parameters in Mode "S"
Note that all of the parameter changes are temporary, taking effect immediately but only remaining valid during the current session. However, the final mode, "S", allows you to permanently save the parameters you have changed.
In mode "S", if you RELEASE Button A, whatever parameter changes you have made will be permanently 'FLASHED' into memory, and they will be restored at the next power-on. But if you continue holding Button A down and press Button B again, you will return to the "Run Mode" and will then be able to release Button A without permanently saving any changes.
Program and Operating Notes
Keep in mind that, because parameters are saved in Micro:Bit FLASH memory, this means that if you modify the program and re-flash it, you will lose any setting changes you may have made using the buttons. In other words, if you want to permanently keep one or more setting changes, you will need to edit those changes into the Python source code.
Also be aware that the operating time (runSeconds) is maintained in RAM memory while the machine is running. It is only saved in FLASH when the run-time times out and gas production is stopped. This means that, if there is a power failure during operation, or if you simply turn off the power or unplug the machine, the software will not log the time that the machine has been running.
Logging the run time is important for machine maintenance purposes. The electrolyzer tank needs to be emptied and rinsed out about every 200 hours of full duty cycle operation. While this is not a hard and fast number, regular maintenance is important. Note also that this software version only logs "run hours," and does not calculate "full duty cycle equivalent" hours. This means that, for example, if your Duty Cycle is set to 33% for most of your operating time, you should multiply your "run hours" by that percentage in order to recon how many machine operating hours you have racked up for maintenance purposes.
In other words, if you want to stop using the machine before the timer expires, it's a good idea to use Button A (i.e. PRESS and RELEASE) to stop the run, stop the 'spinning' display. Stopping the machine in this way will insure that the time that the machine has been running is saved in FLASH memory.
Note also that runSeconds is displayed every time you stop a run using Button A. If you are modifying the code, you should intentionally observe and write down the total number of seconds of operation and edit Line 28 of the source code so that your total operating time is not lost.
Alrighty, then!
I think we're done here...
At least, we're done with our presentation of the control software. Feel free to ask any questions you may have. If you decide to build one of these, I would like to help you succeed.
Of course, if you are an Arduino or a Raspberry Pi hacker, you can certainly use one of those for your build. Either one should work quite well, if you play your cards right. I'm considering using a D1 Mini NodeMcu ESP8266 if I build another one of these.
In our next (final?) installment,
I hope to wrap things up with a Bill Of Materials/Parts List that will give you a head start on finding all the pieces and parts and things that you might use if you build one of these. It should also give you a rough idea of how much you can expect to spend on parts. Of course, this kind of project always costs more than you imagine... But think of all the fun you'll have, and how much you're going to learn.
A couple of weeks ago, I was very happy to hear from a reader in the UK. He provided me with some very encouraging news about how one of George Wiseman's machines has helped his elderly mother make a very dramatic recovery from rheumatoid arthritis. If I can secure his permission, I'll share more details with you next time.
I'd love to hear from you.
If you're building or thinking about building one of these babies, please let me know!
DISCLAIMER:
I am not a doctor, nor am I a medical professional of any kind. This series of articles describes my very individual, personal quest to investigate credible reports of the benefits of breathing hydrogen and oxygen gas, drinking hydrogen enriched water, and applying hydrogen and oxygen gas to weakened or diseased body parts. The devices I am building, the tools and materials I am using, and the gases I expect them to produce, are potentially dangerous and even life-threatening if used carelessly. Should you choose to use any of this information, do so only with the most serious care taken for safety. I am in no way responsible for any use you may make of this information, which you undertake entirely at your own risk.
AquaCure® is a trademark of Eagle Research.
~FIN~
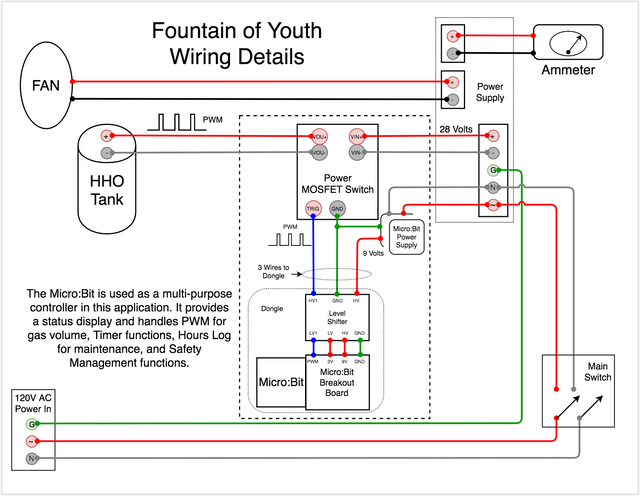
"Fountain of Youth" Modified Wiring Schematic ~ Original image by @creatr
you can still reward it: CLICK HERE.
P.S. If you have an "in" with anybody at Steemit, Inc. - Would you please ask them to get rid of these damn, extremely annoying "off-website" arrow/boxes? The have, overnight, made Steemit ugly. There are much better solutions.
For more technology articles,
please check out our Library Technology Shelf - CLICK below:

For more Health articles, CLICK our Library Health Shelf.


Introducing: The SILVERengines proton - Image by @creatr
CONTACT US - Will Exchange for Steem
You are why I'm here on Steemit!
I have very eclectic interests and hope, over time, to write about them all.
⬇️To Check Out @creatr's World⬇️CLICK Each Image Below⬇️

|

|

|
#############################################################################
#
# "Fountain of Youth" © 2020 by Duncan Cary Palmer
#  Permission granted for personal use. Version: FOY12
#
#############################################################################

from microbit import *  # Get all needed python libraries

#############################################################################
#
# Define initial/default values
#   These will be the values used when you have FLASHed the micro:bit.
#   Three of these values (Duty Cycle, Runtime, and Frequency)
#    can be changed from the user interface when the system is powered up.
#   They can be changed temporarily from the UI for a single 'run.'
#   They will be remembered ONLY IF you use the "Save" function.
#   The runSeconds only change over time as the machine operates, and
#    are only updated when the run finishes, either by timing out or
#    by using the Left Button to end the run.
#
defaultDUTY = 33  # Default Duty Cycle (in %) - limited to a range of 5%-97%
defaultTIME = 70  # Runtime (in minutes from pushbutton start)
defaultFREQ = 4   # Select solfeggio frequency from array below (0 - 8)
#
# Seconds already run (displayed when exiting "Run" mode; used for Hour Log)
#
runSeconds = 11309  # Edit/enter this value here from the last run
#
############################################################################
#
# Possible solfeggio frequencies (in Hz) - to select, set defaultFREQ 0-8
#
solf = [174, 285, 396, 417, 528, 639, 741, 852, 963]

#
# Other default/settable values
#
runMAX = 180  # Limit run time to 180 minutes (3 hours)
sDel = 73  # scroll delay constant, adjusts display speed
pinPWM = pin1  # PWM drive pin for electrolyzer

#
# Input Mode (kept in 'menu' variable)
#
RUN_STOP = 0
SET_DUTY = 1
SET_TIMER = 2
SET_FREQ = 3
SHOW_HOURS = 4
SAVE_SET = 5

mode_id = ["*", "D", "T", "F", "H", "S"]  # one for each mode

menu = RUN_STOP  # Set initial Input Mode
a_presses = 0
a_pressed = 0
b_presses = 0
b_pressed = 0
mode_flag = False

# ==================================
#
# FUNCTIONs - Called from main code
#
# ==================================

#
# FUNCTION Gets Non-Volatile Data - Source: Micro:Bit Support
#
def get_nv_data(name, default):
    try:
        with open(name) as f:
            v = int(f.read())
    except OSError:
        v = default
        try:
            with open(name, "w") as f:
                f.write(str(v))
        except OSError:
            display.scroll("Can't create file %s" % name, delay=sDel)

    except ValueError:
        display.scroll("invalid data in file %s" % name, delay=sDel)
        v = 0
    return v

#
# FUNCTION Saves Non-Volatile Data - Source: Micro:Bit Support
#
def set_nv_data(name, value):
    try:
        with open(name, "w") as f:
            f.write(str(value))
    except OSError:
        display.scroll("Can't write to file %s" % name, delay=sDel)

#
# FUNCTION Toggle RUN state
#
def toggle_run():
    global start_tic, end_tic, running, elapsed_secs, duty_cycle
    if running is False:
        start_tic = running_time()
        running = True
    else:
        end_tic = running_time()
        pinPWM.write_analog(0)  # PWM OFF
        running = False
        elapsed = int((end_tic - start_tic)/1000)+1
        elapsed_secs += elapsed
        display.scroll(elapsed_secs)
        set_nv_data("elapsed_secs.txt", elapsed_secs)

#
# FUNCTION Display current operating mode
#
def show_mode():
    global menu, running
    if menu == RUN_STOP:
        if running is False:
            display.show("_")
    else:
        display.show(mode_id[menu])

start_tic = 0
end_tic = 0

####################################################
#
# Code Execution Begins HERE
#
####################################################

# Be sure we power up in an OFF state...
pinPWM.write_analog(0)  # PWM OFF

running = False
#
# At reset/power-up, the display goes blank. Then a small 'x' is displayed
#  briefly in the center of the screen, followed by an '_' indicating 'OFF'
#
display.show("*")
sleep(373)
display.show(" ")  # Clear screen

#
# Recover non-volatile data (or set initial defaults)
#
elapsed_secs = get_nv_data("elapsed_secs.txt", runSeconds)  # Open hourmeter
frequency = solf[get_nv_data("frequency.txt", defaultFREQ)]  # Open freq. file
run_time = get_nv_data("run_time.txt", defaultTIME)  # Open run_time file
duty_cycle = get_nv_data("duty_cycle.txt", defaultDUTY)  # Duty_cycle file

#
# The period in microseconds is the inverse of the frequency x one million
#
period = int((1/frequency) * 1000000) + 1  # Set period for solfeggio frequency

pinPWM.write_analog(0)  # Ensure that PWM starts as OFF
pinPWM.set_analog_period_microseconds(period)

#############################################################################
#
# Endless Run Loop (while True:)
#
#  Initially, 'menu' Input Mode is RUN_STOP, and 'running' is False, and so
#   the show_mode() displays '_' to indicate the machine is idle. If you HOLD
#   DOWN Button A, Button B will cycle through all modes and the mode will be
#   displayed (i.e. D,T,F,H, or S).
#  In all but Setting Mode 'S' if you release Button A, you will see the
#   current value of that mode scroll repeatedly from right to left.
#
#  To understand user interface operation, read all comments in the code below
#
#############################################################################

while True:  # From here down, all code repeats in an endless cycle
    show_mode()
    while button_a.is_pressed():
        show_mode()  # also debounces button
        a_pressed = 1
        while button_b.is_pressed():
            show_mode()  # also debounces button
            b_pressed = 1
        if b_pressed == 1:
            display.show(" ")  # Clear screen
            b_presses = button_b.get_presses()  # clear for later
            b_pressed = 0
            menu += 1
            mode_flag = True  # clear so running state doesn't change
            if menu > SAVE_SET:
                menu = RUN_STOP
    if a_pressed == 1:
        a_presses = button_a.get_presses()  # clear for later
        a_pressed = 0
        if mode_flag is True:
            mode_flag = False
        else:
            if menu == RUN_STOP:
                if running is False:
                    # running = True
                    toggle_run()
                else:
                    # running = False
                    toggle_run()

    if running is True:
        seconds = int((running_time() - start_tic)/1000)+1
        minutes = int(seconds/60)
        pinPWM.set_analog_period_microseconds(period)  # important if Freq ctl
        pinPWM.write_analog((duty_cycle/100)*1023)  # PWM ON
        if menu == RUN_STOP:
            display.show(Image.ALL_CLOCKS, loop=False, delay=21)  # Spinning/ON
        if minutes >= run_time:  # Are we out of time?
            toggle_run()  # Turn off the gas

    a_presses = button_a.get_presses()
    b_presses = button_b.get_presses()
#
# 'D' is displayed.
#   When in this mode, Button B increments the Duty Cycle by five (5), while
#     Button A decrements it by one (1).
#
    if menu == SET_DUTY:
        display.show("D")
        display.scroll(duty_cycle, delay=sDel)
        if a_presses == 1:
            duty_cycle -= 1
            if duty_cycle < 5:
                duty_cycle = 5
        if b_presses == 1:
            duty_cycle += 5
            if duty_cycle > 97:  # Max duty cycle 97%
                duty_cycle = 97
#
# 'T' is displayed.
#
#   When in this mode, Button B increments the Run Time by five (5), while
#     Button A decrements it by one (1).
#
    if menu == SET_TIMER:
        display.show("T")
        display.scroll(run_time, delay=sDel)
        if a_presses == 1:
            run_time -= 1
            if run_time < 0:
                run_time = 0
        if b_presses == 1:
            run_time += 5
            if run_time > runMAX:  # Limit run time
                run_time = runMAX
#
# '*' (spinning, running) or '_' (stopped) is displayed.
#
#   When in this mode, Button A will either start or stop the run.
#    When the run is stopped, the total run time in seconds will be displayed,
#     scrolling from right to left. If you ever need to re-FLASH the code due
#     to any changes made, be sure to read and enter this value into runSeconds
#     so that you don't lose the log of how much time the machine has been run.
#    Button B will increment the Run Time by five (5) minutes.
#
    if menu == RUN_STOP:
        if b_presses == 1:
            run_time += 5
            display.show("T")
            display.scroll(run_time, delay=sDel)
#
# 'F' is displayed.
#
#   When in this mode, Button B cycles to the next solfeggio frequency in
#     the list of available frequencies.
#
    if menu == SET_FREQ:
        display.show("F")
        display.scroll(frequency, delay=sDel)
        if b_presses == 1:
            defaultFREQ += 1
            if defaultFREQ > 8:
                defaultFREQ = 0
            frequency = solf[defaultFREQ]
            period = int((1/frequency) * 1000000) + 1
#
# 'H' is displayed.
#
    if menu == SHOW_HOURS:
        display.show("H")
        display.scroll(int(elapsed_secs/3600), delay=sDel*3)  # Hours
#
# 'S' is displayed.
#
#   When in this mode, RELEASING Button A will cause all current settings to
#    be stored in FLASH memory.
#
    if menu == SAVE_SET:
        if button_a.is_pressed():
            # display.show(" ")  # Clear screen
            continue
        set_nv_data("duty_cycle.txt", duty_cycle)
        set_nv_data("run_time.txt", run_time)
        set_nv_data("frequency.txt", defaultFREQ)
        display.scroll("Saved", delay=sDel)  # Clue
        menu = RUN_STOP


Good to see that you are working hard!
My dear @lakshmi!
What a lovely surprise to have you visit! <3
I hope you and yours are well. Take care, my friend! :D
You to! I will try to do a post soon. Not much travel lots of gardening , nature and care taking of friend with cancer. :D <3
Ah, take care my friend...
You can also find me on the hive... and whale shares...