Hackintoshing as an iOS Developer
Hackintoshing, an iOS Developer's Perspective
It's been very clear over the past few years that Apple has been moving farther and farther away from the prosumer/professional marketplace. As creators and developers await the new Mac Pro, the only bone Apple threw us was the iMac Pro. The iMac Pro has its own use cases, but the prospect of purchasing a device in that price range and not having the ability to upgrade parts as they grow old and break is scary to me. So I decided to take matters into my own hands.

Mac Pro Concept from CURVED, excerpt
The Build
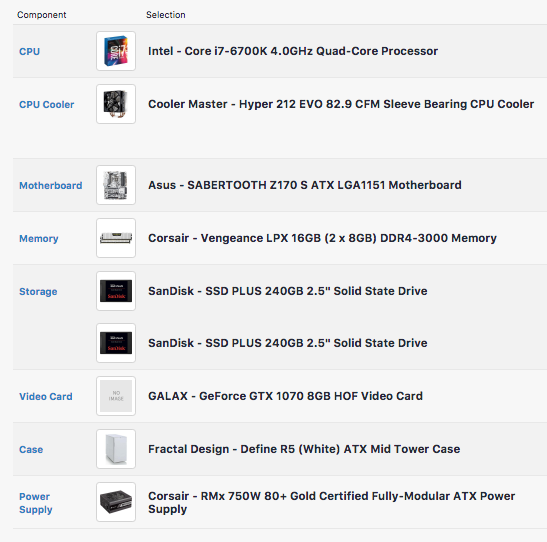
It started over the summer when I built a gaming PC. I had always used my MacBook Pro to do my development, but I wanted a more capable computer at home to run Windows and play games. I hadn't thought about running macOS on it at the time. However, as I decided to go with an Intel CPU, it just so happened that I picked parts that were supported by macOS.
PCPartPicker list

If you're thinking of building your own Hackintosh-capable PC, tonymacx86.com's builders guide is a great starting point for picking parts and components.
(note: link refers to lastest guide as of January 2018. For future guides, navigate directly to tonymacx86's website.)
The Installation Process
I wanted to keep using Windows 10 on my PC in order to play games, so I had to be careful about the location of each operating system. I also use the PC for managing photos and videos with the Adobe Suite. Projects that I am currently working on are located on the second SSD in the system. I ended up finishing all of my projects and moving them to my NAS. This left the PC with nothing important on it. So after a quick backup, I wiped both SSDs with a bootable Linux flash drive.

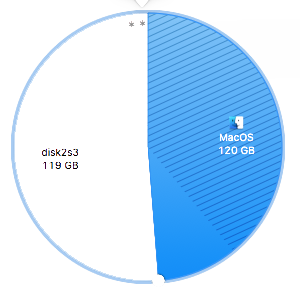
I wanted to make sure that I was efficient with the way I stored my files. I figured that macOS and its programs would need about 90GB and Windows would need about 70GB, based on my previous experience with the way I use hard drive space. Since I would only ever be accessing one operating system at a time, it was ideal to put both of them on the same drive. I separated the first SSD, now my OS drive, into two 120GB partitions: one for macOS, and one for Windows 10. This left each operating system with enough wiggle room to install larger programs if I need to expand down the road.
Afterwards, I just followed the installation guide here, again from tonymacx86. However, Nvidia Pascal GPUs require a little bit of additional setup. To complete that, I followed this guide from hackintosher.com.
All that was left was using Multibeast for the remaining drivers. It took me a couple of attempts and posting on some forums to get audio working, but I manually installed those kexts and things worked out.
Functionality
Now, after using my Hackintosh for a week, I feel confident in saying that the Hackintosh is fully functional. I can boot into either OS without any problems. I did not bother setting up iMessage, a common issue with Hackintoshes. However, I personally don't use iMessage, so that wasn't a big issue for me.
Usage
Coming from my late 2012 MacBook Pro, working with XCode on the Hackintosh feels like a treat. Builds are fast, the simulator works well, and I still have access to all the parts of macOS that I've become comfortable with. More importantly, I'm not sacrificing performance and upgradability for a sleek design. Don't get me wrong, as a general consumer, Apple's products are great. But their professional desktop line is lacking the machine I need. So yeah, performance is good on this machine, but that wasn't the purpose. I get the macOS experience, and that's what matters to me.
Issues
Hackintoshing is not for the weak of heart. It's marginally more complicated than installing Windows, and you have to be able to do your own research and diagnose your own problems throughout the process. It also took several rather attentive hours to complete. And that's not including building the computer itself. As someone who enjoys tinkering with computers, this was a fun weekend project. But for others, it's lost time and a painful process. I wouldn't recommend it if you don't enjoy that kind of stuff.
Updates are also a pain in the ass. Reading over tonymacx86's forums looking for issues and patches every time I update is annoying, takes time out of my day, and leaves me longing for the ability to press update, check my phone for 5 minutes, and start using my computer as if nothing had happened.
Tips and Final Thoughts
Make. Backups. If you don't already, making regular, automated, redundant backups in multiple locations is vital. I had the luxury of being able to wipe all the hard drives in my computer before I started, but if you're going to try to install macOS on your current computer, you have to be willing to both lose everything on the computer and not use the computer for several days. If something goes wrong during the installation process, you are your own support team. But if you're willing to do all of that and really, REALLY want to use macOS (or you're reliant on macOS-exclusive software like XCode), I think that this is a good solution until Apple announces their Mac Pro.
Thank you, thank you very much,
-tytym
Hi. I am @greetbot - a bot that uses AI to look for newbies who write good content!

Your post was approved by me. As reward it will be resteemed by a resteeming service.
Resteemed by @resteembot! Good Luck!
The resteem was paid by @greetbot
Curious?
The @resteembot's introduction post
Get more from @resteembot with the #resteembotsentme initiative
Check out the great posts I already resteemed.
Congratulations @tytyvm, you have decided to take the next big step with your first post! The Steem Network Team wishes you a great time among this awesome community.
The proven road to boost your personal success in this amazing Steem Network
Do you already know that awesome content will get great profits by following these simple steps, that have been worked out by experts?
Cool! I follow you.
Congratulations @tytyvm! You received a personal award!
Click here to view your Board
Congratulations @tytyvm! You received a personal award!
You can view your badges on your Steem Board and compare to others on the Steem Ranking
Vote for @Steemitboard as a witness to get one more award and increased upvotes!