100% Automatic bot to trade items CS:GO
Hello everybody! I don't have an article here for a long time. And this happens not only because of the summer, but also because we work 100%, like our automatic bot for trading. This bot really does all the operations itself and brings up to 10% profit per day. I use this bot for myself, it gradually increasing my income. And when all the tests are finished, the bot is working well and gives a positive result, we started sales and sales growth. Work will pleases us as well as the availability of TradeBot 2.0.

- Buy TradeBot 2.0 with my 20% discount
- Купить TradeBot 2.0 с моей скидкой 20%
Instructions for purchasing a bot
Beginning of work:
1.1 To get started, go to the site https://steam-market-bot.ru.
1.2 We go to the section of the personal cabinet and log in through one of the suggested options, if you can not log in through all the suggested options - write to us via live chat or VK group and we will help you.
1.3 The program works by subscription, the month of using the bot is 1000 rubles (~17$). You can pay only for a full month.
1.4 We replenish the balance via the "Refill" button, choose one of the offered options (Yandex money or Visa / Mastercard).
1.5 After payment - refresh the page and the amount will be displayed in your balance.
1.6 Further "Buy a license".
1.7 Further "Download the program". An archive with three programs will be downloaded: the program TradeBot.jar; The program for automatic acceptance / transfer of items SteamTrader and Steam Desktop Authenticator 47 - the emulator of the Stimian authenticator for the smartphone.
1.8 The TradeBot requires the installation of Java www.java.com
And also install .NET - Microsoft - make a query in the search engine "update .net windows (version)
1.9 Run the TradeBot program - right click on the program shortcut -> open with -> Java (TM) Platform ...
Automatic acceptance / transfer of items.
Acceptance / transfer of items is implemented in a separate Steam trader program, which must be run with the bot. Before you begin, you need to configure automatic acceptance / transmission.
To do this, you must have the Steam Desktop Authenticator installed on your computer. You will only need your file with the maFile extension, which lies in the maFiles folder. The Steam Desktop Authenticator application is not required for work.
If you previously used the Steam Desktop Authenticator program and are authorized in it, then we perform the following actions:
2.1 Unzip the resulting archive with the Steam trader program
2.2 First of all, we check whether your maFile is encrypted, open it with a notepad and look at the contents of the file if it looks like a set of letters and numbers like in the picture:

...then your maFile is encrypted and we need to decode it. If your maFile is not encrypted and you see different settings, then immediately go to step 2.3.
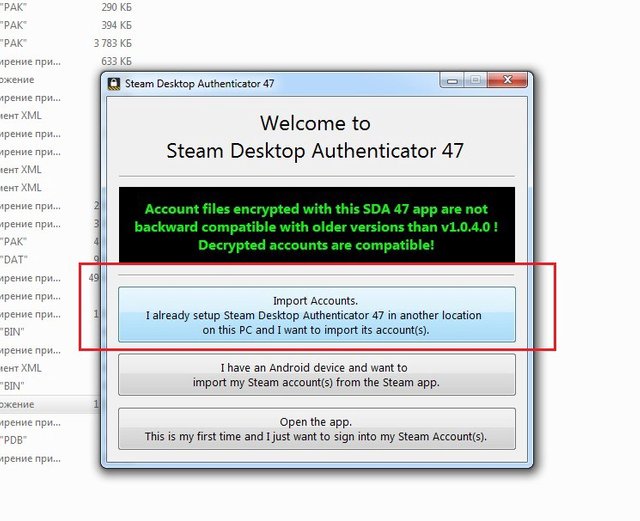
To decrypt maFile, run Steam Desktop Authenticator47 - the application that is in the archive with the bot and click the first option: Import accounts. I already setup ...
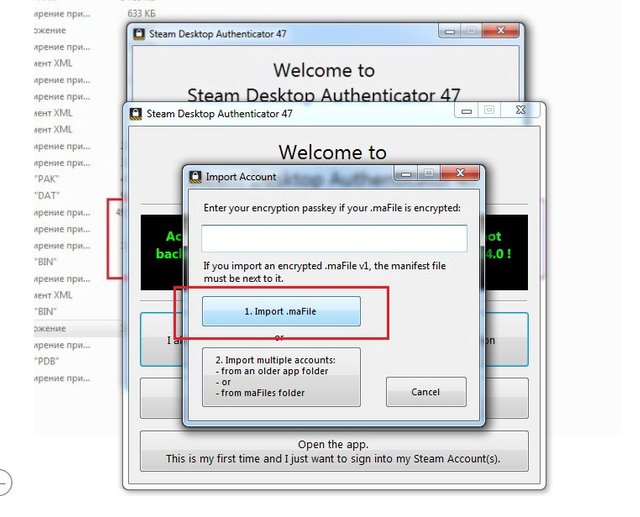
Next, click Import maFile, and select your encrypted maFile (enter enter your encrypttion passkey in the box enter passkey if you have it installed)
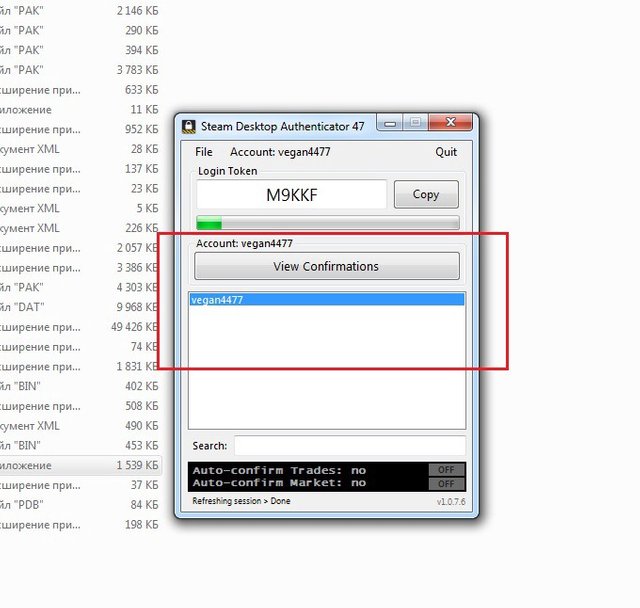
After that, restart the program and your account should appear in the list
2.3 Now copy your decrypted maFile from your Steam Desktop Authenticator 47 to the SteamTrader \ authfiles folder
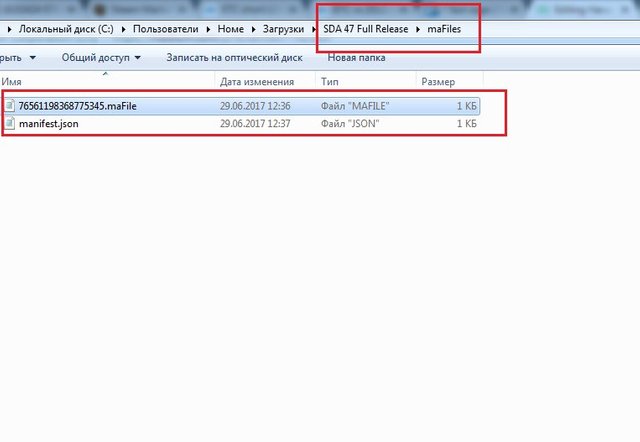
2.4 After that, you need to create a copy of your maFile inside the same authfiles folder and rename this copy to a * .auth format file, where * - is the login of your account account.
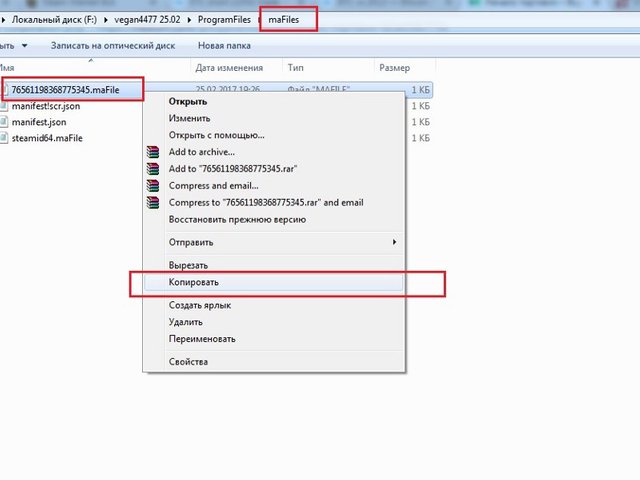
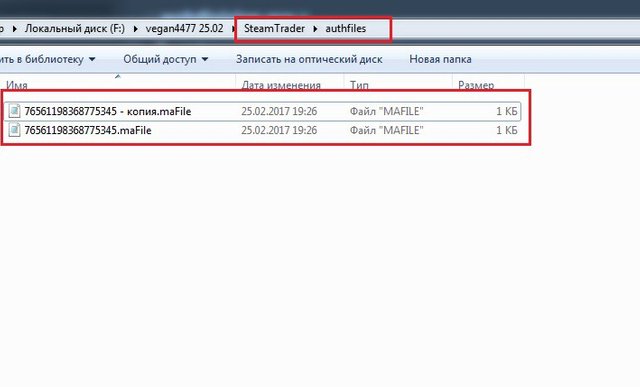
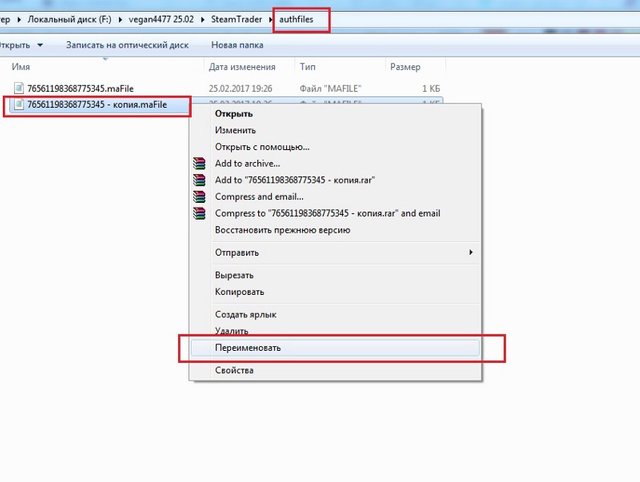
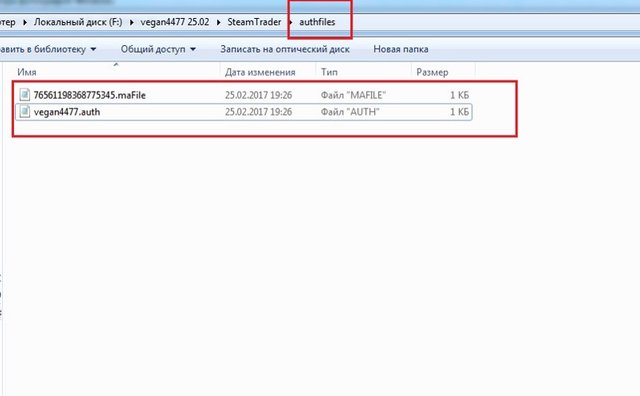
As a result, in the folder authfiles you should have 2 files: the first is your maFile in decrypted form; The second is a file with the extension .auth, renamed as the login of your account's Steam.
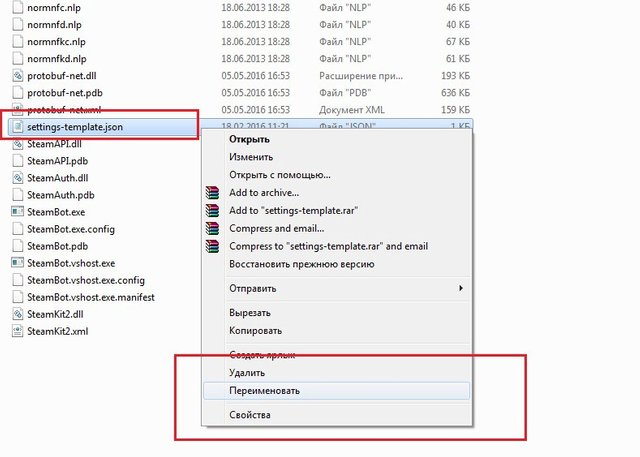
2.5 Next, go to the root folder of the bot, find the file settings-template.json and rename it to settings.json. Now open the settings.json file with notepad and edit it:
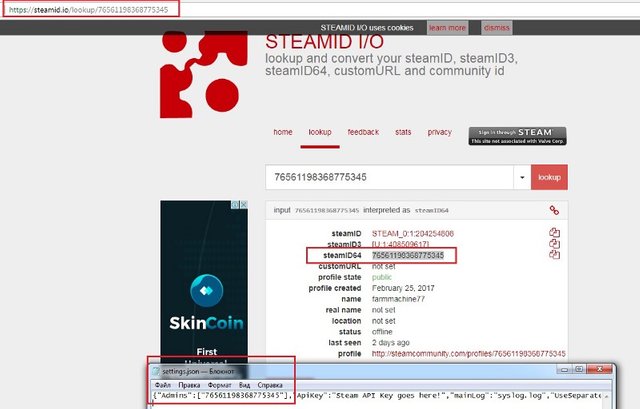
"Admins": ["234567"] - inside square brackets, in quotation marks instead of digits, insert your steamid64, which can be found at https://steamid.io/lookup (insert the link to your Steam profile here).
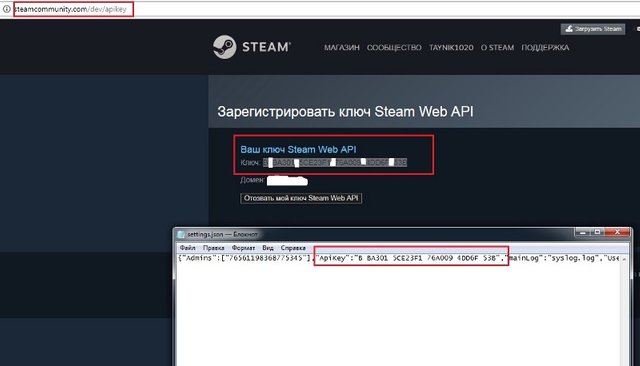
"ApiKey": "Steam API Key goes here!" - inside double quotes, instead of Steam API Key goes here! Insert your stymapi, which can be found at http://steamcommunity.com/dev/apikey
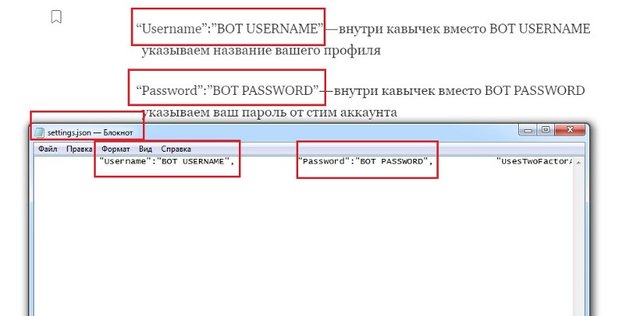
"Username": "BOT USERNAME" - inside the quotation marks instead of BOT USERNAME, enter your account username
"Password": "BOT PASSWORD" - inside the quotes instead of BOT PASSWORD we specify your password from the account's Steam
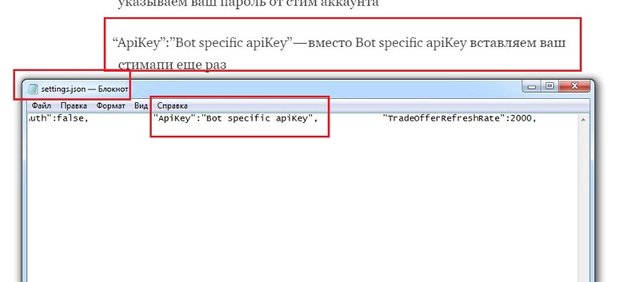
"ApiKey": "Bot specific apiKey" - instead of Bot specific apiKey, insert your stimapy again
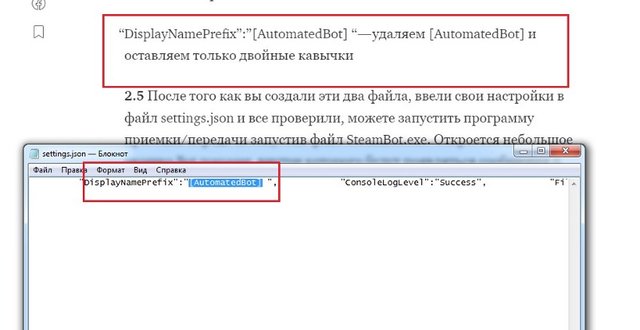
"DisplayNamePrefix": "[AutomatedBot]" - delete [AutomatedBot] and leave only double quotes
2.6 After you created these two files, you entered your settings in the settings.json file and checked everything, you can start the receive / transfer program by running the SteamBot.exe file. A small window will open in the Bot manager, within which messages about the program actions will appear. If you did everything correctly, then the automatic acceptance / transmission is now working and the bot itself will give / receive items.
Do not forget to add the bot and the acceptance / transfer program to the antivirus exceptions, if you have it installed!
Description of the program Trade Bot
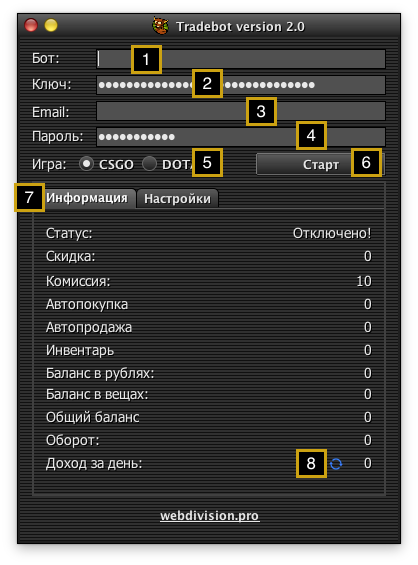
1. Description of the bot. Helps not to get confused in several simultaneously open programs, here you can write something different to distinguish several open copies of the bot.
2. To start trading, you will need the API key of your account TM: go to https://market.csgo.com/docs/ and click on re-create the key. To receive a key on your account, exchanges must work. Check exchanges you can follow links:
Https://market.csgo.com/check/
Https://market.dota2.net/check/
3. In this field, enter the email address in order to receive notifications about the "Status" bot of the program.
4. In the password field, enter the key issued by our site at registration.
5. Selection of the trading platform csgo.tm or dota2.net.
6. Start / stop the bot of the program.
7. Push buttons between "Information" and "Settings".
Section information: discount and commission of your TM account; Auto-purchase - the number of active orders on the site; Auto sales - the number of items offered for sale; Inventory - the number of items in inventory; Balance - free amount on the site; Balance in things - the total amount of the value of all things put up for sale; Turnover - the trading volume of the account for the whole time.
8. Update revenue per day - the bot calculates sales for the last day (the reporting period starts from 00-00) and summarizes the profit earned. If after the specified period (point 9), the bot sold something in the negative, then this minus is subtracted from the profit.

9. The period of your history on the trading floor. If the item is not sold during this time, the bot after this period will try to sell this item from 1 place, not including the purchase price (sale of stale items).
10. The price range for items that the bot will trade.
11. The number of items that will get in after the bot view according to the current settings. On one page there are 56 items, for example, if you want the bot to add the first three tabs, then specify 3х56 = 168 items. Remember, the bot will add orders only to those items that are suitable for the minimum profit at the moment.
12. The number of StatTrak items that the bot will buy. It is calculated separately from the number of objects.
13. The number of knives that the bot will buy. It is calculated separately from the number of objects.
14. The number of StatTrak knives that a bot will buy. It is calculated separately from the number of conventional knives.
15. The bot will add only those items in which the difference between an auto purchase and a sale price is not less than a specified percentage (taking into account your commission and a discount). In fact, this is a potential benefit based on the value of the item. It is designed so that the bot does not trade "to zero", when the entire commission is eaten by the commission. In theory, the larger the number you specify - the less items will be bought, but the profit will be higher.
16. Increase the sale price if I am the only seller. If you stayed with the only offer on the market, then the price is set only by you and you have no one to bargain with, so you can slightly inflate the price - indicate the percentage that the bot will add to the purchase price in such cases.
17. Remove auto purchases that do not fall into the price range. For example, you traded in cheap items, then decided to add more expensive ones. But on the sale there are still cheap items that you no longer want to buy. If the tick is not checked, the bot will again create an order for all items sold and try to buy them again. If the tick is checked, after the sale the bot will buy only those items that pass through the price filter.
18. Check if you want the bot to delete all purchase orders before starting work (a new list of orders matching your filter will be created). If the tick is not worth it, the bot will add new orders to existing ones.
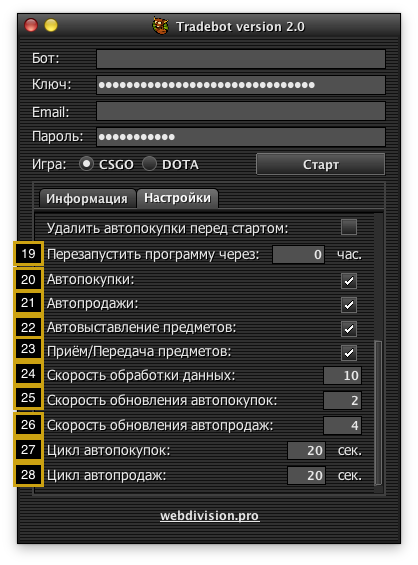
19. Restart the program after N hours - the function well combines with the function from item 18. The bot will automatically restart every N hours. It is made in order that after a certain time the bot automatically updates the purchase orders with the specified settings, because The situation on the market is constantly changing.
20. Enable / disable update of purchase order prices - if ticked, the bot checks all purchase orders in order. Based on the formula laid down in the bot, it automatically adjusts to the price changes and tries to buy the item from the first place. If on some item now less than 3 sellers, then this order is deleted, because There is a risk of buying an item at an inflated price due to the increased demand for this item.
21. Enable / Disable auto sales price update - if ticked, the bot checks the exhibited items and tries to sell them from the first place, considering the purchase price. The bot will never sell a thing in the minus until the period specified in clause 9 passes.
22. Turn on / off auto-display of items from your inventory - if ticked, the bot will put up for sale only those items that are present in your purchase history (the period is taken from point 8).
23. Turn on / off the acceptance / transfer of purchased or sold items. If the checkbox is ticked, the bot will automatically accept and return the trades from the site's TM bots. If there is no tick, then you will have to take / transfer items manually.
24. Number of parallel processes in the bot program. The maximum value is 10. Recommendations from the developer - leave the value as is.
25. The number of simultaneous requests per second to csgo.tm or dota2.net servers to update the prices of auto purchases. If the value is too high, the server will remove your api, and you will have to create a new one. Do not overestimate this value.
26. The number of simultaneous requests per second to csgo.com or dota2.net servers for updating auto-sales prices. If the value is too high, the server will remove your api, and you will have to create a new one. Do not overestimate this value.
27. The cycle of auto purchases - the time allotted to the bot for the passage of orders for autocompleting. Do not overestimate this value, it can cause the cycle to hang.
28. The cycle of auto sales - the time allotted to the bot for the passage of things put up for sale.
Configuring the Steam Desktop Authenticator
1. First start
1.1 Authenticating to the Steam Desktop Authenticator 47
If you have never traded bots and you have a new account, then you need to log in to Steam Desktop Authenticator 47. This program allows you to get authorization codes on the computer and make exchanges in an automatic mode, without user intervention.
If you have not yet linked this authenticator to the steam account, then run the Steam Desktop Authenticator 47:
-click "Open the app." This is my first time and i just want to sign into my steam accounts ", then File / setup new account enter login and password;
- Enter the received SMS code;
- We must save the recovery code (if the program is lost);
We are waiting for 7 days, after which it is possible to make exchanges;
If you previously used the Steam Desktop Authenticator program and are authorized in it, then you do not need to configure anything, copy your maFile from it and then follow our instructions.
If you already have a mobile authenticator attached to your iOS account, then you need to
Re-bind the account and wait 7 days, there are no other options.
If your mobile account has already been tied to an Android authentication system, then there are two options:
Reconnect the account, then wait 7 days;
Use the instructions below and do not wait for 7 days, but some effort will be required.
1.2 Instructions for transferring the authenticator from the Android system to Steam.
Desktop Authenticator.
1) Extract the folder data \ data \ com.valvesoftware.android.steam.community from your device or emulator. For devices with root access, I recommend the Root Explorer program. After extraction, we save this folder to the PC.
2) We go into the folder with the bot "ProgramFiles / maFiles" and rename the file "manifest! Scr.json" to "manifest.json".
3) Now open the renamed file (manifest.json) and replace it with "steamid64" on the id of your steam account, save. You can find your Steamid64 by clicking this link https://steamid.io/lookup (copy the link to your profile and click lookup).
4) Then rename the file "steamid64.maFile". Instead of "steamid64" you need to enter your id again.
5) Then open the renamed "steamid64.maFile" file and see the different fields there.
They need to be filled. To do this, we perform the following steps:
Open "com.valvesoftware.android.steam.community \ files \ Steamguard **********" and transfer the settings to the corresponding fields in our "steamid64.maFile" file.
We left blank fields in our file, device_id we take from
"Com.valvesoftware.android.steam.community \ shared_prefs \ steam.uuid.xm" l (it should be something like this: android: e6ec85420b8a1ca5b7465f49546bd95c)
There is one more important "OAuthToken" field left. We open
"Com.valvesoftware.android.steam.community \ app_cache_i \ login.json" and pull out "access_token" from there, paste it into the field under "OAuthToken".
At the end of the file, in the "SteamID" field, you also need to add your steamid64 id.
The fields SessionID, SteamLogin, SteamLoginSecure, WebCookie must be empty (to avoid errors)
Here is a sample of a healthy "steamid64.maFile" file:
{"Shared_secret": "Daa211QWEld2gPEfUt5uN8WJ / Ug =", "serial_number": "12345678912345678912",
"Revocation_code": "R12345", "uri": "otpauth: // totp / Steam: test1234? Secret = IWTLPV2UCQRJN64DJFK
SADKFJFLDJDSKI & issuer = Steam "," server_time ": 1150212527," account_name ":" test1234 "," token_gi
D ":" ba829102ecb88da "," identity_secret ":" oNcfC / SXeTyNJDLF2LDJfp0 + M = "," secret_1 ":" f6F4myd7h
DjdJshVsASdczVPh6Q = "," status ": 1," device_id ":" android: C37E2D8D4C13446224B781F12A4B1EC8F
47FD20D "," fully_enrolled ": true," Session ": {" SessionID ":" "," SteamLogin ":" "," SteamLoginSecure ":" ",
WebCookie ":" "," OAuthToken ":" "," SteamID ": 76561111111122238}}
(All data are not real and are given for example only)
Done! After launching "Steam Authenticator.exe" you should have your account listed, if not, then you did something wrong, check everything again.
- Buy TradeBot 2.0 with my 20% discount