Build server APIs with GraphQL and Express #4: Relations system and Create Query and resolvers for user data
Repository
What Will I Learn?
- Relations system
- Create Query and resolvers for user data
Requirements
- Basic Javascript
- Install Node
- Install Express
- Install GraphQL
Resources
- Node.js https://nodejs.org
- GraphQL https://github.com/graphql
- Express https://expressjs.com/
Difficulty
Basic
Tutorial Content
let's continue our lesson about GraphQL, this is the fourth series from the GraphQL and Express tutorial. for those of you who have just followed this tutorial, you can see the previous tutorial in the Kurilum section. so in this tutorial, we will discuss system relations on GraphQL, as we know relation are important in a database. The right relations will make Backend's performance easier as the data provided through the API. then how about the relation system on GraphQL, let's find out in this tutorial.
Relations system
In this section, we will discuss Relations on GraphQL. As we know that GraphQL is a Query language, then how do you set the relation?. Of course, you know the Query language in SQL, in the SQL query we recognize the existence of a primary key and foreign key as a relation between tables in the MySql database. well on GraphQL we don't use tables in the database because GraphQL is just a query language. B even though it is only a Query language, GraphQL can create its own relations system.
- Create data relations
Because we don't have a database table. we will create an example using fake data in JSON form. If you follow the previous tutorial, then we have the forum data stored on the variable ForumsData. At ForumsData I will add a key that will relate to other JSON data, we can see an example in the code below:
app.js (Forum data)
let ForumsData = [
    {id : 1, title: "This the first Title of Forum", desc : "This the first Description from the first forum", userId: "1"},
    {id : 2, title: "This the second Title of Forum", desc : "This the first Description from the second forum", userId: "2"},
    {id : 3, title: "This the Third Title of Forum", desc : "This the first Description from the Third forum", userId: "2"}
];
As we saw in the code above I add the userId key which will be the relation of the JSON data that we will create as the example below:
app.js (User data)
let userData = [
    { id : "1", name: "Millea"},
    { id : "2", name: "Duski"},
    { id : "3", name: "Laguna"}
]
Well the data above is the user data that we store in the let userData variable. On our user data we have two keys, the first is the id that will relate to the userId key in the data forum and the second is the name which is the name of the user.
Now we have the data to do relations on GraphQL. What we will do next is create a schema from user data.
- Create Schema for user data
We have defined the data user, now to use it we need to define it in the buildSchema() function, For an explanation of the function you can follow my previous tutorial. For more details, we can example below:
app.js (Schema)
let schema = buildSchema(`
    type Forum {
        id : ID,
        title : String,
        desc : String
    }

    type User {
        id : ID,
        name : String
    }

    type Query {
        forum(id : ID!) : Forum,
        forums : [Forum]
    }
`)
The example above is a schema that we have built from the previous tutorial series until now. Here we add the User schema with fields like the following id: ID and name: String.
Well, the example above is a user schema that we have defined, now we will also define the User in the Query so we can query the data in the schema.
- Create Query for user data
After defining the current schema we need to define it in the query so that we can query the user data. for more details, we can see the example below:
app.js (Query)
type Query {
        forum(id : ID!) : Forum,
        forums : [Forum],
        user(id :ID!) : User,
        users: [User]
    }
In this query I add two things, the first we will display the query results of all users users: [User] and the second is the result of querying user details user(id :ID!) : User,. As we learned in the previous tutorial, to get detailed user data we need to pass something unique, namely the ID. Well after we make the query for the next user data we can make resolvers
- Create Resolvers for user data
To see the results of the query we need to make resolvers in the user data. for more details we can see in the resolvers section of our application:
app.js (Resolvers)
let resolvers = {
    forum: (args)=> {
        return ForumsData.find(el => el.id == args.id)
    },
    forums: ()=> ForumsData,
    user: (args) => {
        return userData.find(el => el.id == args.id)
    },
    users:()=> userData
}
We can see in the code above, in the user resolvers we will accept parameters that are passed on to the graphiql and the parameters we will compare with the id that is in the object userData userData.find(el => el.id == args.id).
Then on the users resolvers we will bring up all the data that is in userData users:()=> userData.
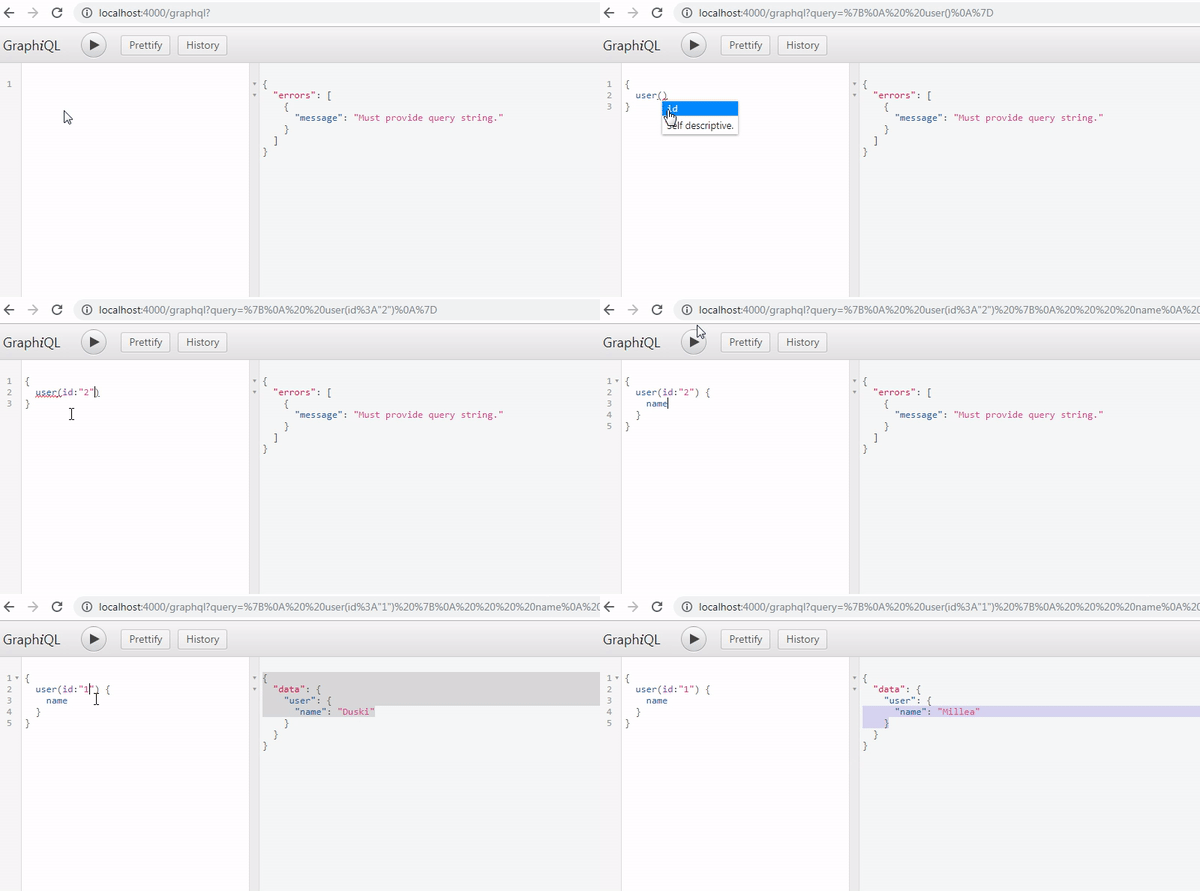
We will see how the user resolvers result. If there is no error then we can see the example as shown below:
.gif)
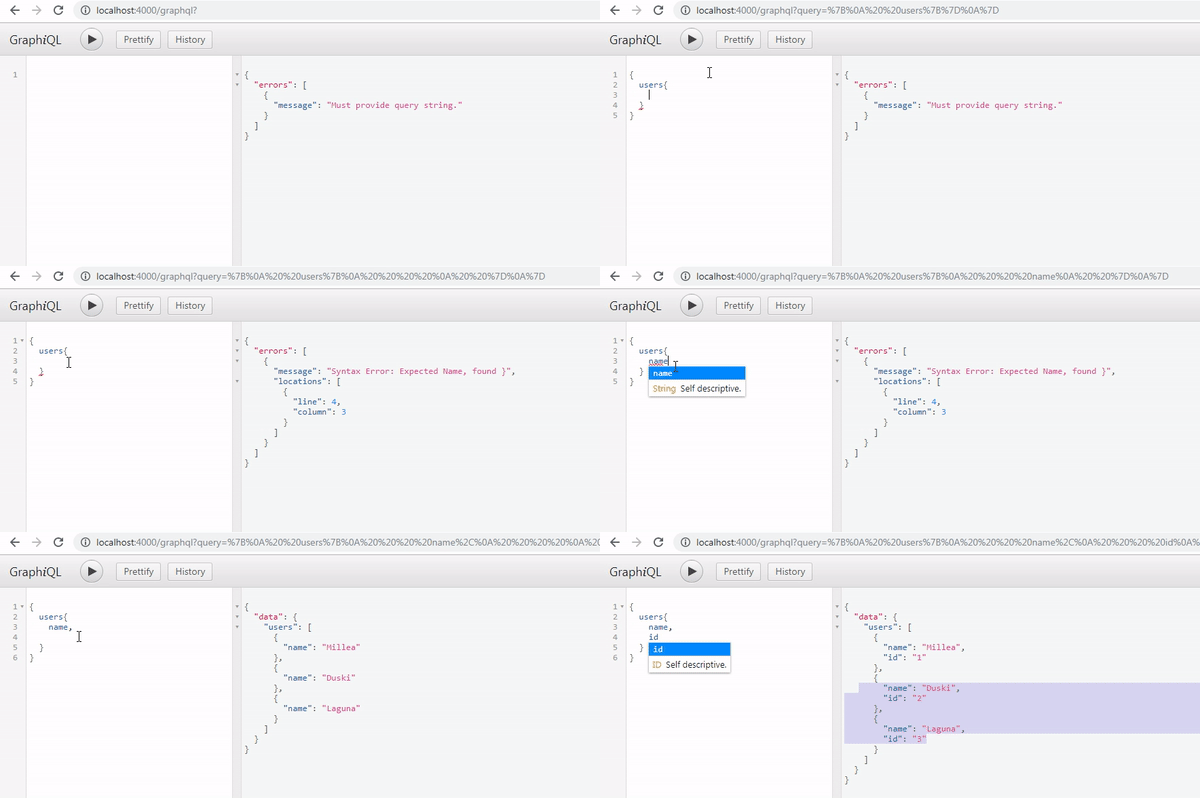
We can see in the picture above that we have successfully displayed the user data in graphiql. This means that our user resolver has gone well, then what about resolvers users. we can see the results as shown below:
.gif)
We can see in the picture above we have succeeded in making resolvers for user and users. then we will create a way we can do relations with user data.
- Relations between forums and user data
We have made resolvers in the user and user data, then we will then connect between the relationships from the forum and user data. So later in the forum schema I will enter the User schema. For more details, we can see the code below:
let schema = buildSchema(`
    type Forum {
        id : ID,
        title : String,
        desc : String,
        user:User
    }

    type User {
        id : ID,
        name : String
    }

    type Query {
        forum(id : ID!) : Forum,
        forums : [Forum],
        user(id :ID!) : User,
        users: [User]
    }
`)

In the Forum schema here we will add a user key with data Schema User user: User. So later the Forum schema will relate to Schema User. Now here we will use the id that is in the user data and userId in the data forum. Well in the next tutorial we will see and display the results of the relations system that we have built. so many tutorials this time, hope this tutorial can help you thank you.
Thank you for your contribution @duski.harahap.
After reviewing your contribution, we suggest you following points:
In the next tutorial put more comments in the code sections. The comments help a lot to better understand the code.
Thanks for following some of our suggestions in your previous tutorials.
Thank you for your work in developing this tutorial.
Looking forward to your upcoming tutorials.
Your contribution has been evaluated according to Utopian policies and guidelines, as well as a predefined set of questions pertaining to the category.
To view those questions and the relevant answers related to your post, click here.
Need help? Chat with us on Discord.
[utopian-moderator]
Thank you for your review, @portugalcoin! Keep up the good work!
Congratulations @duski.harahap!
You raised your level and are now a Minnow!
Vote for @Steemitboard as a witness to get one more award and increased upvotes!
Hi @duski.harahap!
Your post was upvoted by @steem-ua, new Steem dApp, using UserAuthority for algorithmic post curation!
Your post is eligible for our upvote, thanks to our collaboration with @utopian-io!
Feel free to join our @steem-ua Discord server
Hey, @duski.harahap!
Thanks for contributing on Utopian.
We’re already looking forward to your next contribution!
Get higher incentives and support Utopian.io!
Simply set @utopian.pay as a 5% (or higher) payout beneficiary on your contribution post (via SteemPlus or Steeditor).
Want to chat? Join us on Discord https://discord.gg/h52nFrV.
Vote for Utopian Witness!