Firebase firestore in the forum application #14: Comment details and Ownership comment function
Repository
What Will I Learn?
- Comment details
- Ownership comment function
Requirements
- Basic Javascript
- Install Firebase
Resources
- Firebase-https://firebase.google.com/
Difficulty
Basic
Tutorial Content
Let's continue our previous tutorial about forum applications using firebase. Before we have made the comment feature on the application that we created, we have successfully displayed the comment on each forum. For those of you who just joined this tutorial, I suggest you follow the previous tutorial so you don't feel confused. Because this tutorial is a tutorial series. In this tutorial, I will make a new feature to edit comments that have been made by the owner.
Show comment details
In previous tutorials, we have made a comment system. We will add a new feature that is editing comments, but before editing comments, I will display details on the comments that we have loaded. For more details, we can see the sample code below:
index.js
// Load replies
        var replies=[]
        db.collection('forums').doc(forum.id).collection('replies').get()
            .then(snapshot => {
                snapshot.forEach(doc => {
                    replies.push(doc.data())
                })
                res.render('forum-detail', {forum:forum, replies:replies})
            }).catch(function(err) {
                console.log("There is something wrong")
            })
The code above is the backend function that we made in the tutorial. Here we can see that we have passed comment data on variable replies res.render('forum-detail', {forum:forum, replies:replies}). Before we have passed the data forums, as a detail of the forum forum: forum.
We have passed the comment data now we can render the details in the template we are going to, namely forum-detail.hbs. We can render it as in the example below:
forum-detail.hbs
<div class="row">
    <div class="container">
        <h4>List comments</h4>
        {{#each replies}}
            {{desc}} by <b><i>{{user.name}}</i></b>
        {{/each}}
    </div>
</div>
Well because the data that we operate on the backend is an array so to render it we have to do a for each like this {{#each replies}} replies are variables that we have passed from the backend.
We can render all the data in the replies subcollection, all you have to notice is that the key from the database to be rendered must be the same. we can see in the picture below to see what keys are in the forum subcollection
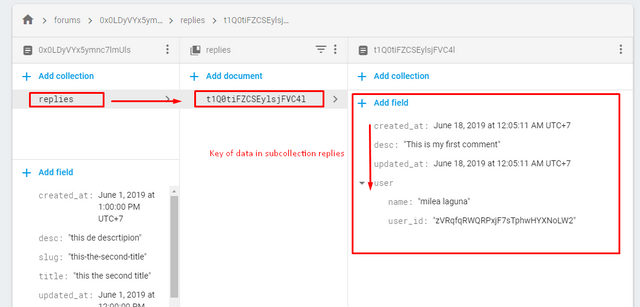
We can see in the picture above, the key above that we can render. well if we look at the image above the user key is an object. Well, the object has its own key. to access the key that is on the object user, we can use it like this {{user.name}}.
We can see the results in the demonstration below:
We have successfully rendered the data that is on the object user.
Edit comment
In this section, we will create a new feature, namely, edit comments. in editing this comment we have a rule. these rules are comments that can only be edited by the owner of the comment. But before making this feature we will do a number of things first so that this feature can run well.
- Change the data structure in the backend
The first part that we will change is to change the data structure that we shift in the backend. as you know, in the previous tutorial we have passed the data to the forum-detail.hbs the template as follows:
functions/index.js
var replies=[]
        db.collection('forums').doc(forum.id).collection('replies').get()
            .then(snapshot => {
                snapshot.forEach(doc => {
                    replies.push(doc.data())
                })
                res.render('forum-detail', {forum:forum, replies:replies})
            }).catch(function(err) {
                console.log("There is something wrong")
            })
To make an edit comment we need something unique, which is the document id of the replies sub-collection. well, here we can get it from doc.id.
In the code above we have pushed the doc.data() data but have not entered doc.id. We can include the data using the data array[] type. Like the following example:
                snapshot.forEach(doc => {
                    replies.push({
                        data: doc.data(),
                        id:doc.id
                    })
                })
We can see above now that the data to be rendered is an array of objects with data data: doc.data() and id id:doc.id.
- Changes to the template
We have changed the data in the backend. Now we also have to change how to render the data in the forum-detail.hbs template. Now to access data in the subcollection we need to access the data key first. For more details, we can see in the example below:
<div class="row">
    <div class="container">
        <h4>List comments</h4>
        {{#each replies}}
            {{data.desc}} by <b><i>{{data.user.name}}</i></b>
        {{/each}}
    </div>
</div>
We need to access the data key first to be able to access data from the replies subcollection. For more details, we can see the demonstration below:
.gif)
Can be seen from the picture above, if we do not access the data key then we cannot display data from the replies subcollection.
Well now we have changed the data structure that we have shifted to the forum-detail template and now we have the document id from that comment.
- Comment edit button in the template
Here we will start adding the edit button to each comment from the owner of the comment. Why do I say each comment?. Because we need to know a forum has many comments and comments that come from many users. So later on the interface, I will use the class to be able to access all the buttons that we make in each comment. For more details, we can see in the code below:
forum-detail.hbs
<div class="row">
    <div class="container">
        <h4>List comments</h4>
        {{#each replies}}
            {{data.desc}} by <b><i>{{data.user.name}}</i></b>
        {{/each}}
        <a href="#" class="btn btn-info is-hidden replies-btn" owner-id="{{data.user.user_id}}" onclick="editComment()">Edit</a>
    </div>
</div>
In the edit button we added. I add the class replies-btn so that later on the frontend we have access to each button in the comment. Because comments in each forum will be more than one.
And then after that I will add a new metadata that is owner-id = "{{data.user.user_id}}". We will use the owner-id as a marker that the button can only be accessed by the owner. Because we will not allow other users to edit comments that are not theirs.
I will add some new comments from other users so we can see the difference:
.gif)
Here I will add a new comment using another account that comes from a facebook account. Now we have two comments from different users, for more details we can look at the database.
- Ownership comment function
Well, now we have two comments that we can make as testing. In this function, I will specify the conditions that we will use. I will launch an element that has a class=replies-btn. well, when looping on that element we will match user.uid with the owner of the comment. for more details, we can see the code below:
var currentUser = null;
auth.onAuthStateChanged(function(user){
    if (user) {
        currentUser = user
        if(document.getElementById('owner_id').value == user.uid)
            document.getElementById('btn-edit').classList.remove('is-hidden')

        var elements = document.getElementsByClassName('replies-btn');
        for (var i = 0; i < elements.length; i++ ) {
        if(elements[i].getAttribute('owner-id') == user.uid)
            elements[i].classList.remove('is-hidden')
        }
    }
});
We will do for () on all class elements that we get from the variablevar elements = document.getElementsByClassName('replies-btn');.
Then we will match the element with which index has the same owner-id as user.uid elements[i].getAttribute('owner-id') == user.uid. Previously we have passed the user id to the** owner-id** meta attribute. For more details we can inspect the element like the image below:
well when the owner-id and user.uid match elements[i].classList.remove('is-hidden'), we can delete class = 'is-hidden' so that we can see the edit button and the user can edit comments because he owns the comment.
For more details, we can see the demonstration in the picture below:
.gif)
I will log in with the Gmail account Millea laguna and as you can see above we can only edit comments that the Millea lagoon account creates, we cannot edit comments from other users. This means that we have succeeded in creating a commenting system for the application that we are making, hopefully, this tutorial will be useful for you, thank you.
Curriculum
- Forum app
Firebase app#1, Firebase app#2, Firebase app#3, Firebase app#4, Firebase app#5, Firebase app#6, Firebase app#7, Firebase app#8, Firebase app#9, Firebase app#10,
Thank you for your contribution @duski.harahap.
After reviewing your contribution, we suggest you following points:
Excellent tutorial again. Good work in developing this contribution!
At the end of your tutorial you used the first person and you should have always kept the third person to have a coherent text.
Nice work on the explanations of your code, although adding a bit more comments to the code can be helpful as well.
Using GIFs to show results is definitely better than standard still images.
Thank you for your work in developing this tutorial.
Looking forward to your upcoming tutorials.
Your contribution has been evaluated according to Utopian policies and guidelines, as well as a predefined set of questions pertaining to the category.
To view those questions and the relevant answers related to your post, click here.
Need help? Chat with us on Discord.
[utopian-moderator]
Thank you for your review, @portugalcoin! Keep up the good work!
Hi @duski.harahap!
Your post was upvoted by @steem-ua, new Steem dApp, using UserAuthority for algorithmic post curation!
Your post is eligible for our upvote, thanks to our collaboration with @utopian-io!
Feel free to join our @steem-ua Discord server
Hey, @duski.harahap!
Thanks for contributing on Utopian.
We’re already looking forward to your next contribution!
Get higher incentives and support Utopian.io!
Simply set @utopian.pay as a 5% (or higher) payout beneficiary on your contribution post (via SteemPlus or Steeditor).
Want to chat? Join us on Discord https://discord.gg/h52nFrV.
Vote for Utopian Witness!