How to create a Sound Recording Application using ObjectBox as DB in android studio (PART 3)
![]()
Repository
https://github.com/objectbox/objectbox-java
What Will I Learn?
- How to create a Sound Recording application using ObjectBox DB.
- How to use Query Builders
- How to modify ObjectBox objects.
- How to access an ObjectBox in an Adapter.
- How to use the
.contains()Query to filter ObjectBox Objects.
Resources
- ObjectBox Website https://objectbox.io/
- ObjectBox Github - https://github.com/objectbox/objectbox-java
Difficulty
- Intermediate
Tutorial Duration - 30 - 35Mins
Tutorial Content
This happens to be the part three of this tutorial series and the part one can be found here and the part two here.
In today's tutorial, we are going to be adding more functionality to our Application which can currently record, and then users can play their recordings.
Today, we are going to be adding a search functionality to the tutorial which will enable users to be able to search recordings by their name and then we would also add the functionality of renaming recordings both in the application and in the saved directory on the user's phone.
Outline
- Modify our
fragment_saved_recordings.xmlto include search widgets. - Implement Search Logic in the
SavedRecordingsFragment - Implement the RENAME functionality in our custom Adapter.
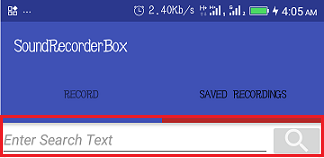
Adding Search widget in our == fragment_saved_recordings.xml ==
For the user to be able to search existing recordings, we have to provide the user with an EditText and a Button that the user can input his search string and then click the button to begin a search.
So, in our fragment_saved_recordings.xml file, we add the following code just above the RecyclerView widget.
NB: To reduce the length of this tutorial, only the newly included code will be shown here others will be indicated in comments ((html comment removed: )).
(html comment removed:  Root RelativeLayout)
<LinearLayout
    android:id="@+id/search_layout"
    android:layout_width="match_parent"
    android:layout_height="wrap_content"
    android:orientation="horizontal">

    <EditText
        android:id="@+id/search_string"
        android:layout_width="0dp"
        android:layout_height="40dp"
        android:layout_weight="1"
        android:hint="Enter Search Text"
        android:textStyle="italic" />

    <ImageButton
        android:id="@+id/btn_search"
        android:layout_width="0dp"
        android:layout_height="40dp"
        android:layout_weight="0.2"
        android:src="@drawable/ic_search" />
</LinearLayout>
(html comment removed:  RecyclerView)
Code Explanation
The above code only creates a LinearLayout with two children views that are horizontally displayed - android:orientation="horizontal", the EditText to accept search string and the Button to intialize a search in the database.
Implement Search Logic in the SavedRecordingsFragment
Next, we have to head to our SavedRecordingsFragment.java class file to implement our search logic.
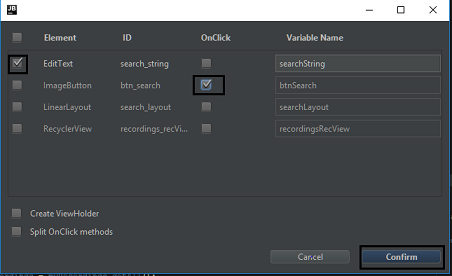
First, we have to inject our views using Butterknife, so as explained in previous tutorials, you need to place your cursor on the layouts name which in this case would be fragment_saved_recordings and then hit the alt + ins keys on a Windows PC and then select the views as indicated in the image below.
Next, in the onClick() method generated for us by butterknife, we have to add the following codes -
@OnClick(R.id.btn_search)
public void onViewClicked() {
    //get search string from the EditText
    String mSearchString = searchString.getText().toString();

    //Display a Toast if the user didn't enter any search string
    if (mSearchString.isEmpty())
        Toast.makeText(getActivity(), "You cant search for a recording without a name!", Toast.LENGTH_SHORT).show();
    else {
        //Get the recordings that match the users search and set it to our adapters list
        recordings = myRecordings.query().contains(Recordings_.recording_name,mSearchString).build().find();

        //If there exist no recordings with such names, let the user know
        //else set the recording list to the gotten recordings
        if (recordings.size() > 0 ){
            savedRecordingsAdapter.setRecordings(recordings);
        }
        else
            Toast.makeText(getActivity(), String.format(getActivity().getString(R.string.toast_recording_not_exists), mSearchString),Toast.LENGTH_SHORT).show();
    }
}
Code Explanation
- First, we get the search string that the user entered and stored it in a String variable -
mSeachString. - We then check if the
mSearchStringvariable is empty using the .isEmpty() method and if it's found empty, we show a Toast to the user indicating that you can't search for a recording without specyfing a name. - If the search string is not empty, we initialize our
recordingsobject which is a List of Recordings -List<Recordings> recordingsto the recordings that their recording_name field contains the search String.- Further Explanation - We use the
Recordingsclass Box currently stored in themyRecordings(private Box<Recordings> myRecordings)object and then we initialize a query on that Box and then we use the query method.contains()specifying the field we want to search in -Recordings_.recording_name. **NB: One must pay attention to the underscore () after the class name (Recordings) ** and next, we specify themSearchStringas the value of what we are searching for in the field specified. - Next, we build the query -
build()and lastly we call thefind()method to execute the query.
- Further Explanation - We use the
- Next, we use an if/else to check if the recordings returned size is more than 0, if it is more than zero we set the new recordings list of our adapter to the returned recordings by calling the adapter method -
setRecordings-savedRecordingsAdapter.setRecordings(recordings), else we send a Toast out to the user saying no recordings with such names found.
Implement the RENAME functionality in our Adapter.
Furthermore, we need to implement the RENAME functionality in our adapter class. We would implement this by setting a setOnLongClickListener() listener on our cardview and then initialize a Dialog to display the rename function for the user and when the user clicks on the rename function we present the user with a dialog where he can input the new name of the recording and then click OK to save.
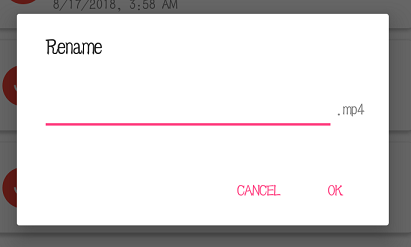
Meaning we have to create a new layout file for our rename functionality, right click on the layout folder under the res folder => New => Layout resource file and name the layout - dialog_rename_recording and then input the following code.
<?xml version="1.0" encoding="utf-8"?>
<LinearLayout xmlns:android="http://schemas.android.com/apk/res/android"
    android:orientation="horizontal" android:layout_width="match_parent"
    android:layout_height="wrap_content"
    android:layout_centerHorizontal="true"
    android:padding="20dp">

    <EditText
        android:id="@+id/new_name"
        android:layout_weight="1"
        android:layout_width="wrap_content"
        android:layout_height="wrap_content" />

    <TextView
        android:text=".mp4"
        android:id="@+id/textView"
        android:layout_width="wrap_content"
        android:layout_height="wrap_content" />

</LinearLayout>
Code Explanation
The above xml code creates a layout as the one below, no explanation will be done here as this is a simple to understand code.
Next, we need to head to our adapter class - SavedRecordingsAdapter and below the existing codes in the onBindViewHolder() method, we need to add the following codes -
NB: Only new codes will be shown as existing codes in the method will be omitted for brevity.
holder.cardView.setOnLongClickListener(new View.OnLongClickListener() {
    @Override
    public boolean onLongClick(View v) {

        ArrayList<String> option_entries = new ArrayList<>();
        option_entries.add(mContext.getString(R.string.dialog_file_rename));
        final CharSequence[] items = option_entries.toArray(new CharSequence[option_entries.size()]);

        // Rename dialog created
        AlertDialog.Builder builder = new AlertDialog.Builder(mContext);
        builder.setTitle(mContext.getString(R.string.dialog_title_options));
        builder.setItems(items, new DialogInterface.OnClickListener() {
            public void onClick(DialogInterface dialog, int item) {
                if (item == 0) {
                    renameFileDialog(holder.getAdapterPosition());
                }
            }
        });
        builder.setCancelable(true);
        builder.setNegativeButton(mContext.getString(R.string.dialog_action_cancel),
                new DialogInterface.OnClickListener() {
                    public void onClick(DialogInterface dialog, int id) {
                        dialog.cancel();
                    }
                });

        AlertDialog alert = builder.create();
        alert.show();

        return false;
    }
    });
Code Explanation
- In our
onLongClick()method, we create an ArrayList of type String called -option_entrieswhich we add a string resource to it with the id of R.string.dialog_file_rename which has the value of - Rename. From the option_entries ArrayList, we create a CharSequence array - items. - Next, we create an AlertDialog builder and then we set the Title of the builder to a string resource with the id -
R.string.dialog_title_optionswhich has the value of Options. - We then set the items of the builder to the
itemsobject and then we also register aDialogInterface.onClickListenerto this builder and then we use an if statement to check what item was clicked and for now the online time has the position of - 0. - If the rename option is clicked, we call a method -
renameFileDialog()and specify the position of the item that was clicked which can be gotten from the holder object by calling -holder.getAdapterPosition(); - Next, we set the text of the negative button of the dialog to a string resource of id -
R.string.dialog_action_canceland from the name it has the value of - Cancel and when the user clicks this button, we just call thecancel()method to remove the dialog. We then build the dialog and then call the.show()method.
renameFileDialog()
public void renameFileDialog (final int position) {
    // File rename dialog
    AlertDialog.Builder renameFileBuilder = new AlertDialog.Builder(mContext);

    LayoutInflater inflater = LayoutInflater.from(mContext);
    View view = inflater.inflate(R.layout.dialog_rename_recording, null);

    final EditText input = view.findViewById(R.id.new_name);

    renameFileBuilder.setTitle(mContext.getString(R.string.dialog_title_rename));
    renameFileBuilder.setCancelable(true);
    renameFileBuilder.setPositiveButton(mContext.getString(R.string.dialog_action_ok),
            new DialogInterface.OnClickListener() {
                public void onClick(DialogInterface dialog, int id) {
                    try {
                        String value = input.getText().toString().trim() + ".mp4";
                        rename(position, value);
                    } catch (Exception e) {
                        Log.e(LOG_TAG, "exception", e);
                    }

                    dialog.dismiss();
                }
            });
    renameFileBuilder.setNegativeButton(mContext.getString(R.string.dialog_action_cancel),
            new DialogInterface.OnClickListener() {
                public void onClick(DialogInterface dialog, int id) {
                    dialog.dismiss();
                }
            });

    renameFileBuilder.setView(view);
    AlertDialog alert = renameFileBuilder.create();
    alert.show();
}
Code Explanation
- Here we set the view of our dialog builder created to be the rename layout which we created earlier -
dialog_rename_recording.xml, we then get a reference to the EditText where the user will input the new name that he intends to save the recording as -final EditText input = view.findViewById(R.id.new_name);. - We set the title of the dialog and also sets the text of the positive button also which is a string with the value - OK.
- We then set a
DialogInterface.OnClickListener()on the positive button where we get the input entered by the user and store it in a String variable -valuewhich we then pass to a method -rename()and also the position of the renamed recording also and then after this we call thedismiss()method of the dialog.
NB: Therename()method is responsible for renaming the recording - We also call the
dismiss()method of the dialog if the negative button was clicked also. - We set the view of the builder to our view object and then we call the
show()method also to display the dialog.
rename()
public void rename(int position, String name) {
    //rename a file
    String mFilePath = Environment.getExternalStorageDirectory().getAbsolutePath();
    mFilePath += "/Soundbox/" + name;
    File f = new File(mFilePath);

    if (f.exists() && !f.isDirectory()) {
        //file name is not unique, cannot rename file.
        Toast.makeText(mContext,
                String.format(mContext.getString(R.string.toast_file_exists), name),
                Toast.LENGTH_SHORT).show();
    } else {
        //file name is unique, rename file
        File oldFilePath = new File(getItem(position).getRecording_path());
        oldFilePath.renameTo(f);

        //Get a Box for the Recordings.class
        Box<Recordings> RECORDINGS = ((MyApplicationClass)mContext.getApplicationContext()).getBoxStore().boxFor(Recordings.class);

        //Get the particular box item that we intend to rename
        Recordings mRecordingToChange = RECORDINGS.get(recording.getId());
        mRecordingToChange.setRecording_name(name);
        mRecordingToChange.setRecording_path(f.getAbsolutePath());

        //Put the modified object back into our database
        RECORDINGS.put(mRecordingToChange);
        notifyItemChanged(position);
    }
}
Code Explanation
- Firstly, we create a String variable -
mFilePathwhich stores the absolute path of the external storage appended with the string -"/Soundbox/"and also thenameargument passed into this method which happens to be the new name the user intends to rename the file to. We then create a new file with the created file path. - If the file already exists or is a directory name, we display a Toast informing the user that such a file already exist.
- If the file name is unique, we then get the path of the current recording using -
getItem(position).getRecording_path()and store it in a File object -oldFilePathwhich we then rename to the unique file name store in object f.
Now we have achieved the renaming of the recording in the user's phone storage, next we have to rename the recording in our database and also change the file path field also. - We get a Recordings Box from our application class -
MyApplicationClassby calling thegetBoxStore()method and indicating theRecordings.classas the Box we intend to retrieve and store them in -RECORDINGS. - Next, we query our Box object for the recording that has the id as the
recordingobject -recording.getId()and store this recording inmRecordingToChangeobject. - We set the new name of the recording -
mRecordingToChange.setRecording_name(name)and then we set the path of the recording -mRecordingToChange.setRecording_path(f.getAbsolutePath()). - Lastly, we put this modified object into our Box by calling the
put()method -RECORDINGS.put(mRecordingToChange)and then we notify the adapter that an item has been changed by calling -notifyItemChanged(position).
APPLICATION EXECUTION
I thank you for your contribution. Here are my thoughts;
Titles show what your post is about, so use them wisely. As you're teaching concepts with the examples, it is wise to write them on your titles, so keep doing that. But, positioning them is also essential. The main thing you're teaching in the tutorial is DB concept, not the example. Instead of writing the example to the head of the title, change the position of it. So that way, you can directly catch readers/viewers attention to what you teach instead of the example. I'll give an example of what I meant;
Your contribution has been evaluated according to Utopian policies and guidelines, as well as a predefined set of questions pertaining to the category.
To view those questions and the relevant answers related to your post, click here.
Need help? Write a ticket on https://support.utopian.io/.
Chat with us on Discord.
[utopian-moderator]
Thank you for your review, @yokunjon!
So far this week you've reviewed 2 contributions. Keep up the good work!
Firstly, let me appriate @yokunjon for taking the time to moderate my contribution.
But I have a few thoughts of my own.
When you say this I really don't see your point because one learns from watching another apply concepts in the teaching.
I really don't get your point with that thought..
Alot of contributions follow that pattern.(the pattern of learners watch the teacher apply the pattern)
You cant just introduce people to a concept and call it a tutorial, you have to show them how to use it (the concept).
The first comment about including it in the topic I agree with that but this doesn't resonate well with me..
I oblige to think otherwise thanks.
First of all, I'm sorry for the late reply. I was unable to reply yesterday.
If we were to count every application of a concept as a tutorial, that would mean I could just record my job and publish that as a tutorial. But this is invalid because that does not count as teaching. Yes, people can learn from watching while others do their jobs. But when that happens, the real work is only the learner's effort. A real tutorial is very different from that. It must have the techniques for teaching. There are lots of techniques for it. That's what I'm trying to tell.
But, still, even I would like to see that you're following, they are only my thoughts. You might not follow and still get higher scores. The feedback I gave is not connected to the questionnaire, they are just my own thoughts for you to increase the overall value of the post. The real scoring at the moment is the questionnaire. It is a little incomplete at the moment, but it will be improved.
Hey @edetebenezer
Thanks for contributing on Utopian.
We’re already looking forward to your next contribution!
Want to chat? Join us on Discord https://discord.gg/h52nFrV.
Vote for Utopian Witness!
@resteemator is a new bot casting votes for its followers. Follow @resteemator and vote this comment to increase your chance to be voted in the future!