Understanding Iterations and Snapshots in Realm Java using Android Studio

Repository
https://github.com/realm/realm-java
What Will I Learn?
- Iterations
- Snapshots
Requirements
- An Integrated Development Environment(IDE) for building Android Application(e.g Android Studio, IntelliJ)
- Android Device/Virtual Device.
- Little Experience in working with Realm Java.
- Java Programming Experience.
- Of course, willingness to learn
Resources
- Retrofit Website. https://realm.io/
- Retrofit Github. - https://github.com/realm
- Retrofit License - Apache License
- Lombok Website - https://projectlombok.org
Difficulty
- Intermediate
Tutorial Duration - 30 - 35Mins
Tutorial Content
In today's tutorial, we are going to be learning about iterations and snapshots in Realm.
Iterations and snapshots in Realm come to play when you are iterating a result set with the intentions of modifying its elements.
For instance, you have a RealmResult object - result which holds a group of objects having three fields - name (String), age (int), married (Boolean) the below code snippet would be expected to modify the elements but only half would be modified -
realm.beginTransaction();
for (int i = 0; result.size(); i++) {
    result.get(i).setMarried(true);
}
realm.commitTransaction();
Once an element is being modified, it is immediately removed from the collection which will in turn shift all element's positions and when i get incremented, an element is missed.
In order to avoid this, the concept of iterations and snapshots come into play.
Iterators that are created from RealmResult will automatically use a snapshot as compared to that created from RealmList which won't.
A snapshot guarantees that the order of elements remain the same and won't change even if an element is modified or deleted.
Outline
- Dependencies Used
- Add a TextView in activity_main.xml layout file.
- Create a model class - Person
- Realm Iteration and Snapshot Illustration
Depenedencies used
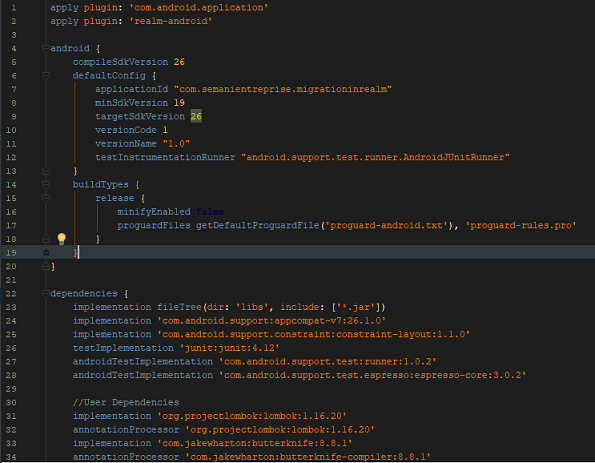
- implementation 'com.jakewharton:butterknife:8.8.1'
annotationProcessor 'com.jakewharton:butterknife-compiler:8.8.1'
The ButterKnife dependency should be placed in your application level gradle file - "build.gradle" which will make the injection of views (e.g ImageView, TextView) as easy as possible which we will be seeing in this tutorial.
- implementation 'org.projectlombok:lombok:1.16.20'
annotationProcessor 'org.projectlombok:lombok:1.16.20'
The lombok dependency also is placed in the application level gradle file which makes the generator of getter and setter methods for our model classes by just adding the annotations @Getter for getters and @Setter for the setter methods.
Realm dependency
Steps
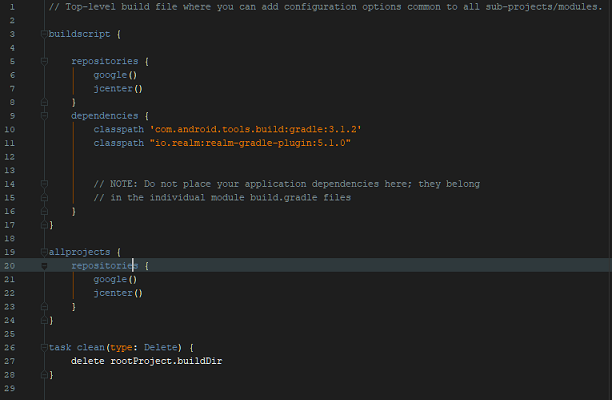
Head to your project level gradle file and add the classpath dependency:
classpath "io.realm:realm-gradle-plugin:5.1.0"Next, head to your application level Gradle file "build.gradle" and add the realm-android plugin to the top of the file.
apply plugin:'realm-android'
Finally, refresh your Gradle dependencies.
After you have added the necessary dependencies, your application level Gradle file should look like this :
And your project level Gradle file should look like this :
Add TextView in activity_main.xml
In order for us to show the result of our migrations in our tutorial, we are going to be adding one TextView in our activity_main.xml file :
<?xml version="1.0" encoding="utf-8"?>
//RootLayout - ConstraintLayout

<TextView
    android:id="@+id/result"
    android:layout_width="match_parent"
    android:textAlignment="center"
    android:layout_height="wrap_content"
    android:padding="10dp"
    android:textSize="17sp"
    android:textColor="#e42121"
    android:text="Result Text!" />
Code Explanation
The above code includes a TextView in our layout file with the id - result and has a padding of 10 on every side - android:padding="10dp" we then set the text to be aligned at the center - android:textAlignment="center".
Creating the Person model Class
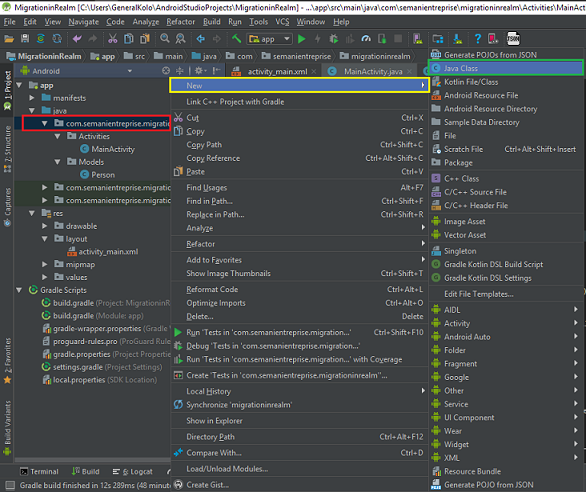
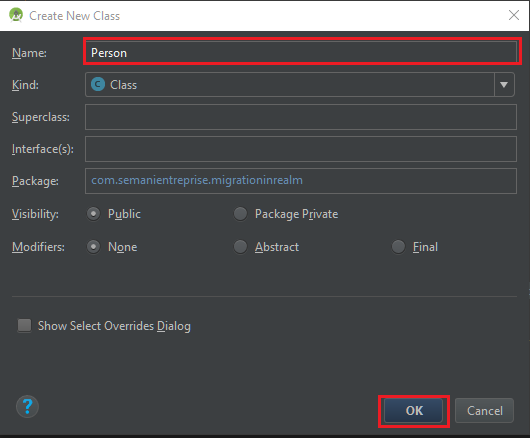
Next, we are going to create a new java class file which can be done by right-clicking on java folder => New => Java class and then input the name the class Person.
Step 1
Step 2
Next, let the Person class extend the RealmObject class and add the following fields - name (String) , age (int) , married (Boolean) and then we add the annotations @Getter and @Setter using lombok library in order to inject our getter and setter methods, this way boilerplate are removed.
@Getter
@Setter
public class Person extends RealmObject {
    private String name;
    private int age;
    private Boolean married;
}
Realm Iteration and Snapshot Illustration
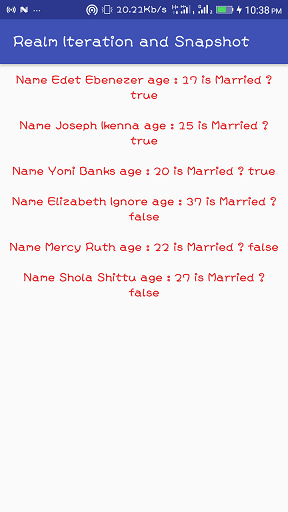
To illustrate Iteration and Snapshot in Realm, we are going to be creating six Realm objects of the Person class earlier created, we will be setting the married field of the first three to false and the last three to true. We will then use iteration to set the married field of the first three to true and use snapshots to set the last three to false.
MainActivity.java
Firstly, we have to create a Realm variable - private Realm realm; and then add the following codes in our onCreate() method
Realm.init(this);

realm = Realm.getDefaultInstance();

createRealmObjects();

iterationAndSnapshot();
Code Explanation
- We initialize Realm in our Acitivy class file -
Realm.init(this); - Next, we make our realm object use the default realm instance -
realm = Realm.getDefaultInstance();which means that it has access to all the model classes in our application if we had more than one. - Next, we make a call to the
createRealmObjects()method which creates as stated earlier 6Personrealm objects - Finally, we call the
iterationAndSnapshot()method where we will be seeing how to use iteration and snapshot to modify the elements in aRealmResultobject.
createRealmObjects()
private void createRealmObjects() {
realm.executeTransaction(new Realm.Transaction() {
        @Override
        public void execute(Realm realm) {
            Person Eben = realm.createObject(Person.class);
            Eben.setName("Edet Ebenezer");
            Eben.setAge(17);
            Eben.setMarried(false);

            Person Joe = realm.createObject(Person.class);
            Joe.setName("Joseph Ikenna");
            Joe.setAge(15);
            Joe.setMarried(false);

            Person Yomi = realm.createObject(Person.class);
            Yomi.setName("Yomi Banks");
            Yomi.setAge(20);
            Yomi.setMarried(false);

            Person Lizzy = realm.createObject(Person.class);
            Lizzy.setName("Elizabeth Ignore");
            Lizzy.setAge(37);
            Lizzy.setMarried(true);

            Person Mercy = realm.createObject(Person.class);
            Mercy.setName("Mercy Ruth");
            Mercy.setAge(22);
            Mercy.setMarried(true);

            Person Shola = realm.createObject(Person.class);
            Shola.setName("Shola Shittu");
            Shola.setAge(27);
            Shola.setMarried(true);
        }
    });
}
Code Explanation
- We start an
executeTransaction()on our realm variable and then we override theexecute()method where we create six newPersonobjects with the details- Object 1 (Eben) => name = Edet Ebenezer , age = 17 , married = false
- Object 2 (Joe) => name = Joseph Ikenna , age = 15 , married = false
- Object 3 (Yomi) => name = Yomi Banks , age = 20 , married = false
- Object 4 (Lizzy) => name = Elizabeth Ignore , age = 37 , married = true
- Object 5 (Mercy) => name = Mercy Ruth , age = 22 , married = true
- Object 6 (Shola) => name = Sholla Shittu , age = 27 , married = true
iterationAndSnapshot()
private void iterationAndSnapshot() {
    RealmResults<Person> singles = realm.where(Person.class).lessThanOrEqualTo("age", 20).findAll();

    // Use an iterator to get singles to married based on age
    realm.beginTransaction();
    for (Person single : singles) {
        single.setMarried(true);
    }
    realm.commitTransaction();

    RealmResults<Person> married = realm.where(Person.class).greaterThan("age", 20).findAll();

    // Use a snapshot to set Married to single based on age
    realm.beginTransaction();
    OrderedRealmCollectionSnapshot<Person> marriedSnapShot = married.createSnapshot();
    for (int j = 0; j < marriedSnapShot.size(); j++) {
        marriedSnapShot.get(j).setMarried(false);
    }
    realm.commitTransaction();


    RealmResults<Person> everyBody = realm.where(Person.class).findAll();

    StringBuilder persons = new StringBuilder();
    for(Person person : everyBody){
        persons.append("Name "+person.getName()+" age : "+person.getAge()+" is Married ? "+person.getMarried()+"\n\n");
    }
    result.setText(persons.toString());
}
Code Explanation
- First, we get a
RealmResultobject that contains a set ofPersons that are less than the age of 20 using a combination of thewhere()and thelessThanOrEqualTo()methods with thefindAll()method. - Next, we begin a realm transaction -
realm.beginTransaction()and then we use an iterator which automatically uses a snapshot once it's being used on aRealmResultobject (i.e singles). We then we set the married field of each element in thesinglesobject in a for loop to true and then we commit the transaction -realm.commitTransaction(). - Next, we get a
RealmResultset of objects that are greater than the age of 20 using thewhere()andgreaterThan()predicates together with thefindAll()method.
We then created a snapshot from the married RealmResult object -OrderedRealmCollectionSnapshot<Person> marriedSnapShot = married.createSnapshot();.
Next, we begin a realm transaction -realm.beginTransaction()and then use a for loop to set the married field of all matching objects to false and then commit the transaction -realm.commitTransaction(). - We then get all the objects of
Personclass and store a reference in the everybody object and then append all their details into a StringBuilder object - persons inside of a for each loop.
Each details are gotten as follows :- name : person.getName()
- age : person.getAge()
- married : person.getMarried()
- Lastly, we set the toDisplay StringBuilder object as the text of our TextView injected with ButterKnife -
result.setText(persons.toString());
Application Execution Image
Curriculum
- Understanding Queries in Realm Java using Android Studio (PART 1)
- Understanding Queries in Realm Java using Android Studio (PART 2)
- Understanding Queries in Realm Java using Android Studio (PART 3)
- Understanding Queries in Realm Java using Android Studio (PART 4)
- Understanding Queries in Realm Java using Android Studio (PART 5)
- Understanding Queries in Realm Java using Android Studio (PART 6)
- Understanding Migrations in Realm Java using Android Studio
- Understanding Aggregation in Realm Java using Android Studio
Proof of Work
https://github.com/generalkolo/Realm-Examples/tree/master/Realm%20Iterations%20and%20Snapshots
Hey @edetebenezer
Thanks for contributing on Utopian.
We’re already looking forward to your next contribution!
Contributing on Utopian
Learn how to contribute on our website or by watching this tutorial on Youtube.
Want to chat? Join us on Discord https://discord.gg/h52nFrV.
Vote for Utopian Witness!
Thank you for your contribution.
Please keep the following in mind for your upcoming tutorials:
I certainly hope to see more effort and better results on your upcoming work.
Your contribution has been evaluated according to Utopian policies and guidelines, as well as a predefined set of questions pertaining to the category.
To view those questions and the relevant answers related to your post, click here.
Need help? Write a ticket on https://support.utopian.io/.
Chat with us on Discord.
[utopian-moderator]
Thanks @mcfarhat.
New tutorial concepts will be implemented in my up coming tutorials.
Go here https://steemit.com/@a-a-a to get your post resteemed to over 72,000 followers.