Xamarin Learning Serie 1 MASTERDETAIL PAGE STRUCTURE

github project download link : https://github.com/elsedongusu/xamarin-app1
my github profile : https://github.com/elsedongusu
github link : https://github.com/xamarin/Xamarin.Forms
What we will learn:
- What is “MasterDetail Page” ?
- Why we should use?
- Basic features and usage.
Requirements:
- Visual Studio (I suggest Visiual Studio Mac) If you does not have you can download at there [https://www.visualstudio.com/tr/downloads/?rr=https%3A%2F%2Fwww.google.com.tr%2F]
What is “MasterDetail Page” ?
Whether you are working on the web, desktop or working on mobile technology has become a necessity to develop user-focused applications. This becomes even more important in mobile environments. Such as windows, shortlists, fewer entrances, are a must for the mobile interface design. Guiding the user is one of those delicacies. Because of we can not display all the information on one screen, we group that information and direct the user to other screens. Here; them master detail page is a structure for directing users on the mobile application. We can easily say that in mobile applications the menu structure is masterdetail page structure. When you think about a menu structure, first you have a structure that contains menu elements, and when you click on these elements, another structure leads the user to an another page. In the MasterDetailPage structure, the menu structure (the container where our links are located) is called MasterPage, and the screen that we will link to when we click on the links is called DetailPage. In this case we can say that in a MasterDetailPage there are two screens, MasterPage and DetailPage.
Why we should use?
We nearly always need menu structures in mobile applications. In such cases we need to use the MasterDetail Page.
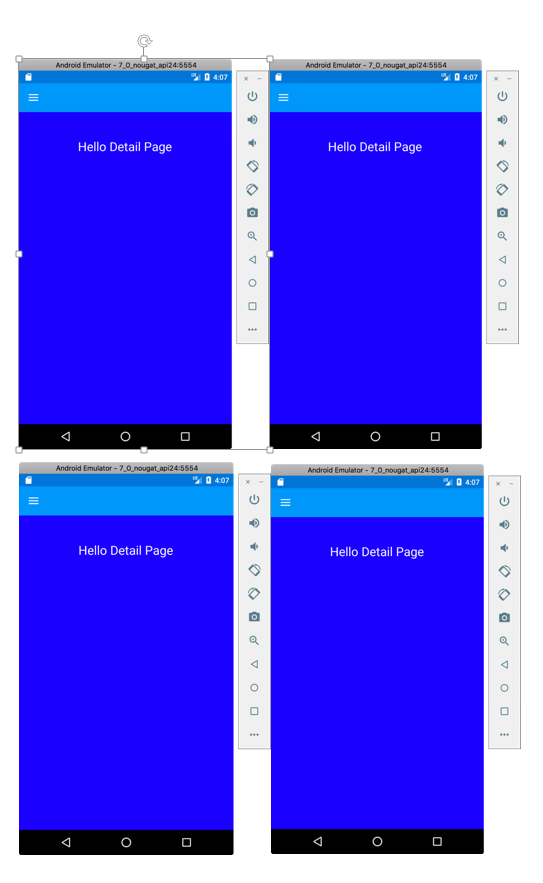
You can see ‘what’s look like’ at the below.

You can see the closed version of the menu in the first two pictures and in the last two pictures are the open version of the menu.
Let's look at how MasterDetailPage is now done.
First of all, we talked about 2 structure of pages. MasterPage and Detail Page. Firstly, add these pages to a folder. It's possible to use even a simple ContentPage because of it is derived from the Page class or we can use a CarouselPage or a TabPage.
I am using ContentPage at there:
<?xml version="1.0" encoding="UTF-8"?>
<ContentPage xmlns="http://xamarin.com/schemas/2014/forms" xmlns:x="http://schemas.microsoft.com/winfx/2009/xaml"
             x:Class="Tutorial1.Views.MyMasterPage" Title="My Master Page">
    <ContentPage.Content >
        <StackLayout BackgroundColor="Teal" >
             <StackLayout HorizontalOptions="Center" Margin="0,50" >
            <Label FontSize="24" Text="Hello Master Page"></Label>
        </StackLayout>
        </StackLayout>

    </ContentPage.Content>
</ContentPage>
The structure of my MasterPage consists of a ContentPage. I colored the backgrounds here especially to understand the work logic. This will be our Menu.
<?xml version="1.0" encoding="UTF-8"?>
<ContentPage xmlns="http://xamarin.com/schemas/2014/forms" xmlns:x="http://schemas.microsoft.com/winfx/2009/xaml" x:Class="Tutorial1.Views.MyDetailPage">
    <ContentPage.Content >
        <StackLayout VerticalOptions="FillAndExpand" BackgroundColor="Blue">
        <StackLayout HorizontalOptions="Center" Margin="1,50" >
            <Label TextColor="White" FontSize="24" Text="Hello Detail Page"></Label>
        </StackLayout>
            </StackLayout>
    </ContentPage.Content>
</ContentPage>
These are our DetailPage. DetailPage is the page you get when you interact with the menü. Let us come to masterdetailpage. I mostly prefer to build it myself. So it's getting simpler codes. We create a class for this and we will derive this class from the MasterDetailPage class.
using System;
using Tutorial1.Views;
using Xamarin.Forms;

namespace Tutorial1
{
    public class MasterDetailPage1 : MasterDetailPage
    {
        public MasterDetailPage1()
        {
            Master = new MyMasterPage();
            Detail = new NavigationPage(new MyDetailPage());
        }
    }
}
It's so easy to create a MasterDetailPage, as you can see. What you need to be aware of here is that the Title property of the MasterPage is the require (you will get errors at runtime if you did not give an title to masterPage). Actually we see this title clearly on iOS screens. IOS uses it like a button. But on Android, it is a hamburger icon. If you want to see the hamburger icon on iOS, it will be enough to put the hamburger image on the MasterPage's Icon feature. You need to be aware that the relevant icon is located in the Resources folder. It is also included in the source code.
1- MASTERDETAIL PAGE’S BASIC FEATURES AND USEAGES
We created a MasterDetailPage above. Now we will look at how to use this. As you can imagine, we will change the DetailPage of the MasterDetailPage with any item selected from the menu. To do this, I will add a few elements to the MasterPage that makes up our Menu, and change the DetailPage of our MasterDetailPage in their click event. First, we create a ContentPage named NewDetailPage to separate the old DetailPage and the new DetailPage. Then we access the existing MasterDetailPage in the click of the items that we put in the Menu as follows.
var masterdetailPage = (MasterDetailPage)App.Current.MainPage;
Then we make an assignation to Master and Detail properties of this MasterDetailPage as we would like. I do not want to change the Master page here. I am just changing the Detail page.
masterdetailPage.Detail = new NavigationPage(new NewDetailPage());
You will see here that we have a new problem now. The DetailPage has changed but the Menu is still in the open position. For close the menü we have an property; IsPresented. This property takes boolean values and allows the menu to be open when it is true and close when it is false.
masterdetailPage.IsPresented = false;
Of course, it's totally in your hands to want to close the or open Menu here. In this way, we can open the DetailPage with a simple click, and it is also possible to pass information to the DetailPage. For this we need to make a small edit in the DetailPage. Now, when we click on a button from the menu we want to do, we will move the text of this button to the new Detail page
public partial class NewDetailPage : ContentPage
    {
        public NewDetailPage(string Content)
        {
            InitializeComponent();
        }
    }
We changed the constructor of our NewDetailPage as above. Now let's edit the clicked event of the button in MasterPage
public void btnClicked(object sender, EventArgs eventArgs)
        {
            var masterdetailPage = (MasterDetailPage)App.Current.MainPage;
            var content = (Button)sender;
            masterdetailPage.Detail = new NavigationPage(new NewDetailPage(content.Text));
            masterdetailPage.IsPresented = false;

        }
Because of we call the parameterized constructor of NewDetailPage, we need to make the following change in our page.
public partial class NewDetailPage : ContentPage
    {
        public NewDetailPage(string Content)
        {
            InitializeComponent();
            lblContent.Text = "Clicked Item Name:" + Content;
        }
    }

On the XAML side;
<ContentPage.Content>
        <StackLayout HorizontalOptions="Center" VerticalOptions="Center">
            <Label Text="Hello NEW DETAIL PAGE"></Label>
            <Label x:Name="lblContent"></Label>
        </StackLayout>
    </ContentPage.Content>
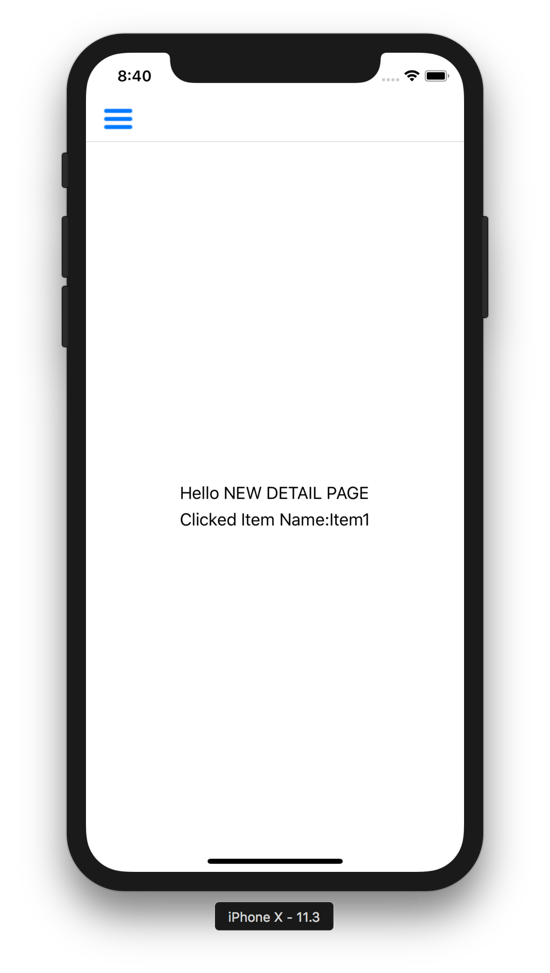
iOS looks like this;

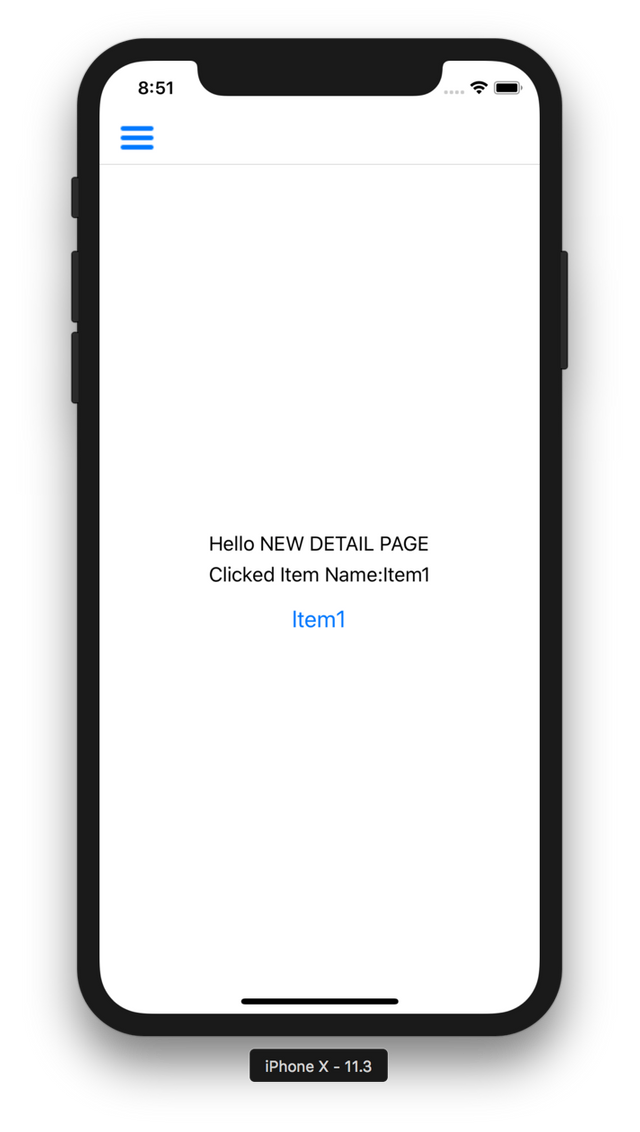
As you can imagine, we can transfer a simple string of data here, as well as an object. For example, we will push the button we clicked on the DetailPage page. For this we modify the NewDetailPage constructor as follows;
        {
            InitializeComponent();
            lblContent.Text = "Clicked Item Name:" + Content;
            stkContainer.Children.Add(button);
        }
In the clicked event of our MasterPage, we make the following change;
public void btnClicked(object sender, EventArgs eventArgs)
        {
            var masterdetailPage = (MasterDetailPage)App.Current.MainPage;
var content = (Button)sender;
            masterdetailPage.Detail = new NavigationPage(new NewDetailPage(content.Text, content));
            masterdetailPage.IsPresented = false;
        }

It's just one of the many ways to transfer data, and perhaps the easiest one you see. Now let's put a different structure to our DetailPage than the ContentPage and see how we can group more data. I add a TabbedPage there. I will click on the second button in the menu to convert the DetailPage to a TabbedPage and start navigating through the tabs. First, create our TabbedPage
<?xml version="1.0" encoding="UTF-8"?>
<ContentPage xmlns="http://xamarin.com/schemas/2014/forms"
             xmlns:x="http://schemas.microsoft.com/winfx/2009/xaml"
             x:Class="Tutorial1.Views.TabPage1" Title="Tab1">
    <ContentPage.Content>
        <StackLayout HorizontalOptions="Center" VerticalOptions="Center">
            <Label Text="Tab Page 1"></Label>
        </StackLayout>
    </ContentPage.Content>
</ContentPage>

<?xml version="1.0" encoding="UTF-8"?>
<ContentPage xmlns="http://xamarin.com/schemas/2014/forms"
             xmlns:x="http://schemas.microsoft.com/winfx/2009/xaml"
             x:Class="Tutorial1.Views.TabPage2" Title="Tab2">
    <ContentPage.Content>
        <StackLayout HorizontalOptions="Center" VerticalOptions="Center">
            <Label Text="Tab Page 2"></Label>
        </StackLayout>
    </ContentPage.Content>
</ContentPage>
Now, let's create a Page that we wrap our Tab Pages like a container. I prefer to do this with a class, but you can also create it yourself quickly from the Visual Studio theme gallery
using System;
using Tutorial1.Views;
using Xamarin.Forms;
namespace Tutorial1
{
    public class MyTabbedPage : TabbedPage
    {
        public MyTabbedPage()
        {
Children.Add(new TabPage1());
            Children.Add(new TabPage2());
        }
    }
}

On the second button in the MasterPage is in the clicked event;

public void btnTabbedClicked(object sender, EventArgs eventArgs)
        {
            var masterdetailPage = (MasterDetailPage)App.Current.MainPage;
            masterdetailPage.Detail = new NavigationPage(new MyTabbedPage());
            masterdetailPage.IsPresented = false;
        }
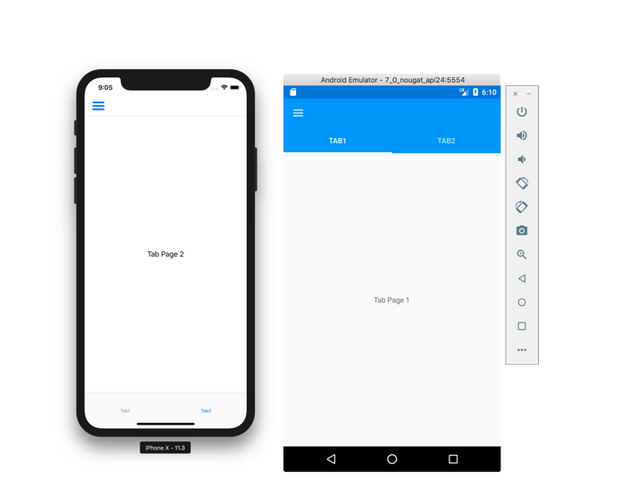
It will look like these pictures on Android and IOS.

WHAT WE LEARNED
1- What is MasterDetailPage? It is used for what purpose. What are the usage areas?
2- The elements that make up the MasterDetailPage structure and their use.
Author: @elsedongusu
Thank you for your contribution.
Your contribution has been evaluated according to Utopian policies and guidelines, as well as a predefined set of questions pertaining to the category.
To view those questions and the relevant answers related to your post, click here.
Need help? Write a ticket on https://support.utopian.io/.
Chat with us on Discord.
[utopian-moderator]
Congratulations @elsedongusu! You have completed some achievement on Steemit and have been rewarded with new badge(s) :
Click on any badge to view your Board of Honor.
For more information about SteemitBoard, click here
If you no longer want to receive notifications, reply to this comment with the word
STOPDo not miss the last announcement from @steemitboard!
Congratulations @elsedongusu! You received a personal award!
Click here to view your Board
Congratulations @elsedongusu! You received a personal award!
You can view your badges on your Steem Board and compare to others on the Steem Ranking
Vote for @Steemitboard as a witness to get one more award and increased upvotes!