Flutter: Building a WhatsApp Clone from scratch
Github Repository:
What Will I Learn?
- You learn flutter
- You learn how to build a clone app using flutter
Requirements
System Requirements:
- IDEA intellij, Visual Studio Code with the Dart/Flutter Plugins, Android Studio or Xcode
- The Flutter SDK on the latest Master Build
- An Android or iOS Emulator or device for testing
OS Support for Flutter:
- Windows 7 SP1 or later (64-bit)
- mac OS (64-bit)
- Linux (64-bit)
Required Knowledge
- A little understanding of key/value stores
- A fair understanding of Mobile development and Imperative or Object Oriented Programming
- Some understanding of real time databases
Resources for Flutter and this Project:
- Flutter Website: https://flutter.io/
- Flutter Official Documentation: https://flutter.io/docs/
- Flutter Installation Information: https://flutter.io/get-started/install/
- Flutter GitHub repository: https://github.com/flutter/flutter
- Flutter Dart 2 Preview Information: https://github.com/flutter/flutter/wiki/Trying-the-preview-of-Dart-2-in-Flutter
- Flutter Technical Overview: https://flutter.io/technical-overview/
- Dart Website: https://www.dartlang.org/
Difficulty
- Basic
What is Flutter?
Flutter is a brand new mobile app SDK made by Google. It is meant to help developers and designers build modern apps for Android and IOS.
Flutter has one of the simplest and effortless establishment forms. You basically clone the GitHub repo and keep running there Flutter Doctor apparatus, it is a breeze. For more data on the most proficient method to introduce Flutter for your framework see: https://flutter.io/setup/
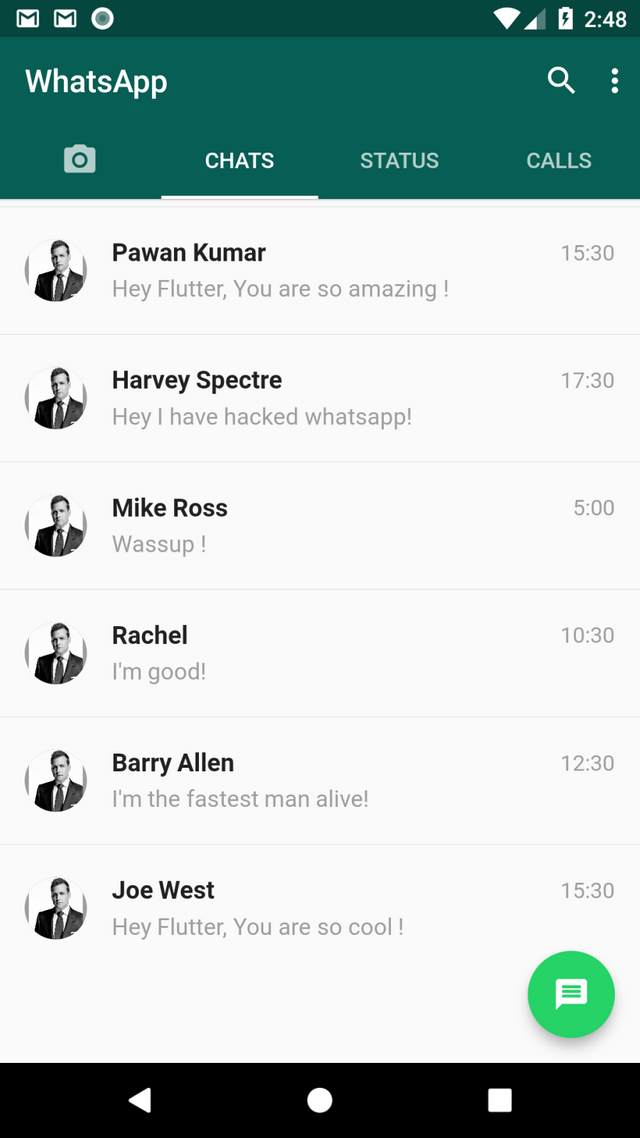
In this arrangement, we will assemble a UI clone of the mainstream informing application WhatsApp. WhatsApp is an astonishing application which enables clients to rapidly message and call friends and family for nothing.
Utilizing Flutter, we're ready to rapidly manufacture the format of WhatsApp without hardly lifting a finger.
All Code for this Tutorial:
https://github.com/iampawan/FlutterWhatsAppClone?files=1
Getting Started
Right off the bat, we make another Flutter venture utilizing there convenient CLI.
1 $ flutter create whatsapp_ui_clone
This will produce the venture documents for both Android and IOS
Since the task has been created, cd into the venture organizer and run Flutter run
1 $ cd whatsapp_ui_clone && Flutter run
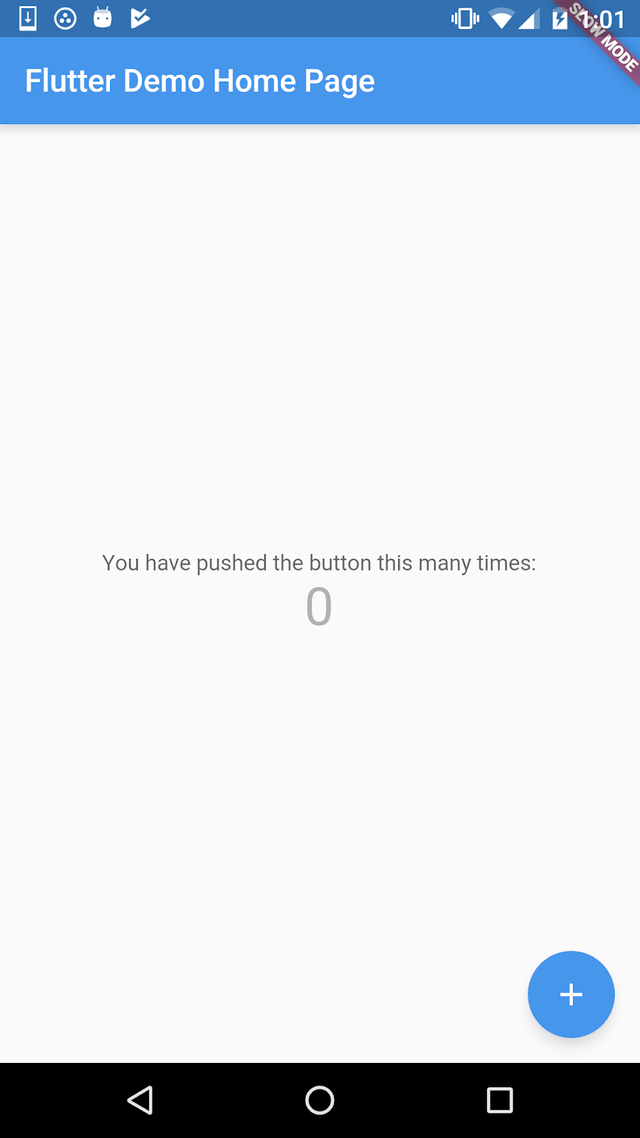
By default, Flutter produces a Counter application so if everything went well, you should see this on your device.
Since the application is running, how about we explore to the lib organizer and open main.dart. Here you can see the code for the default application. We will evacuate everything so we are left with a blank file.
We should begin by bringing in vacillate material bundle. This bundle contains an arrangement of pre-made gadgets which are planned after Google's material outline rules.
1 import 'package:flutter/material.dart';
Extraordinary! with the bundle imported, we currently proceed onward to the main work. This is the primary thing that runs when the application is propelled.
In main.dart, we include the lines
void main(){
}
Next, we indicate the runApp strategy within main
void main(){
runApp(
);
}
In runApp, we make another occurrence of MaterialApp. This will be the parent widget of our application.
void main() {
runApp(
new MaterialApp(
));
}
The widget MaterialApp can be relegated a couple of properties. For our motivations, we are just going to utilize the home, topic and title. Alter the current code with the goal that it would seem that this.
void main() {
runApp(
new MaterialApp(
home: new WhatsAppUiClone(), //new
title: 'WhatsApp', // new
theme: new ThemeData( //new
primaryColor: new Color(0xff075E54), //new
accentColor: new Color(0xff25D366), //new
),
));
}
The above code sets a couple of properties for our application. Title gives the application its title, home appoints it a landing page and subject sets some worldwide style rules.
Time to make the WhatsAppUiClone class. Under the main strategy, we make another class called WhatsAppUiClone and have it broaden the StatefulWidget.
class WhatsAppUiClone extends StatefulWidget {
_WhatsAppUiClone createState() => new _WhatsAppUiClone();
}
class _WhatsAppUiClone extends State {
@override
Widget build(BuildContext context) {
return new Scaffold(
);
}
}
view rawCreate the home
In Flutter, there are two sorts of widgets, Stateful and Stateless. The above code utilizes the Stateful variation. As should be obvious, it is made in three stages. To begin with, on line 1, the class name is characterized trailed by the watchwords Extends StatefulWidget. At that point on line two, the state is made. At long last, online five another class is made, this time utilizing the name used to make the state. This class expands the State.
With the majority of the standard off the beaten path, we would now be able to move onto making the appBar. In _WhatsAppUiClone, include the following lines
class _WhatsAppUiClone extends State with SingleTickerProviderStateMixin { //modified
TabController _tabcontroller; //new
@override
Widget build(BuildContext context) {
return new Scaffold(
appBar: new AppBar(
backgroundColor: Theme.of(context).primaryColor,
title: new Text('WhatsApp'),
elevation: 0.7,
bottom: new TabBar(
controller: _tabcontroller,
indicatorColor: Colors.white,
tabs: [
new Tab(icon: new Icon(Icons.camera_alt)),
new Tab(text: 'CHATS',),
new Tab(text: 'STATUS',),
new Tab(text: 'CALLS',)
],
),
),
);
}
 }
Fabulous! with only a couple of lines of code, and a little change, we have made a material application bar with a base route tabs. The class is altered to incorporate SingleTickerProviderStateMixin which is a liveliness property utilized by the TabBar. Next, we restored another Scaffold which is a gadget from the material bundle. A Scaffold gives us diverse API's to adding distinctive highlights to our application, for example, an AppBar, Tabs, Drawer, and so forth... To take in more, see
https://docs.flutter.io/vacillate/material/Scaffold-class.html.
Inside the Scaffold, we utilize the appBar property to make a material application bar. The foundation shading is then set to the essential shading characterized before in the topic property of our MaterialApp gadget. As a feature of the appBar, we utilize the base property to make a TabBar. The TabBar takes in a couple of properties, for example, the pointer shading, a controller with we additionally characterized and tabs. Tabs takes a cluster if gadgets of sort Tab. The four tabs are set here.
With that off the beaten path, it's the ideal opportunity for us to make our distinctive pages. For the present, we will simply make a gadget which shows some content. In our lib folder, make another envelope called pages. Within pages we make four called call_history.dart, camera_page.dart, chat_screen.dart and status_page.dart. These records will be the distinctive tab bodies.
For call_history, we include the following lines
import 'package:flutter/material.dart';
class CallHistory extends StatelessWidget {
@override
Widget build(BuildContext context){
return new Container(
child: new Center(
child: new Text('Time to make history...', style: new TextStyle(fontSize: 20.0),),
)
);
}
}
In camera_page we include
import 'package:flutter/material.dart';
class CameraPage extends StatelessWidget {
@override
Widget build(BuildContext context){
return new Container(
child: new Center(
child: new Text('Camera Here! ', style: new TextStyle(fontSize: 20.0),),
)
);
}
}
For chat_screen
import 'package:flutter/material.dart';
class ChatScreen extends StatelessWidget {
@override
Widget build(BuildContext context){
return new Container(
child: new Center(
child: new Text('Red Squadron report in... ', style: new TextStyle(fontSize: 20.0),),
)
);
}
}
At long last for status_page
import 'package:flutter/material.dart';
class StatusScreen extends StatelessWidget {
@override
Widget build(BuildContext context){
return new Container(
child: new Center(
child: new Text('Red Five reporting...', style: new TextStyle(fontSize: 20.0),),
)
);
}
}
With every one of the segments set up, it's an ideal opportunity to wire things up and take a gander at the outcomes. Back in main.dart, adjust the record with the goal that it would seem that this
import 'package:flutter/material.dart';
import './pages/camera_page.dart' ; //new
import './pages/chat_screen.dart' ; //new
import './pages/status_page.dart' ; //new
import './pages/call_history.dart' ; //new
void main() {
runApp(
new MaterialApp(
home: new WhatsAppUiClone(),
title: 'WhatsApp',
theme: new ThemeData(
primaryColor: new Color(0xff075E54),
accentColor: new Color(0xff25D366),
),
));
}
class WhatsAppUiClone extends StatefulWidget {
_WhatsAppUiClone createState() => new _WhatsAppUiClone();
}
class _WhatsAppUiClone extends State with SingleTickerProviderStateMixin {
TabController _tabcontroller;
//new
@override
void initState() {
super.initState();
_tabcontroller = new TabController(
vsync: this,
length: 4,
);
}
//new
@override
void dispose() {
super.dispose();
_tabcontroller.dispose();
}
@override
Widget build(BuildContext context) {
return new Scaffold(
appBar: new AppBar(
backgroundColor: Theme.of(context).primaryColor,
title: new Text('WhatsApp'),
elevation: 0.7,
bottom: new TabBar(
controller: _tabcontroller,
indicatorColor: Colors.white,
tabs: [
new Tab(icon: new Icon(Icons.camera_alt)),
new Tab(text: 'CHATS',),
new Tab(text: 'STATUS',),
new Tab(text: 'CALLS',)
],
),
),
//new
body: new TabBarView(
controller: _tabcontroller,
children: [
new CameraPage(),
new ChatScreen(),
new StatusScreen(),
new CallHistory()
],
),
);
}
}
Beginning from the best and working our way down, we imported the four documents we just made into main.dart. Next, we abrogate two of Flutter's lifecycle strategies. In the initState strategy, we set the _tabcontroller we made before to another TabController. The quantity of tabs was set here. Moving further down, we again abrogate a lifecycle technique, this time the dispose. At long last, in the Scaffold, we utilized the body property and set it to another TabBarView. The TabBarView utilized an indistinguishable controller from previously and took in the four distinct classes we made as its Child.
Presently if all worked out as expected, the outcome should resemble this

Conclusion
As should be obvious, it takes next to no for you to get up and running with Flutter. This is section one of an arrangement I am wanting to do. The following part might be discharged at some point amid the following week. Everything relies upon how much homework I have.
Summary
In this tutorial, I showed how can we clone the WhatsApp UI in flutter. We will build an app which is a clone of our favourite messenger WhatsApp.
Very nice post Pawan ji. Kya ye sach mein kaam karega?
obviously! You can try it on android and ios. If you face any trouble please let me know by commenting.
Thank you pawan bhai. I am following you.
Thank you for your contribution.
Please don't do this any more.
Need help? Write a ticket on https://support.utopian.io/.
Chat with us on Discord.
[utopian-moderator]
Congratulations! This post has been upvoted from the communal account, @minnowsupport, by Pawan Kumar from the Minnow Support Project. It's a witness project run by aggroed, ausbitbank, teamsteem, theprophet0, someguy123, neoxian, followbtcnews, and netuoso. The goal is to help Steemit grow by supporting Minnows. Please find us at the Peace, Abundance, and Liberty Network (PALnet) Discord Channel. It's a completely public and open space to all members of the Steemit community who voluntarily choose to be there.
If you would like to delegate to the Minnow Support Project you can do so by clicking on the following links: 50SP, 100SP, 250SP, 500SP, 1000SP, 5000SP.
Be sure to leave at least 50SP undelegated on your account.