Complete tutorial for Synkron (open source application for synchronising folders)
Introduction:
Synkron is a basic QT application which is a perfect tool to synchronize many folders at once. It can sync every type of data such as document, audio and photo. Synkron is available for Windows, macOS X and GNU/Linux.
Written in C++, in this application qt4 library is used. It is an open source application and is authorized within the terms of GPL v2.
Along with synchronization, this application serves other purposes too such as Multisync, Scheduler, SyncView, Blacklist, Filters and Restore. All these options can be accessed from the toolbar.
How to Sync?
Launch Synkron
You will see the default interface which looks like this-
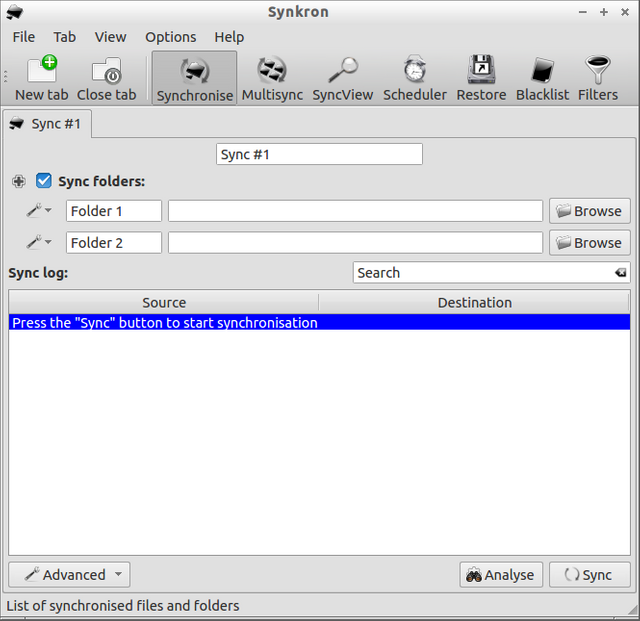
Select Synchronise from the toolbar as shown-

Tabs:
It’s capability is not limited to one synchronization at a time. With the help of it’s Tab feature, you can run a number of synchronizations. To start a new operation or to cancel an operation, use the " New Tab " & " Close Tab " buttons.
A tab can also be** renamed** from here-

Synchronising Folders:
Multiple folders can be synced in this application, thanks to it’s Multisync feature.
To add a folder, click on the on the + (plus) button which can be located above the path of recently used sync folder. A folder can be removed by clicking on the - (minus) toggle next to the respective folder.
The location of the sync folder can be changed by modifying the path from line edit. You can also simply choose the " Browse " option and allot a new path.

Analysis:
You can see the synchronization order of various files and documents in the Analysis window. To open this window, select " Analyse " from the adjacent part of the default interface window.
This window provides the detailed information about each folder being synchronized. The folders selected for synchronization are given red icons. " Not Found " indicates that one of the sync folders doesn’t contain any file or sub-folder.
If a file’s older version is present in any folder, the last used date of the respective file in it’s relevant cell is shown in red color and a message " Obsolete " will appear in front of it. Some advanced options are also displayed here such as " Propogated Deletions " and " Detect Collisions ".
A context menu can be accessed by right clicking the desired file or folder. From this menu, various operations such as renaming, adding to blacklist, adding it’s extension to blacklist and deleting the file or folder can be performed.
The exact number of files and folders which are to be synchronised is shown in the first row of the Analysis window.
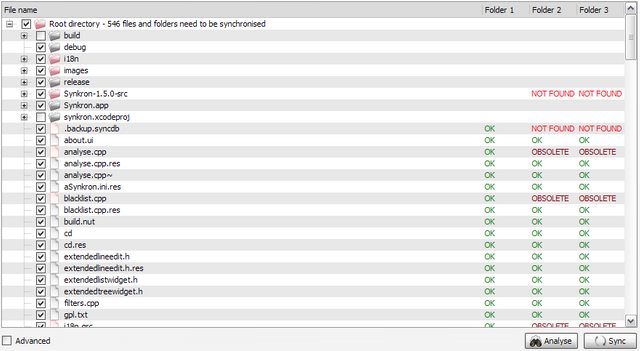
Analysis is only for the information purpose, it is not a mandatory for the synchronization process.
Synchronization:
To start syncronisation, select the " Sync " option from default interface window. It is given right next to the Analysis button.
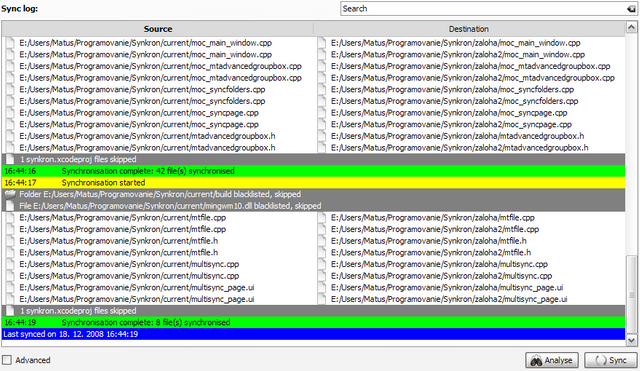
All the changes performed are displayed in the table widget known as Sync Log. In this table the collided files, errors occurred, deleted files or folders, files or folders skipped due to Blacklist etc are displayed.
Files and folders can also be searched in Sync Log using the search box. This log can be saved in the form of an HTML file. For saving, choose" Save Log " from the " File " option.
The items painted blue at the bottom most part of the window are the ones which are currently being synchronised and the last used date is also mentioned.
You can cancel the synchronisation any time by clicking on " Stop Sync ".
Advanced Options:
For using the Advanced Options, check the " Advanced " checkbox.
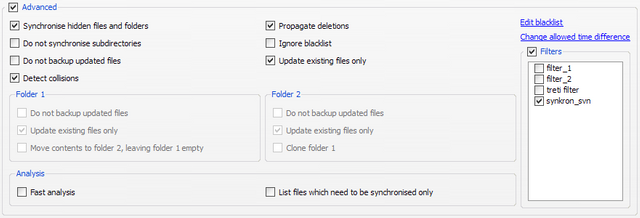
- Syncronisation of Hidden Files/Folders - Synkron syncs the hidden items if you check this checkbox.
Propagate Deletions- Using this feature, you can delete the files which were once deleted from one of the folders and as well as in other sync folders. - Ignore Sub directories- If you check this checkbox, Synkron will not synchronize the items of the sub directories within any folder.
- Ignore Blacklist- Some of the blacklisted items can be ignored using this feature.
- Update Only Existing Files - The older versions of Files are updated with the newer versions but the the sync folder is not copied to where it doesn’t exist.
- Detect Collisions- If a file’s location is changed to two places, the Synkron can not choose which change it should propagate. When this feature is used, both the locations of a file are displayed and you can choose which file to propagate.
- Fast Analysis- To analyse the files and folders superficially, select Fast Analysis. The details can be expanded by clicking on the desired file or folder.
- List Only to be Synchronised Files- By checking the " List files which need to be synchronised only " option the updated files, deleted files and non-existing files will be ignored and only the files selected for syncronisation will be displayed in the Analysis window.
- Allowed Time Difference- The default Allowed Time Difference is set by 2 seconds. To change it, change the time in " Change Allowed Time Difference " link and then click OK.
- Filters- Check the Filters checkbox, and select the Filters you wish to use.
MultiSync:
The Multisync feature syncs sources with the destination. It is useful for creating backup.

Sources:
For each source, there is an unique path in it’s destination which contains it’s synchronised contents.

For adding a new source, click on the " Add " button and to remove an existing source click on the " Remove " button.
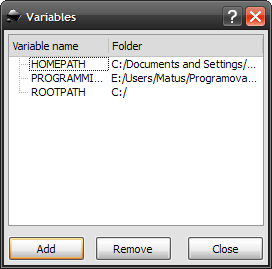
Variables:
Using this feature, some of the words of the beginning of a path can be replaced. For adding or removing the variables, click on " Variables ".
SyncView:
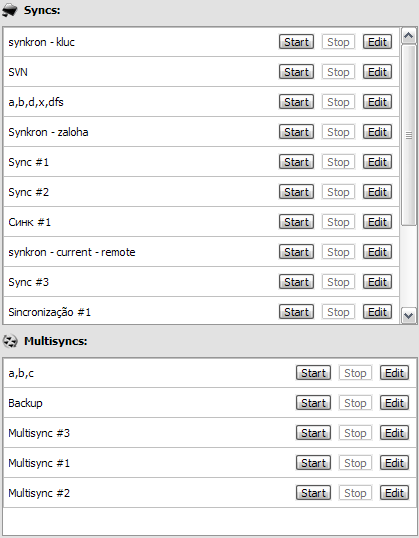
Select SyncView to have a quick glance over the Synchronise and the Multisync tab.

You can start, stop or edit synchronizations in Synchronize and Multisync tab from here.
Scheduler:
Select Scheduler from this tab as shown-

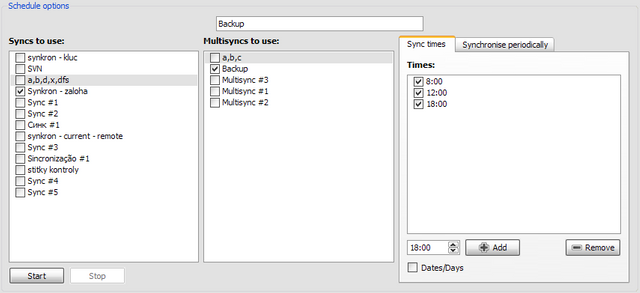
Scheduler allows you to schedule syncronisations in a particular time in future or after a certain period interval.
Schedules can be added or removed using the respective buttons. If you want to start all synchronisations, click on " Star All " and to stop all the running synchronisations click on " Stop All ".

Schedule Options:
You can select " Sync times " to assign syncronisations for a particular time, day, date in future. To schedule a syncronisation, click on " Add " and to remove it select " " Remove ".
From " Synchronise Periodically " you can choose the period after which Synkron should synchronise the selected files and folders.
Restore:
You can restore and remove the overwritten files using the Restore feature.

Restoring Temporary Files- Select the desired files and click " Restore ". This will restore the files which were in backup to the folders they previously belonged to.
Removing Temporary Files- Open the groupbox named " Clean Temporary Files " to remove the Temporary Files. After configuring various options of your choice, click on " Clean " to delete the temporary files.
Blacklist:
To exclude various files or folders or specific extensions, add them to the Blacklist.

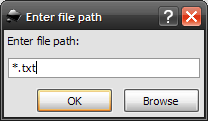
To add items click on " Add " button and to Remove items click on " Remove " button. Wildcards can be used to add a file or folders instead of their paths. Simply mention the wildcard you wish to use (say " *.txt " ). Now, click OK.
Filters:
To filter your synchronisations, use Filters.

To add or remove the specific extensions, click on " Add " or " Remove " button respectively. The files which don’t end with the specified extensions used in Filters won’t be synchronized.
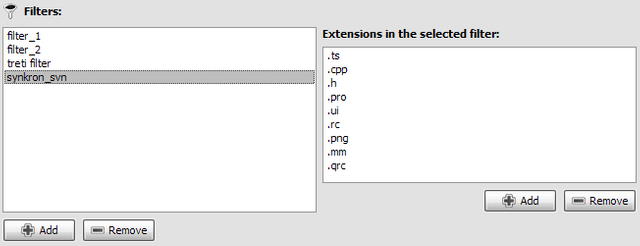
More than one extensions can be added or removed in Filters as shown in the image -
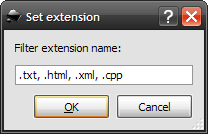
Flitter option is only applicable to the Synchronise section. Filters are not supported by the Multisync section.
Other Options of the Menu Bar:
File-
Sync All- To sync all of the Synchronise tabs individually use this option.
Tabs-
Save Tab / Save Tab As- For saving the present Synchronise or Multisync tab in the form of an XML file. (.slist) extension is assigned to it.
Load Tab- To load an existing XML file of extension " .slist "
Save Log- Saves the SyncLog information as stated above in SynLog section.
Options-
- Run Hidden- Minimises the Synkron window to the tray.
- Change Temporary Path- To change the path of folder in which the deleted or overwritten files are backed up.
- Quit Synkron After Completion- Synkron will automatically quit after completing the sychronisation.
- Shut Down After Completion- Synkron will automatically shut down your system after completing the synchronisation.
- Synchronise All At Launch- Enabling this option encourages Synkron to sync all the Synchronise tabs as soon as it is launched.
Help-
- Check For Updates- To check whether you’re using the latest version of Synkron or not, click on this option. It will display the results in a dialogue box.
So that was the complete walkthrough for Synkron !! Keep waiting for other tutorials ! Bye Bye!
Posted on Utopian.io - Rewarding Open Source Contributors
Thank you for the contribution. It has been approved.
You can contact us on Discord.
[utopian-moderator]
Hey @osblog I am @utopian-io. I have just upvoted you!
Achievements
Suggestions
Get Noticed!
Community-Driven Witness!
I am the first and only Steem Community-Driven Witness. Participate on Discord. Lets GROW TOGETHER!
Up-vote this comment to grow my power and help Open Source contributions like this one. Want to chat? Join me on Discord https://discord.gg/Pc8HG9x