Rgb Led Control with Arduino from Keyboard
What Will I Learn?
Hello there, in this post, we'll apply the colors that we picked using the keyboard to our RGB Led. As you know, the RGB (Red, Green, Blue) radiates over the three main colors. As we can directly use these three, we still can change their values to get different colors by mixing them digitally and display them as we like. This enables us to do many things. The most developed screen technologies are running on the RGB Led and they allow us to display different output values.In our exercise, we'll be seeing the basics of this technology.According to the color that we type in by our keyboard, the RGB Led will be displaying the color that we desire.
Merhaba arkadaşlar bu gönderimizde arduino kullanarak klavyeden girilen renk seçimini rgb led'imize uyguluyoruz.Bilgidiniz gibi RGB(Red,Green,Blue) üç ana renk üzerinden ışıma yapmaktadır.Net olarak bu renkleri elde edebileceğimiz gibi bunların ara değerlerini de dijital olarak girdi sağlayıp görüntüleyebiliriz.Bu da bize büyük imkanlar sağlamaktadır.Günümüzde en gelişmiş ekran teknolojisi RGB led üzerinden ilerlemekte ve anlık komutlara göre farklı çıktı degerlerini görselleştirmektedir.Uygulamamızda bu teknolojinin temelini yapacağız.Klavyemizden girilen 3 renk ismine göre rgb led'imizi o renge ayarlayacağız.
Components- Malzemeler
-Arduino Uno
-Breadboard
-330R Resistor(3)
-Jumper Wires
-RGB Led/Leds
Requirements-Gereksinimler
-Arduino IDE(I used version 1.8)
- Intermediate code and algorithm knowledge
Difficulty-Zorluk
- Intermediate-Orta düzey
Tutorial Contents-İçerik
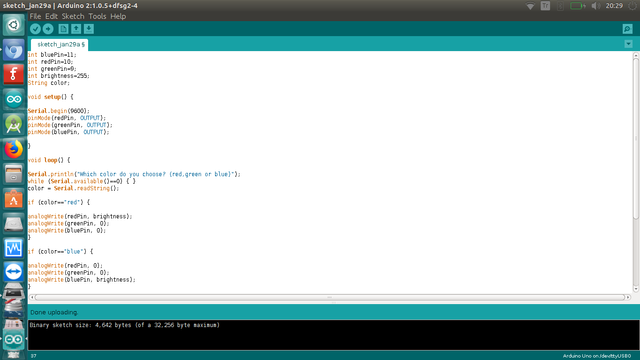
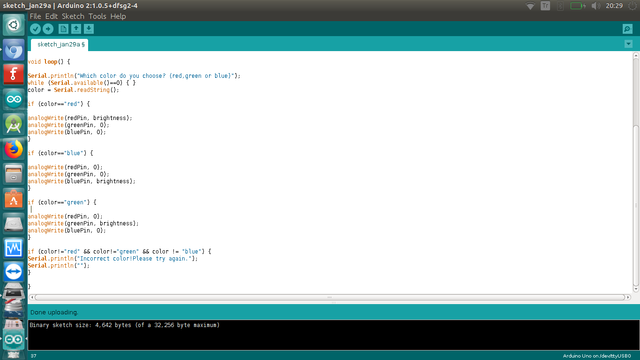
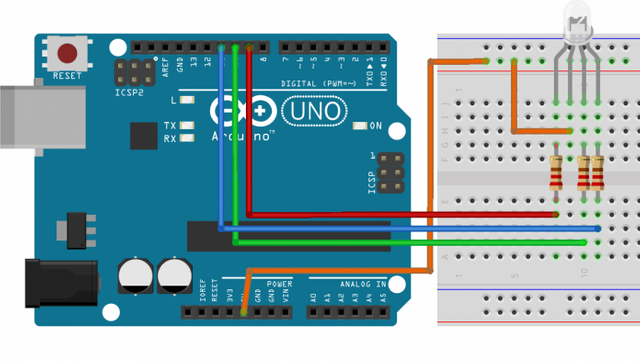
Bu uygulamamızda 3 direnç ve 1 RGB led kullanıyoruz.Klavyeden red\green\blue string değerlerinden birini giriyoruz.Seçilen string değerine göre led'i yakıyoruz.
Şimdi burada bilmemiz gereken çok basit bir nokta var RGB ledler sırasıyla Mavi, Yeşil ve Kırmızı değerlerini doğrusal bir fonksiyon gibi alırlar.Açıklamak gerekirse R(0-255), G(0-255), B(0-255) arasinda değer almaktadır.Bu değerler dijital olarak seri anlamda değiştirilebildiği gibi(while\for döngüleri) analog anlamdada değiştirilebilir(potansiyometre,ısı sıcaklık sensörleri butonlar).Biz bu uygulamamızda 3 tür renk seçenegi ile kısıtlıyoruz ve string olarak aldığımız degeri ledimize 255 çıkış değerini veriyoruz.
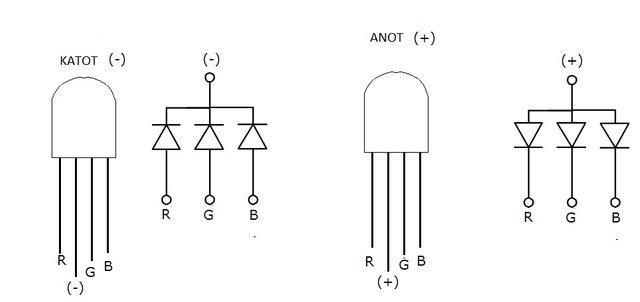
Bu uygulamanın kodlama kısmında 3 giriş pinimiz ve 1 ortak anot pinimiz var.Ben dijital pinlerden 9,10 ve 11 pinlerini kullandım.Anot pini ise direk olarak 5V güç pinine bağlanmakta.Uygulamamızda seçilen renk değerine(seçili pin değeri) tam akım gönderilmekte(1 değeri) ve geri kalan 2 pine(0 değeri) akım verilmemektedir.Böylece klavyeden girdiğimiz değeri RGB led üzerinde görebiliyoruz.

Mockups / Examples


Circuit-Devre

Result-Sonuç
My Previous projects-Önceki Projelerim
Light level measurement with arduino
Arduino parking sensor project
Posted on Utopian.io - Rewarding Open Source Contributors
Your contribution cannot be approved because it does not follow the Utopian Rules.
Your tutorial is similar to tutorials submitted before.Check this.
I appreciate your effort but there have been a flood of arduino tutorials and we are being very selective in this. This is for your information so that next time if you really really want to make an arduino tutorial, please be very thorough and cover a LOT! You will need to perform the experiment and ensure that THE TUTORIAL IS UNIQUE in all aspects.
You can contact us on Discord.
[utopian-moderator]
I sent you a message from the discord