Building command line applications in php
@amosbastian recently developed a utopian cli tool. Initially i thought it would be nice to create mine specifically for the php ecosystem but reading through his post, i realized he just got to learn about building command line apps. So also there are many people who don't know how to. This tutorial is the first in a series of Building command line applications in php. Lets dive in.
What Will I Learn?
In this series, you will learn to
- Create your first php command line app.
- Hack popular php command line tools.
- Build a simple but useful command line application.
Requirements
To follow on with this tutorial, it is expected that you are conversant with modern php. You need to understand concepts like
- Classes
- namespaces
- autoloaders
- composer.
If you don't already know about these, i suggest you take time out to understand them. These things can be scary at first but they're quite simple at the core.
Difficulty
Intermediate
Tutorial Contents
Many php command line apps today leverage the power of symfony/console to quickly bootstrap their apps and we'll do the same in this tutorial.
Step 1
Create a directory specifically for this project and navigate into the folder
Create a composer.json file in the root directory of your working folder. Require symfony/console in the require section of the file. It should look like this
{
    "require": {
        "symfony/console": "~2.0"
    }
}
Open your terminal and navigate into your working directory. Then run composer install to pull in the console package.
Step 2
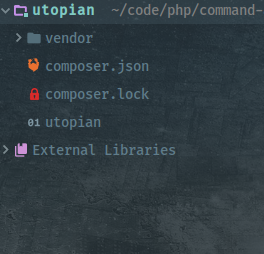
Create a file in your root directory and name it what you like. Please note that this will be the executable file of your application. For instance, composer install checks a file named composer and executes the instructed command. So for this tutorial, i'll advise you name it utopian. This file does not have an extension. Your folder structure should now look like this;

Step 3
- Open the
utopianfile. - Add
#! /usr/bin/env phpat the beginning of the file. This will specify php as the environment to use - require
vendor/autoload.phpto enable us have access to our vendor files. We should have this now
#! /usr/bin/env php

<?php

require 'vendor/autoload.php';
Now we're ready to start building.
- Type
$app = new Application();. This will create an instance of Symfony's Console class. Make sure you import the file correctly, using it's namespaceSymfony\Component\Console\Application. You can specify a description for your app by passing it as the first parameter. You can also add a version number as the second parameter. You should have something that looks like this now;
$app = new Application("PHP Console tool for utopian.io", "1.0");
- To register a new command called greet,
$app->register('greet') - To set a description for your command,
$app->setDescription('Offer a greeting to the given person') - To add arguments to your command,
$app->addArgument('name', InputArgument::REQUIRED, "Your name")
All these methods are fluent, so they can be chained to one another. Putting the pieces together, we have
#! /usr/bin/env php

<?php

use Symfony\Component\Console\Application;
use Symfony\Component\Console\Input\InputArgument;
use Symfony\Component\Console\Input\InputInterface;
use Symfony\Component\Console\Output\OutputInterface;

require 'vendor/autoload.php';

$app = new Application("PHP Console tool for utopian.io", "1.0");
$app->register('greet')
    ->setDescription('Offer a greeting to the given person')
    ->addArgument('name', InputArgument::REQUIRED, "Your name")
    ->setCode(function (InputInterface $input, OutputInterface $output)
    {
        $message = 'Hello, '.$input->getArgument('name');
        $output->writeln("<info>{$message}</info>");
    });

$app->run();
So we have a greet command which we are registering.
Next we add a name argument. The second parameter of the addArgument method makes sure that we force an argument to be passed. TO make this optional, use InputArgument::OPTIONAL instead. The third parameter specifies a description for the argument.
The setCode method is where the actual logic takes place. It accepts an anonymous function. The function uses the InputInterface class to accept inputs from the command line and OutputInterface to print something on the command line.
$input->getArgument('name') gets the value of the argument called name, which in this case is our user input.
$output->println() writes a message on the command line. The HTML like tag <info></info> adds a bit of styling to our output.
Make sure you use the correct namespace for all imported classes as shown in the code snippet above. We are ready to go.
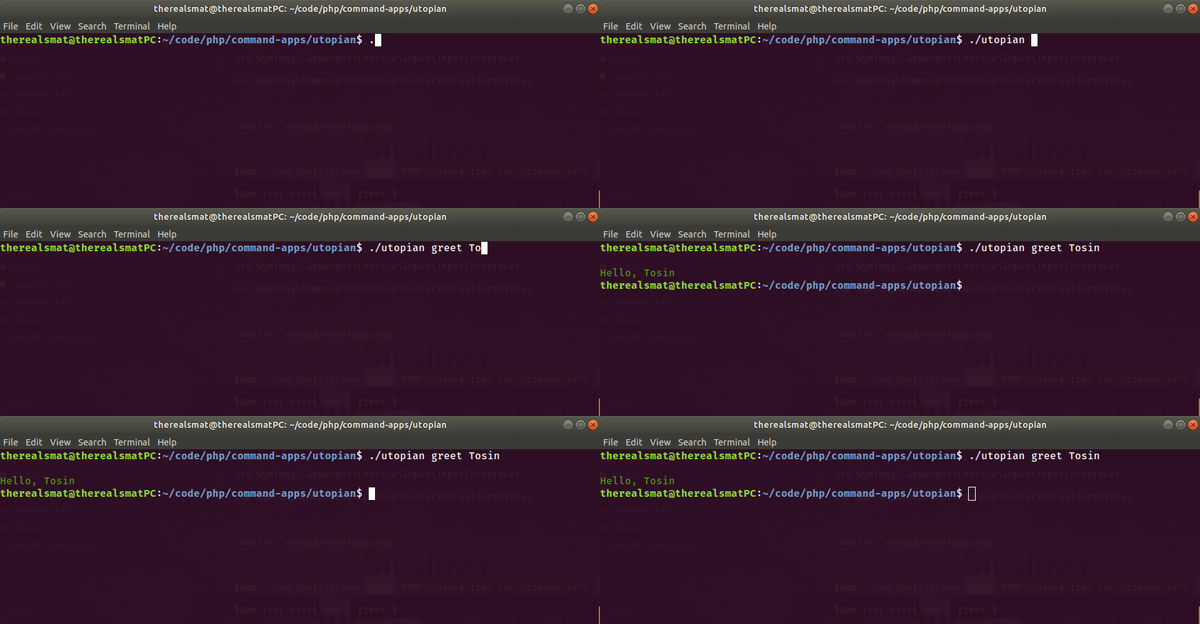
Go to your command line, and test your new command.

Now that we have a working application, lets refactor our code to use classes instead.
- Create a new directory called src
- update your
composer.jsonfile with the following information
{
    "require": {
        "symfony/console": "~2.0"
    },
    "autoload": {
        "psr-4": {
            "therealsmat\\": "src"
        }
    }
}
This will enable us autoload the src directory under the therealsmat namespace. Of course you can change the namespace to suit you.
- Create a new class in your
srcdirectory. Call itSayHelloCommand.php. It will contain all the logic for ourgreetcommand.
<?php namespace therealsmat;

use Symfony\Component\Console\Command\Command;

class SayHelloCommand extends Command {

}
Add two methods to the class;
configure()andexecute()The configure method should look like this;
public function configure(){
      $this->setName('greet')
            ->setDescription('Offer a greeting to the given person')
            ->addArgument('name', InputArgument::REQUIRED, "Your name");
}
Also the execute method should look like this
public function execute(){
      $message = sprintf('%s', $input->getArgument('name'));
        $output->writeln("<info>{$message}</info>");
}
Our class should now look like this
<?php namespace therealsmat;

use Symfony\Component\Console\Command\Command;
use Symfony\Component\Console\Input\InputArgument;
use Symfony\Component\Console\Input\InputInterface;
use Symfony\Component\Console\Input\InputOption;
use Symfony\Component\Console\Output\OutputInterface;

class SayHelloCommand extends Command {

    public function configure()
    {
        $this->setName('greet')
            ->setDescription('Offer a greeting to the given person')
            ->addArgument('name', InputArgument::REQUIRED, "Your name")
    }

    public function execute(InputInterface $input, OutputInterface $output)
    {
        $message = sprintf('%', $input->getArgument('name'));
        $output->writeln("<info>{$message}</info>");
    }
}
Now lets get back to your utopian file. Refactor it to look like this;
#! /usr/bin/env php

<?php

use therealsmat\SayHelloCommand;
use Symfony\Component\Console\Application;

require 'vendor/autoload.php';

$app = new Application("PHP Console tool for utopian.io", "1.0");
$app->add(new SayHelloCommand);
$app->run();
Go back to your command line and try the command again. You should get the same result. CONGRATULATIONS!!!
As a tip, what if you wanted to add options at runtime to the command e.g, you want to change the greeting at runtime to 'Hi,', chain
addOption('greeting', null, InputOption::VALUE_OPTIONAL, 'Override the default greeting', 'Hello');
to the configure method. It should look like this;
public function configure(){
      $this->setName('greet')
            ->setDescription('Offer a greeting to the given person')
            ->addArgument('name', InputArgument::REQUIRED, "Your name")
            addOption('greeting', null, InputOption::VALUE_OPTIONAL, 'Override the default greeting', 'Hello');

}
The greeting is the name of the option. The InputOption::VALUE_OPTIONAL specifies that the option input is not required. The third argument specifies a description for the option. The fourth option specifies a default value for the option if it is not supplied at run time.
Finally tweak the execute method to make it look like this;
public function execute(){
      $message = sprintf('%s, %s',  $input->getOption('greeting'), $input->getArgument('name'));
        $output->writeln("<info>{$message}</info>");
}
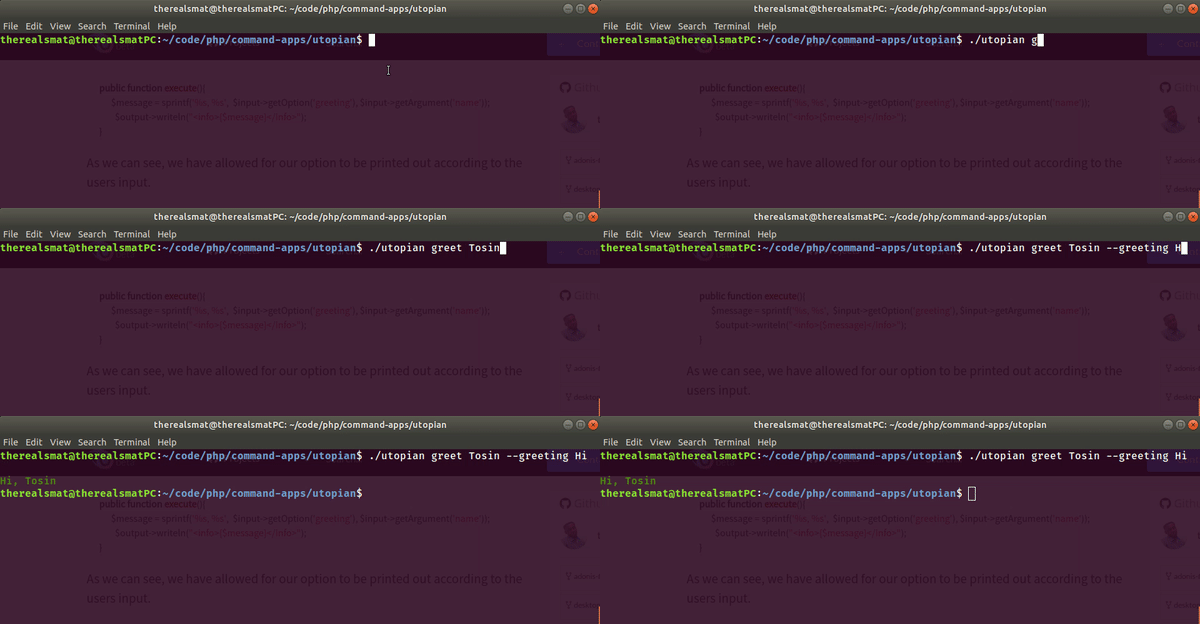
As we can see, we have allowed for our option to be printed out according to the users input.
Go back to your command line and run the command again, this time, with the option.

Command line tools often benefit from more straightforward, obvious, simple designs. Part of the reason for this is the fact that command line tools are easily written as smaller, simpler tools that — in the Unix tradition — each do one thing well.
Posted on Utopian.io - Rewarding Open Source Contributors
Thank you for the contribution. It has been approved.
You can contact us on Discord.
[utopian-moderator]
Hey @therealsmat I am @utopian-io. I have just upvoted you!
Achievements
Suggestions
Get Noticed!
Community-Driven Witness!
I am the first and only Steem Community-Driven Witness. Participate on Discord. Lets GROW TOGETHER!
Up-vote this comment to grow my power and help Open Source contributions like this one. Want to chat? Join me on Discord https://discord.gg/Pc8HG9x