[EN/DE] Meltdown & Spectre - The inner workings (Part 2: Meltdown)
[EN] Meltdown
Introduction
Now that we've covered all the necessary terms, it's time to finally get to Meltdown! Before we begin, it's important to know that the Meltdown attack works on all major operating systems, but unlike Spectre it only works on modern Intel processors (and maybe a few more). The reason for that might be, that these processors lack features the attack needs. However the authors of the Meltdown whitepaper (linked below) stated, that the general abuse of out-of-order execution is possible on AMD and ARM processors as well.
The Meltdown attack is divided into 3 steps, we'll start with (you probably already guessed it) step 1.
Step 1
As we learned in Part 1, an application cannot simply read data stored in kernel space, because then it could read the entire physical memory. What happens if it tries anyway? The CPU raises an exception, the process is terminated, and the system starts cleaning up. However, due to out-of-order execution, there is a small time frame in which code after the illegal memory access is still executed.
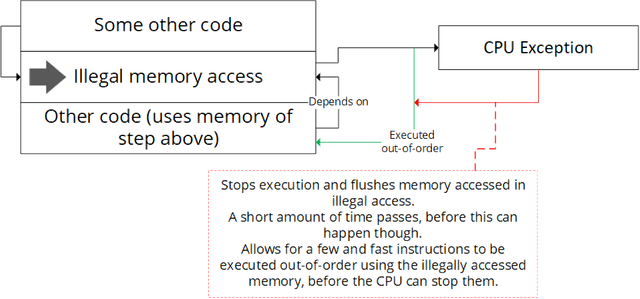
The image above might look a bit complicated, but it's actually quite simple. Our application executes some code and suddenly it reads data from a kernel space address, for example, and stores the content in a register. The CPU will obviously notice that and raise an exception. But since our CPU is not only attentive but also pretty diligent, the code after the illegal access was already loaded into the CPU and is waiting for the content of our kernel address to be loaded from memory. Raising the exception takes some time, so that the code is given the content of the kernel address and executed between the illegal memory access and the raising of the exception.
This gives us a time frame to do something with the kernel space value we aren't supposed to access. One of the reasons the attack mostly doesn't work on AMD and ARM CPUs could be, that this timeframe might be much smaller.
Step 2
For step 2 we'll assume that all of the things we do are programmed efficient enough, to be executed in the small time frame (So we'll win the race against the exception).
We can't just send our value over to some other application, though, we'll need to use a covert channel. We will apply the Flush+Reload method described in Part 1, but there are other possibilities. Normally, we would need to multiply our kernel address value with the page size, but we will ignore this part to make the step easier to understand.
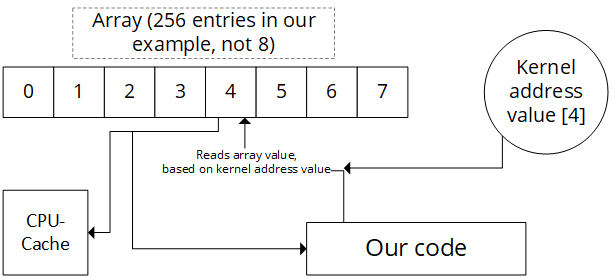
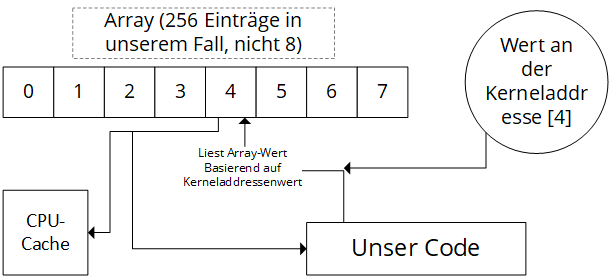
Let's assume we want to read an 1 byte (8 bit) value from the kernel space each time we run our attack and that we defined an array with the length of 256 (2⁸) before our illegal memory access that is not stored in the CPUs cache yet.
Our 8 bits can store a value between 0 and 255. To prepare our Flush+Reload attack, we now use the (8 bit) value from the kernel space address as our array index, so we just load the value stored at this index in our array. As described in Part 1, we don't actually care about that value. We just care about the fact, that it now exists in the CPUs cache. (Not the other 255 values of the array though, which is important)
Step 3
The complicated part is over, now we'll just need to recover our value using the Flush+Reload attack. Using a second application sharing the memory where our array lies with our application from step 2 and 1, we'll load all the values stored in our array one by one. By recording how much time it takes to load these values, we know which one is stored in the cache, so that's the value the other application accessed. The value the other application accessed is the value stored in the kernel space address.
We just read a value from kernel space! By repeating this step a lot of times for the other addresses, we can read all values in kernel space. Since the whole physical memory is mapped in kernel space at some point, we can read the whole physical memory. That also means all data other programs store in memory, for example passwords or usernames.
Conclusion
That's it for Meltdown, in the next post I'll talk about Spectre. These two posts should give you a good overview over Meltdown and how dangerous it is. In a later post, I might also talk about how to prevent Meltdown and Spectre. If you have any questions, feel free to ask! Thanks for reading!
References
- Yarom Y. and Falkner K. FLUSH+RELOAD: a high resolution, low noise, L3 cache side-channel attack. (San Diego, CA, August 20 - 22, 2014)
- Lipp, M., Schwarz, M., Gruss, D., Prescher, T., Haas, W., Mangard, S., Kocher, P., Genkin, D., Yarom, Y., Hamburg, M. Meltdown. (2018)
[DE] Meltdown
Einleitung
Nun, da wir alle nötigen Begriffe geklärt haben, kommen wir endlich zu Meltdown! Bevor wir beginnen ist es wichtig zu wissen, dass Meltdown-Attacken auf allen größeren Betriebssystemen funktionieren, allerdings im Gegensatz zu Spectre nur auf modernen Intel-Prozessoren (und nur eventuell noch einigen anderen). Das kann daran liegen, dass diesen Prozessoren Features fehlen, welche diese Attacke benötigt. Allerdings haben die Autoren des Meltdown-Whitepapers (unten verlinkt) erklärt, dass der genrelle Missbrauch der out-of-order Ausführung auch mit Prozessoren von AMD und ARM möglich ist.
Die Meltdown Attacke ist in 3 Schritte unterteilt. Wir fangen (wie man relativ leicht erraten kann) mit Schritt 1 an.
Schritt 1
Wie wir im ersten Teil gelernt haben, kann eine Anwendung nicht einfach Daten lesen, welche sich im kernel space befinden, da sie dann den gesamten physikalischen Speicher auslesen könnte. Was passiert, wenn man es trotzdem versucht? Die CPU löst eine Ausnahme aus, der Prozess wird gestoppt und das System fängt an aufzuräumen. Allerdings gibt es durch die out-of-order Ausführung ein kleines Zeitfenster, in dem Code nach dem illegalen Speicherzugriff dennoch ausgeführt werden kann.
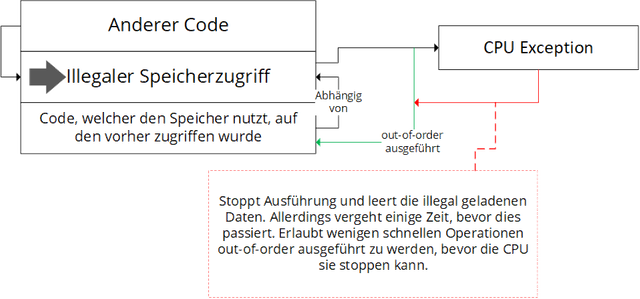
Das obere Bild sieht vielleicht etwas kompliziert aus, ist es aber gar nicht. Unsere Anwendung führt einigen Code aus, und versucht zum Beispiel plötzlich Daten von einer Addresse aus dem kernel space zu lesen. Das wird die CPU natürlich merken, und eine Ausnahme auslösen. Da unsere CPU aber nicht nur wachsam sondern auch sehr fleißig ist, wurde der Code nach der Zeile, die die Ausnahme auslöst, schon in die CPU geladen und wartet darauf, dass der Inhalt der Kerneladdresse aus dem Speicher geladen wurde. Die Ausnahme auszulösen dauert eine Weile, so dass dem Code, welcher zwischen dem illegalen Speicherzugriff und dem Auslösen der Ausnahme ausgeführt wird, tatsächlich der Inhalt der Kerneladdresse übergeben wird
Dies gibt uns ein Zeitfenster, um etwas mit dem Wert zu tun, auf den wir eigentlich gar nicht zugreifen dürfen. Einer der Gründe, aus dem diese Attacke meist nicht auf AMD oder ARM CPUs funktioniert, könnte sein, dass diese Zeitfenster dort eventuell wesentlich kleiner ist.
Schritt 2
Für Schritt 2 nehmen wir an, dass alles was wir programmiert haben effizient genug ist, um in diesem schmalen Zeitfenster ausgeführt zu werden.
Wir können unseren Wert nicht einfach direkt an eine andere Anwendung senden, wir müssen einen covert channel nutzen. Wir werden die Flush+Reload Methode aus dem ersten Teil einsetzen, allerdings gibt es noch andere Möglichkeiten. Normalerweise müssten wir unseren geladenen Wert nun noch mit der page-Größe multiplizieren, allerdings ignorieren wir diesen Teil um den Schritt etwas einfacher zu machen.
Angenommen, wir wollen jedes Mal, wenn wir unsere Attacke ausführen einen 1 byte (8 Bit) Wert aus dem kernel space lesen. Außerdem haben wir vor dem Code, welcher die Ausnahme auslöst, ein Array mit der Länge 256 (2⁸) definiert.
Unsere 8 bit können einen Wert zwischen 0 und 255 speichern. Um unsere Flush+Reload Attacke vorzubereiten benutzen wir nun den (8 Bit) Wert, der sich an unserer kernel space Addresse befindet, als Index für unser Array. Das bedeutet, dass wir einfach den Wert laden, der an dieser Stelle im Array gespeichert ist. Wie in Teil 1 beschreiben interessieren wir uns nicht für den Wert. Wir interessieren uns nur dafür, dass dieser Wert (dadurch, dass wir ihn geladen haben) jetzt im CPU-Cache liegt. (Nicht jedoch die anderen 255 Werte des Arrays, was wichtig ist)
Schritt 3
Der schwierige Part ist getan, jetzt müssen wir nur noch den Wert mithilfe der Flush+Reload Attacke laden. Mit einer zweiten Anwendungen, welche den Speicherbereich in dem unser Array liegt mit der Anwendung aus Schritt 1 und 2 teilt, laden wir nun alle Werte, die in diesem Array gespeichert sind. Indem wir dabei aufzeichnen, wie viel Zeit sie jeweils zum Laden brauchen wissen wir, welcher dieser Werte schon im Cache liegt und somit von der anderen Anwendung gelesen wurde. Das ist also der Wert, der an unserer kernel space Addresse lag.
Wir haben gerade erfolgreich einen Wert aus dem kernel space gelesen! Indem wir diesen Schritt viele Male für alle anderen Addressen wiederholen können wir alle Werte aus dem kernel space auslesen. Da der gesamte physikalische Speicher an einem bestimmten Punkt im kernel space referenziert wird, können wir den gesamten physikalischen Speicher auslösen. Das heißt auch alle Daten, die andere Programme im Speicher haben, also Passwörter, Nutzernamen usw.
Fazit
Das war's für Meltdown, im nächsten Post werde ich dann Spectre erläuern. Diese zwei Posts sollten einen guten Überblick über Meltdown liefern, und aufzeigen, wie gefährlich diese Attacke ist. In einem späteren Post erkläre ich vielleicht auch noch, wie man Meltdown und Spectre verhindern kann. Falls irgendwelche Fragen aufgekommen sind, können diese gerne in den Kommentaren gestellt werden!
Referenzen
- Yarom Y. and Falkner K. FLUSH+RELOAD: a high resolution, low noise, L3 cache side-channel attack. (San Diego, CA, August 20 - 22, 2014)
- Lipp, M., Schwarz, M., Gruss, D., Prescher, T., Haas, W., Mangard, S., Kocher, P., Genkin, D., Yarom, Y., Hamburg, M. Meltdown. (2018)
Sehr ausführlich und TOP beschrieben !
Schaue ab jetzt öfters mal bei dir vorbei :)
Vielen Dank! Versuche die Beschreibung so verständlich wie möglich zu halten, weiß ja wie schwer verdaulich das sonst ist. :D
Ein super Artikel, der auch noch in Deutsch und English verfügbar ist. Quellenangaben sind auch dabei. Gut erklärt. Wirklich gute Arbeit.
Dankeschön!
@originalworks
The @OriginalWorks bot has determined this post by @biw to be original material and upvoted it!
To call @OriginalWorks, simply reply to any post with @originalworks or !originalworks in your message!