Learn Algorithms & Data Structures with GO | Part 2 | Singly Linked Lists
Motivation
Linked Lists are one of the oldest data structures, invented in 1955–1956 by Allen Newell, Cliff Shaw and Herbert A. Simon. They are very common in computer science, and can be used to implement other data structures, such as stacks, queues, dictionaries. Hence, it is very important to understand them and the best way to do this is to implement them. Golang does not have these Linked Lists implemented in the core libraries, because their behavior can be replicated via slices. You can skip reading this tutorial and jump right to the code.

What Will I Learn?
By the end of this tutorial, you will be able to :
- Explain Singly Linked Lists
- Implement one in Golang
Requirements
- Install Go on your machine (Go)
- Plain text editor, or a more powerful IDE (I use Goland)
- Basic Go syntax knowledge
- Basic understanding of how interfaces work in GO (you can read about that here)
Difficulty
- This tutorial has a basic level of difficulty.
Tutorial Contents
I will explain what a Linked List is and than I will go through its operations, explaining how I have implemented them and attaching a suggestive drawing for the more complex ones. Implementation wise, I drew inspiration from the Cormen book, together with some online materials.
Workspace Setup
Install Go on your machine. Download the code or code as you read through this article. Alternatively, you can try and implement your own version of a linked list, after having read this tutorial.
What is a Linked List?
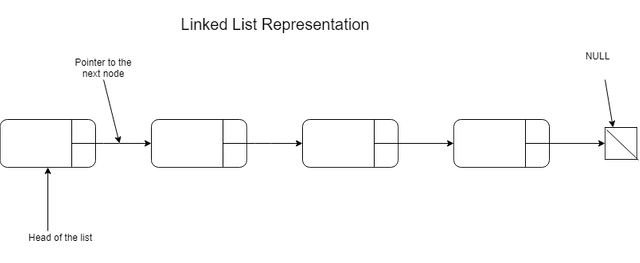
Linked Lists are dynamic sets in which the order is determined by a pointer in each order, Depending on implementation, a linked list consists of a pointer to a node called head, which is usually the first element in the list. We can choose to add other fields to our linked list structure, such as a pointer to the last element as well (usually to speed up appending at the end of the stucture) or size. A singly linked list element is called a Node. A node is a structure which contains a pointer to the next Node and data, which can be any other object, int, string etc. Here is a visual representation of a singly linked list:

Singly Linked List Implementation
My linked list struct contains a pointer to the head node and a size. A node, contains a pointer to the next node as well the data, which in my case can be any Golang structure. This generic behavior is achieved by marking the data field as type interface{}:
type Node struct {
    next *Node
    data interface{}
}

type LinkedList struct {
    head *Node
    size int
}
I have implemented as series of methods I have found relevant for this data structure. I will explain each and every one, but before getting into the those, let's go through some helper functions.
Helper functions
There are three helper functions, The first isValidIndex checks if the given index is a valid one for the list. We check this by verifying if it is greater or equal than 0 and smaller than the list size. The next two methods are very similar. One returns the node before the given index and one returns the node at the specified index. We obtain those node by iterating starting withe the head node and then going through the next pointers until we reach the desired index.
func (l *LinkedList) isValidIndex(index int) bool {
    return index >= 0 && index < l.size
}

func (l *LinkedList) getNodeBeforeIndex(index int) *Node {
    p := l.head
    for i := 0; i < index-1; i, p = i + 1, p.next {}
    return p
}


func (l *LinkedList) getNodeAtIndex(index int) (*Node, bool) {
    if !l.isValidIndex(index) {
        return nil, false
    }
    p := l.head
    // make the pointer point to the data at the required index
    for i := 0; i < index; i ++ {p = p.next}

    return p, true
}
Check if the list is empty: IsEmpty()
Checking if a list is empty can be done very easily. We could check if the head node is null, or alternative see if the size is 0. I have chosen the second method, because I have the size field in my Linked List struct.
func (l *LinkedList) IsEmpty() bool {
    return l.size == 0
}
Return list size: Length()
To find the size of a linked list, one would normally have to traverse all nodes, and count them. This operation takes O(n) time. In order to have this operation done in constant time, I have the size field in my Linked List implementation. I update this field after node removals or additions. Hence, finding the list size is trivial:
// Length function return the size of the list
func (l *LinkedList) Length() int {return l.size}
Return value at index: Get(index)
Getting the value at a certain index is pretty straightforward. We go through each node in a loop until we reach the node at the specified index, and return the value from that node. Remember each node has a pointer to the next, so we can iterate our linked list by starting with a node p, the head of the list and then do p.next until we reach the end of the list, i.e. when p.next = nil.
// Get function returns the node value at the specified index
func (l *LinkedList) Get(index int) (interface{}, bool) {
    nodeAtIndex, exists := l.getNodeAtIndex(index)
    return nodeAtIndex.data, exists
}
Add values to the end of the list: Append(values)
The last node in the array, has a reference, next that points to null. In order to append a new node, the end of an array, we make that next pointer point to the node. We repeat this if we have a list of new values. If the list is empty, we make the new value as the head. This function has linear complexity, O(max(n, m)), where n is the size of the array and m is the number of elements we wish to append. We could reduce the complexity, if we store a pointer to the last node in the list.
// Append function appends elements to the end of the list
func (l *LinkedList) Append(values ...interface{}) {
    for _, value := range values {
        node := &Node{data:value}
        if l.IsEmpty() {
            l.head = node
        } else {
             // get the last node in the list
            p, _ := l.getNodeAtIndex(l.size - 1)
            p.next = node
        }
        l.size ++
    }
}
Add values at the begging of the list: Prepend(values)
Adding at the begging of the list is equivalent to making the new node the new list head. We make this the new node as the head by updating pointers. The old list head becomes the "next" of the new node and the new head is now the new value. We repeat this process if we want to add multiple values.
// Prepend adds values at the end of the list
func (l *LinkedList) Prepend(values ...interface{}) {
    for _, value := range values {
        newNode := &Node{next:l.head, data:value}
        l.head = newNode
        l.size ++
    }
}
Add values at index: Insert(index, values)
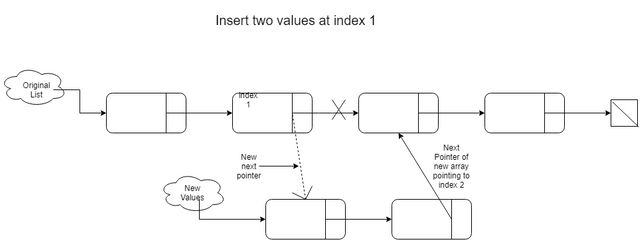
We want to add values at a certain index and shift the remaining nodes left, if any. There are three cases to consider. Adding values at the end of the list (last valid index) is equivalent to the method of appending. Adding values at the begging, at index 0 is not equivalent to our prepend method. For example, if we have the list 1 -> 2 -> 3 and want to insert at "index 0" values 10, 12, we expect the end result to be 10 -> 12 -> 1 -> 2 -> 3. However, if we call prepend we would get 12 -> 10 -> 1 -> 2 -> 3. The last case to consider is when we insert at another random valid index. My approach here has been to form a new linked list from the values we want to insert and update the pointers. We update the next pointer from the node situated at "index - 1" to point the the head of the newly created list. The last node next pointer from the new list will point to the node situated at value index from our list. Here is an illustration of this process:

// Insert function inserts values at the specified index and shifts
// elements from that position onwards, if any, to the right
func (l *LinkedList) Insert(index int, values ...interface{}) error {
    if !l.isValidIndex(index) {
        return errors.New("index out of bounds")
    }
    // append at the end
    if index == l.size - 1 {
        l.Append(values...)
        return nil
    }
    listToAdd := NewWithValues(values...)
    lastNodeFromNewList, _ := listToAdd.getNodeAtIndex(listToAdd.size - 1)

    l.size += listToAdd.size
    if index == 0 {
        lastNodeFromNewList.next = l.head
        l.head = listToAdd.head
        return nil
    }
    nodeBeforeInsertIndex := l.getNodeBeforeIndex(index)
    lastNodeFromNewList.next = nodeBeforeInsertIndex.next
    nodeBeforeInsertIndex.next = listToAdd.head

    return nil
}

func (l *LinkedList) getNodeBeforeIndex(index int) *Node {
    p := l.head
    for i := 0; i < index-1; i, p = i + 1, p.next {}
    return p
}
Remove value at index: Remove(index)
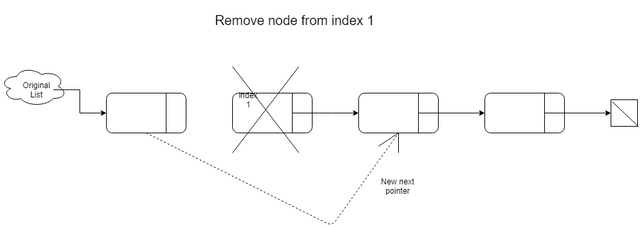
We have two cases we need to consider. If we want to remove the head, we just make the head next pointer be the new head. If we want to remove a random node at index i, we make the pointer next from node i-1 point to node i+1. Here is an illustration of this process:

// Remove function deletes the node at the specified position
func (l *LinkedList) Remove(index int) error {
    if !l.isValidIndex(index) {
        return errors.New("index out of bounds")
    }
    if index == 0 {
        l.head = l.head.next
        return nil
    }
    p := l.getNodeBeforeIndex(index)
    p.next = p.next.next
    l.size --

    return nil
}
Check if value is in list: Contains(value)
In order to check if a value is contained in the list, we start at the head and iterate through the list. If any of the nodes along the way matches the given value, the function returns true. If not, it returns false.
// Contains function checks to see if the value is contained in the list
func (l *LinkedList) Contains(value interface{}) bool {
    if l.IsEmpty() {
        return false
    }
    for p := l.head; p.next != nil; p = p.next {
        if p.data == value {
            return true
        }
    }
    return false
}
Conclusion, what will I learn next time?
This has been a rather long tutorial, so thank you if you have made it this far. We have learned about Linked List, implemented some useful methods and made it generic, so that you can use this in other projects if you wish to. Next time I hope to cover Doubly Linked Lists.
Curriculum
You can use this linked list implementation to redo my Stack and Queue implementation from my last tutorial. Going through my last tutorial is not necessary in order to understand this one.
Learn Algorithms & Data Structures with GO | Part 1 | Stacks and Queues
References
The Linked Lists drawings in this post are done by me.
- Introduction to Algorithms, Cormen, Leirson, Rivest and Stein, Chapter III, Data Structures
- Geeks for Geeks
- Wikipedia Linked List
- Thumnail
Posted on Utopian.io - Rewarding Open Source Contributors
Thank you for the contribution. It has been approved.
You can contact us on Discord.
[utopian-moderator]
Hey @mcfarhat, I just gave you a tip for your hard work on moderation. Upvote this comment to support the utopian moderators and increase your future rewards!
you always have great content
Thank you!
You got a 9.52% upvote from @redlambo courtesy of @prometheus21! Make sure to use tag #redlambo to be considered for the curation post!
This post has received a 2.72 % upvote from @speedvoter thanks to: @prometheus21.
Your contribution cannot be approved because it does not follow the Utopian Rules.
Utopian rule
Explanation
You can contact us on Discord.
[utopian-moderator]
@cha0s0000
I do not list functions from the Go documentation ... If you had read my tutorial you would have realized that Go has no standard libraries for Data Structures. This is 100 % my implementation for a linked list and is not trivial in the least. I will contact your supervisor on discord.
Way to stick to your guns!!
Yes this looks like a good tutorial, thank you, particularly since this is your own work.
This has been approved again
Thank you very much!
@cha0s0000 based on the author's notes below, and upon you also bringing this up, i agree this one should be approved again.
I approved it again. Thanks @cha0s0000
Hey @prometheus21 I am @utopian-io. I have just upvoted you!
Achievements
Suggestions
Get Noticed!
Community-Driven Witness!
I am the first and only Steem Community-Driven Witness. Participate on Discord. Lets GROW TOGETHER!
Up-vote this comment to grow my power and help Open Source contributions like this one. Want to chat? Join me on Discord https://discord.gg/Pc8HG9x